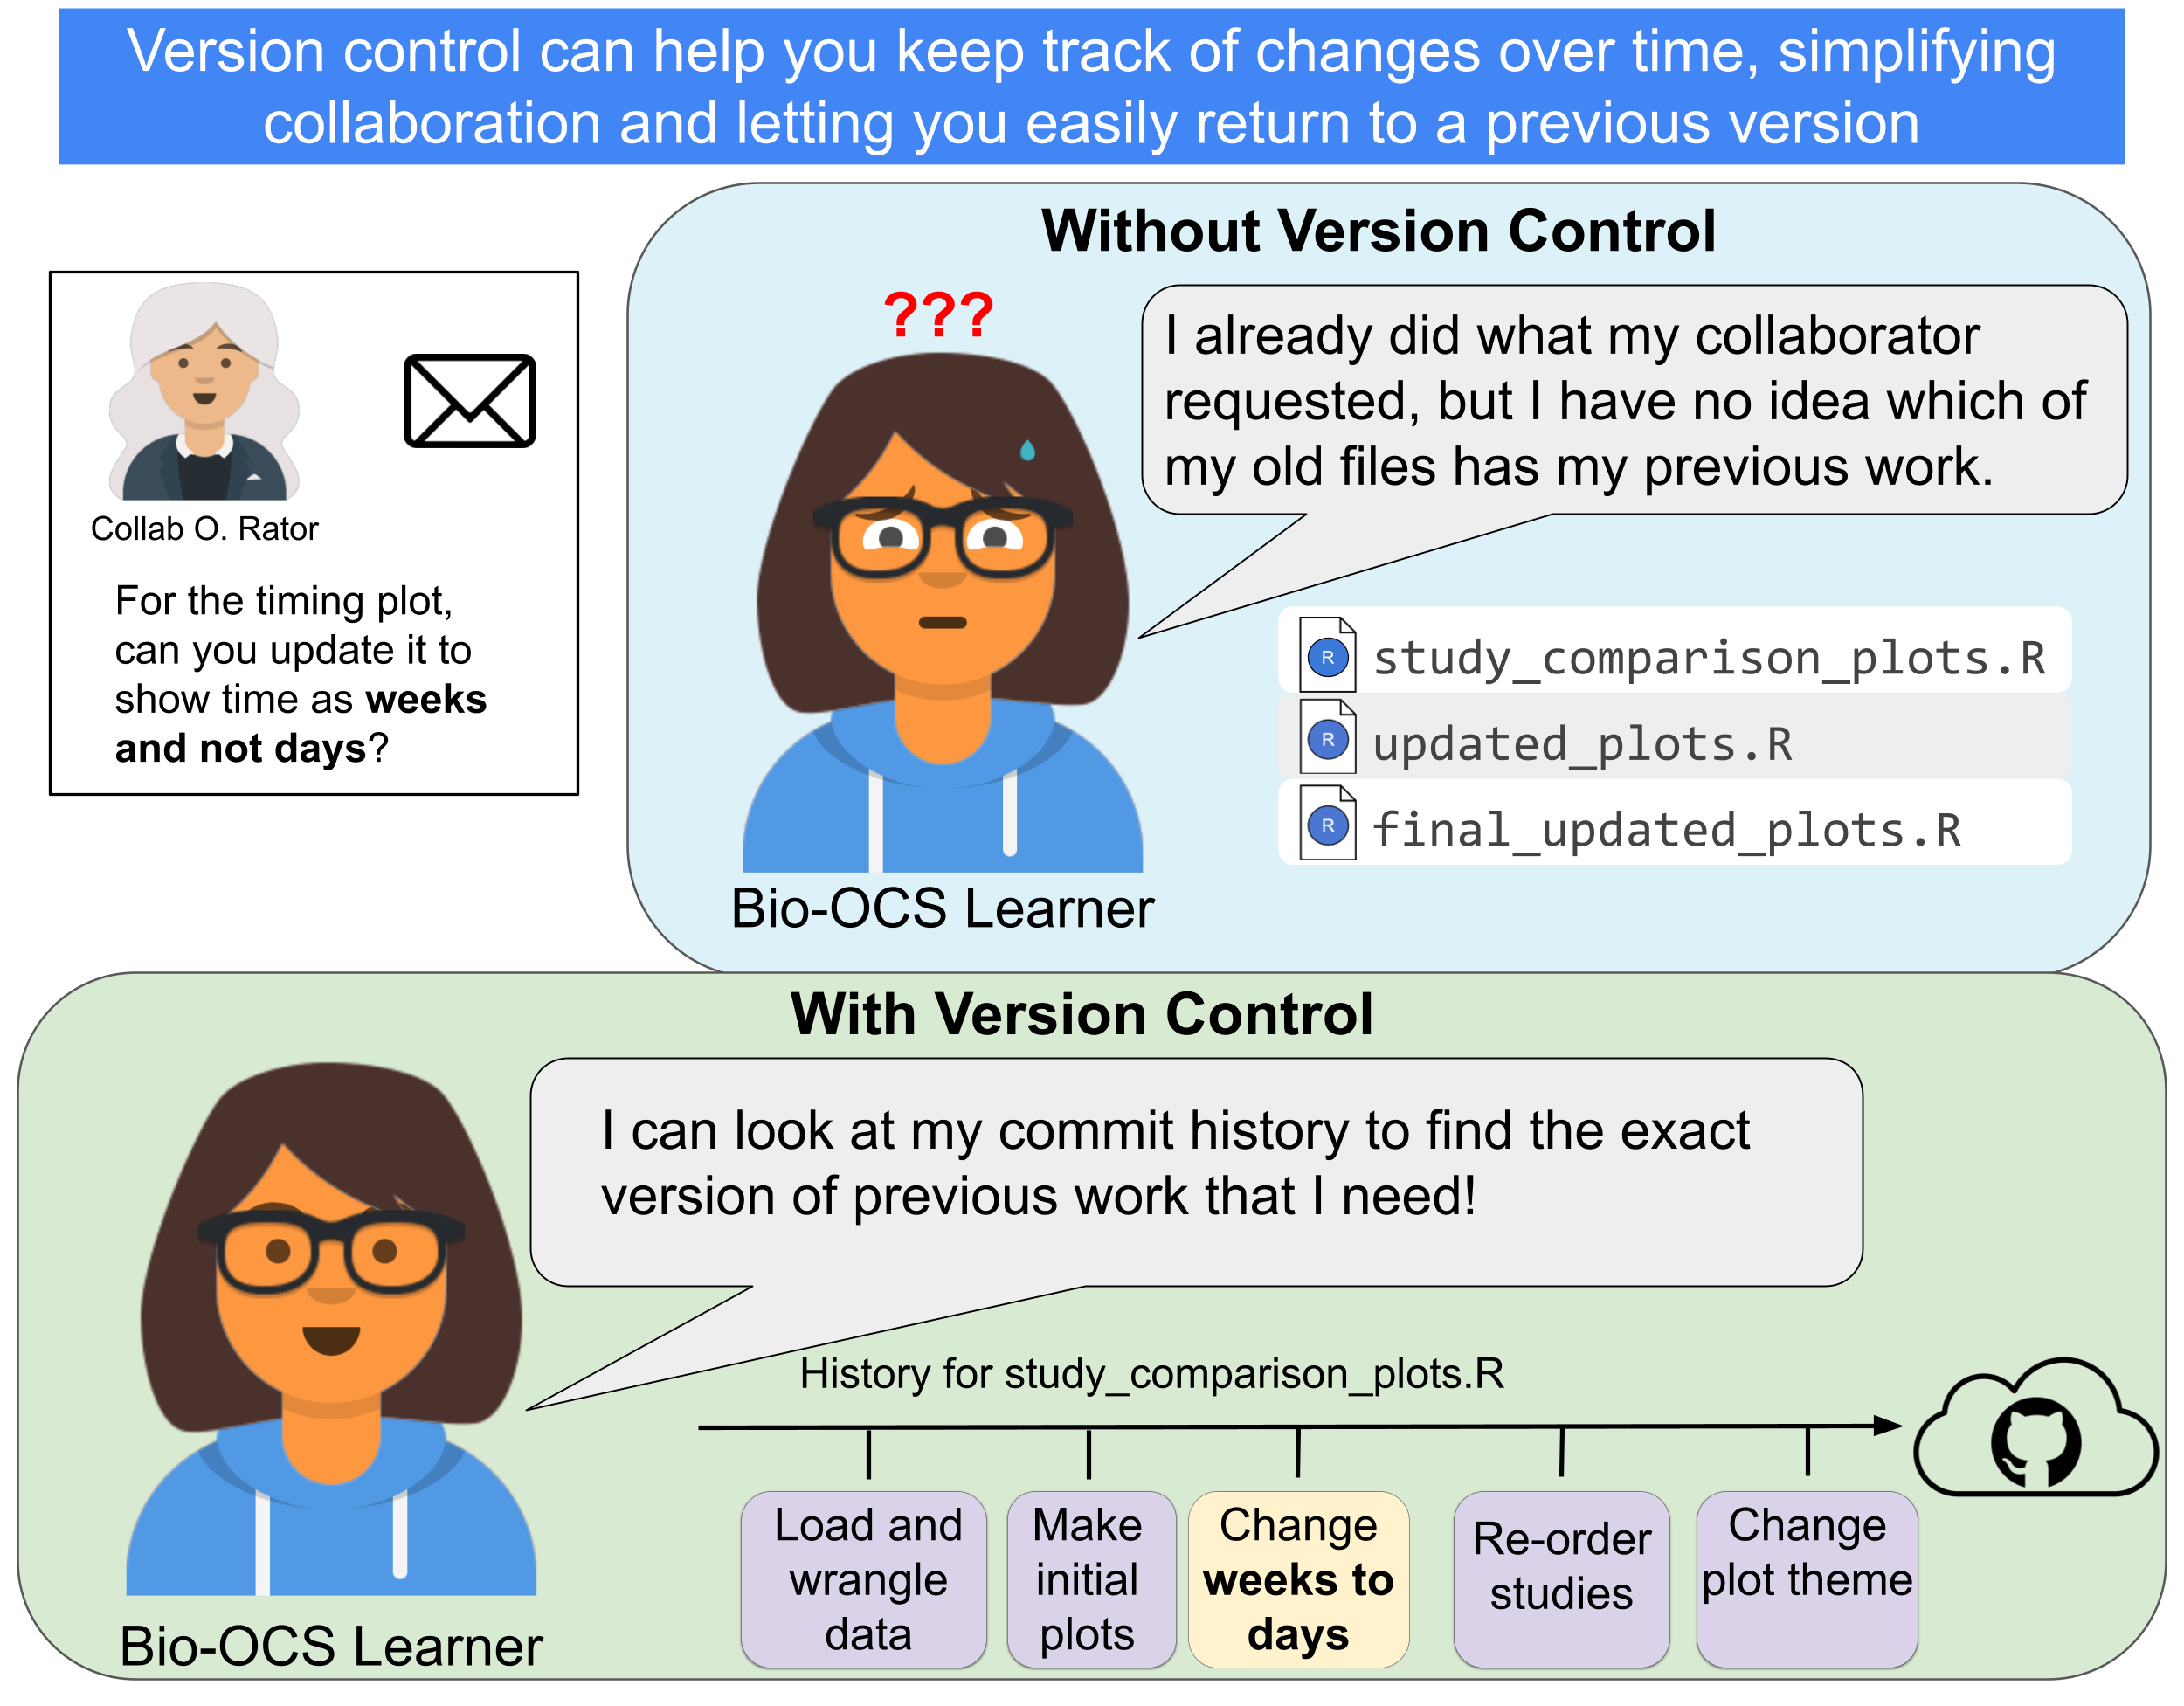
Biomedical Open Case Studies: Making version controlled reproducible analyses
Disclaimer
This case study is still under review by a team of experts. While it is complete and has undergone some review by experts, we are continuing to improve the case study. If you have any suggestions, please email us at bioOCS@fredhutch.org. This case study is scheduled to be finalized by November 15, 2026.
Disclaimer
The purpose of the Open Case Studies project is to demonstrate the use of various data science methods, tools, and software in the context of messy, real-world data. A given case study does not cover all aspects of the research process, is not claiming to be the most appropriate way to analyze a given data set, and should not be used in the context of making policy or clinical decisions without external consultation from scientific experts or medical care professionals. In addition, due to size constraints, datasets used within a case study may be a subset of the original/full dataset.
License information
This work is licensed under the Creative Commons Attribution-NonCommercial 4.0 (CC BY-NC 4.0) United States License unless otherwise noted.
Funding information
This work is funded through the National Institutes of Health, specifically the National Institute of General Medical Sciences: Grant Number 1R25GM160622.
To cite this case study, please use:
Teichman, Sarah and Isaac, Kathryn J, and Hoffman, Ava and Wright, Carrie. (2026). https://github.com/opencasestudies/ocs-bio-version-control/. Making version-controlled reproducible analyses (Version v1.0.0).
GitHub Repository
To access the GitHub repository for this case study see here: https://github.com/opencasestudies/ocs-bio-version-control
Keywords
- version control
- Git
- GitHub
- reproducibility
- meta-analysis
- infant gut microbiome
Prerequisites
Prerequisites
To follow along with this case study, you’ll need the following installed:
- R (install here)
- RStudio (install here), Positron (install here), or another IDE compatible with R
It will also be helpful to be have the following skills:
- basic R skills (many introductory courses can be found online, including this one)
- familiarity with
dplyrandggplot2, or willingness to learn (thesedplyrandggplot2cheatsheets may be helpful, as well as the original open case studies) - OPTIONAL: command line skills (this resource for basics with the command line maybe helpful)
- this is not necessary if using GitHub Desktop, as is suggested in this case study, however there are alternate instructions throughout the case study that use the command line to interact with Git
You do not need to have any previous Git and GitHub knowledge or experience for this case study.
Motivation
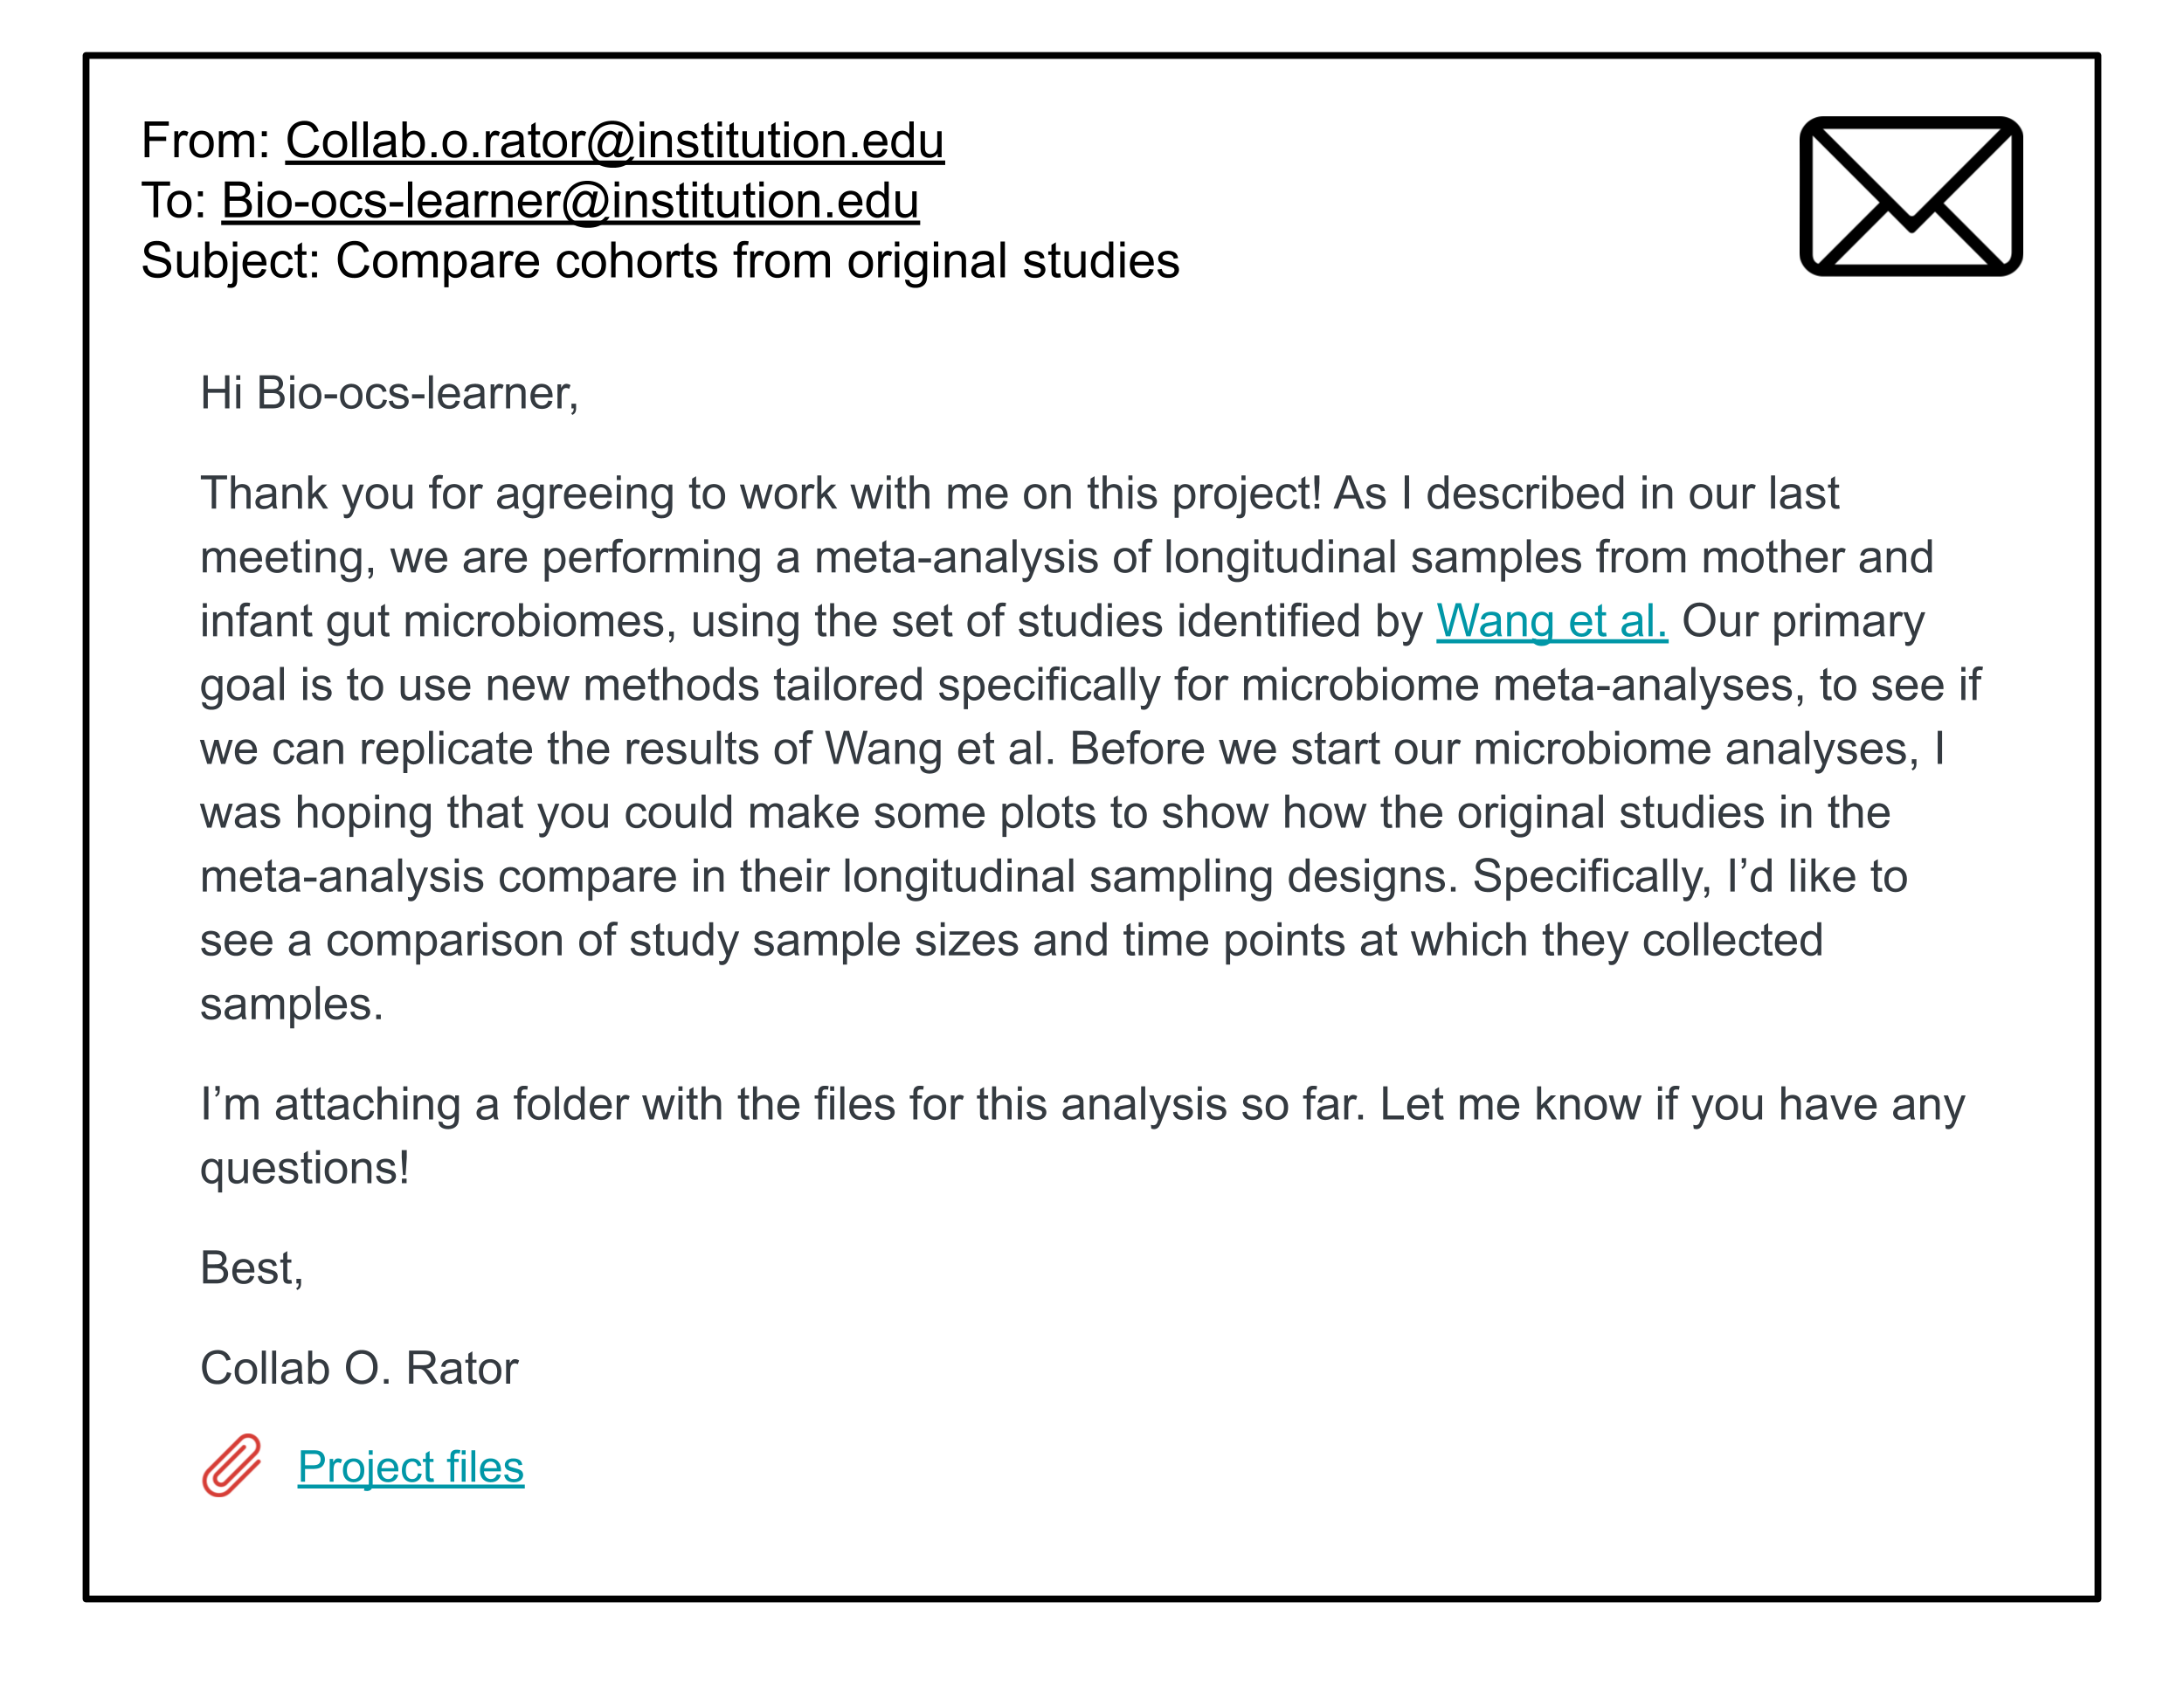
In this case study, we ask you to imagine that you are working with a collaborator on a scientific project. You receive the following email, requesting your help performing a preliminary data analysis. Don’t worry about the scientific background for this analysis right now, an explanation will be given in the context section.
If you were to start working on this project with your collaborator, it may look something like this.
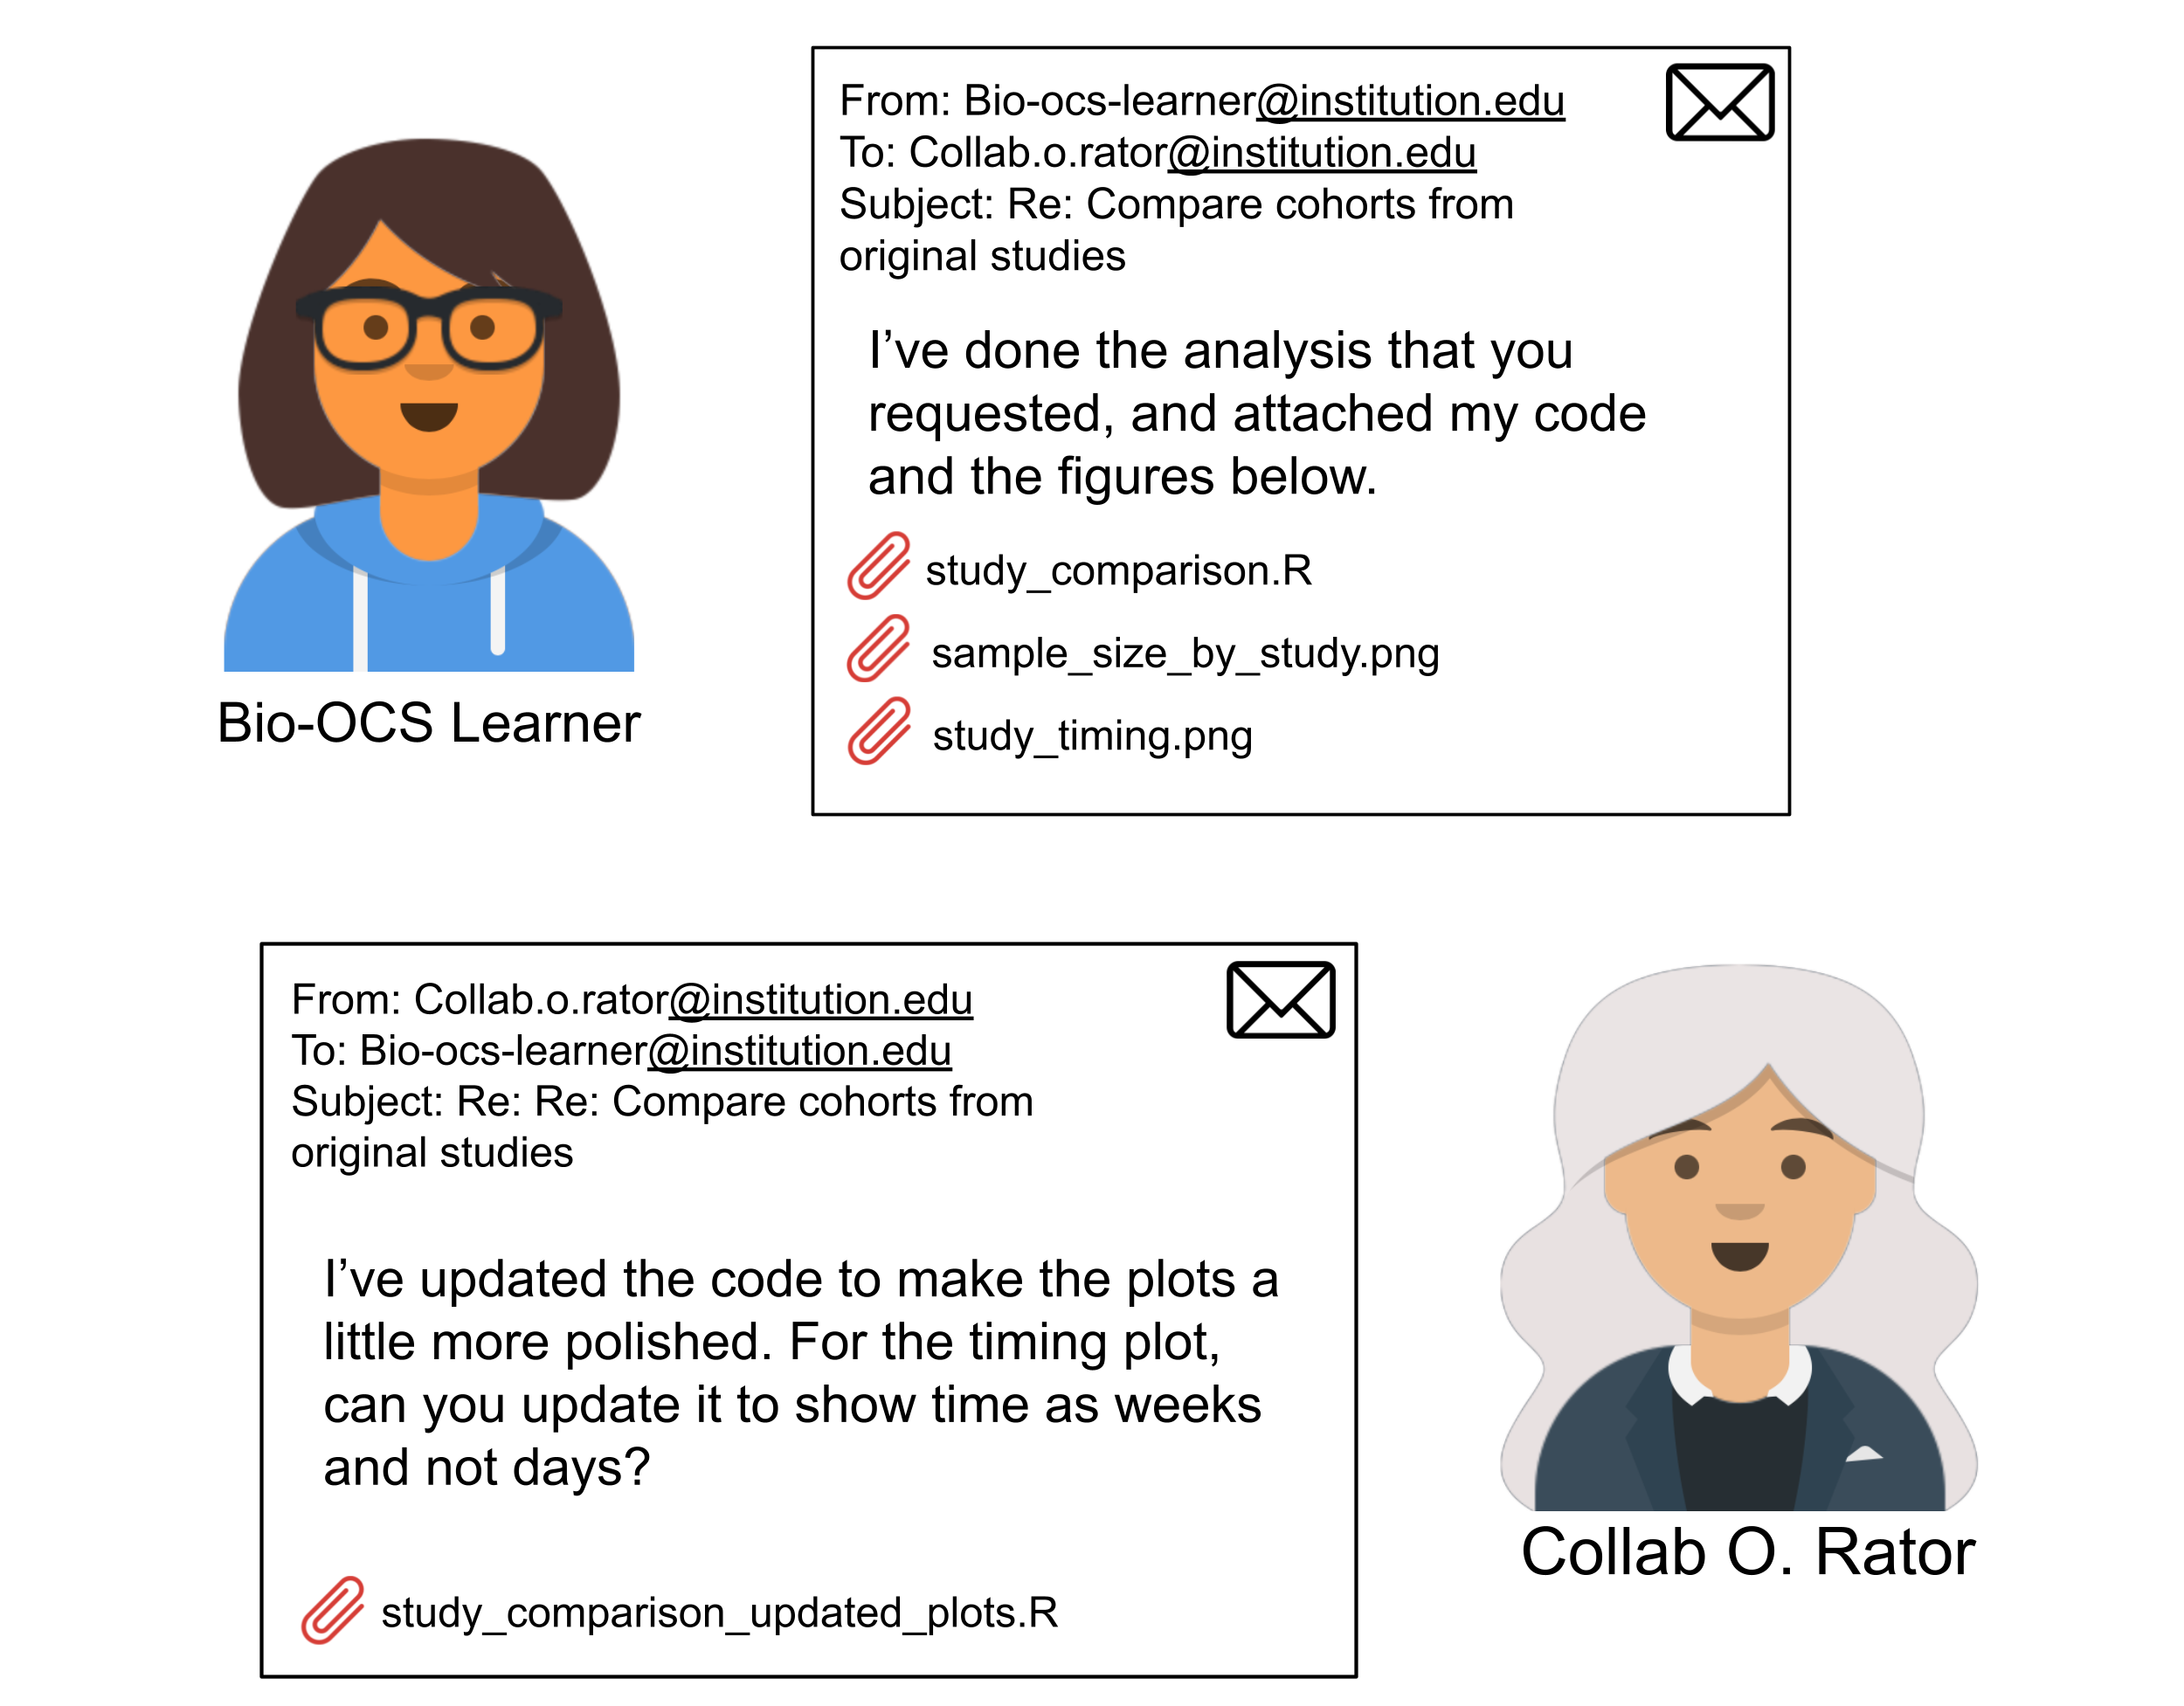
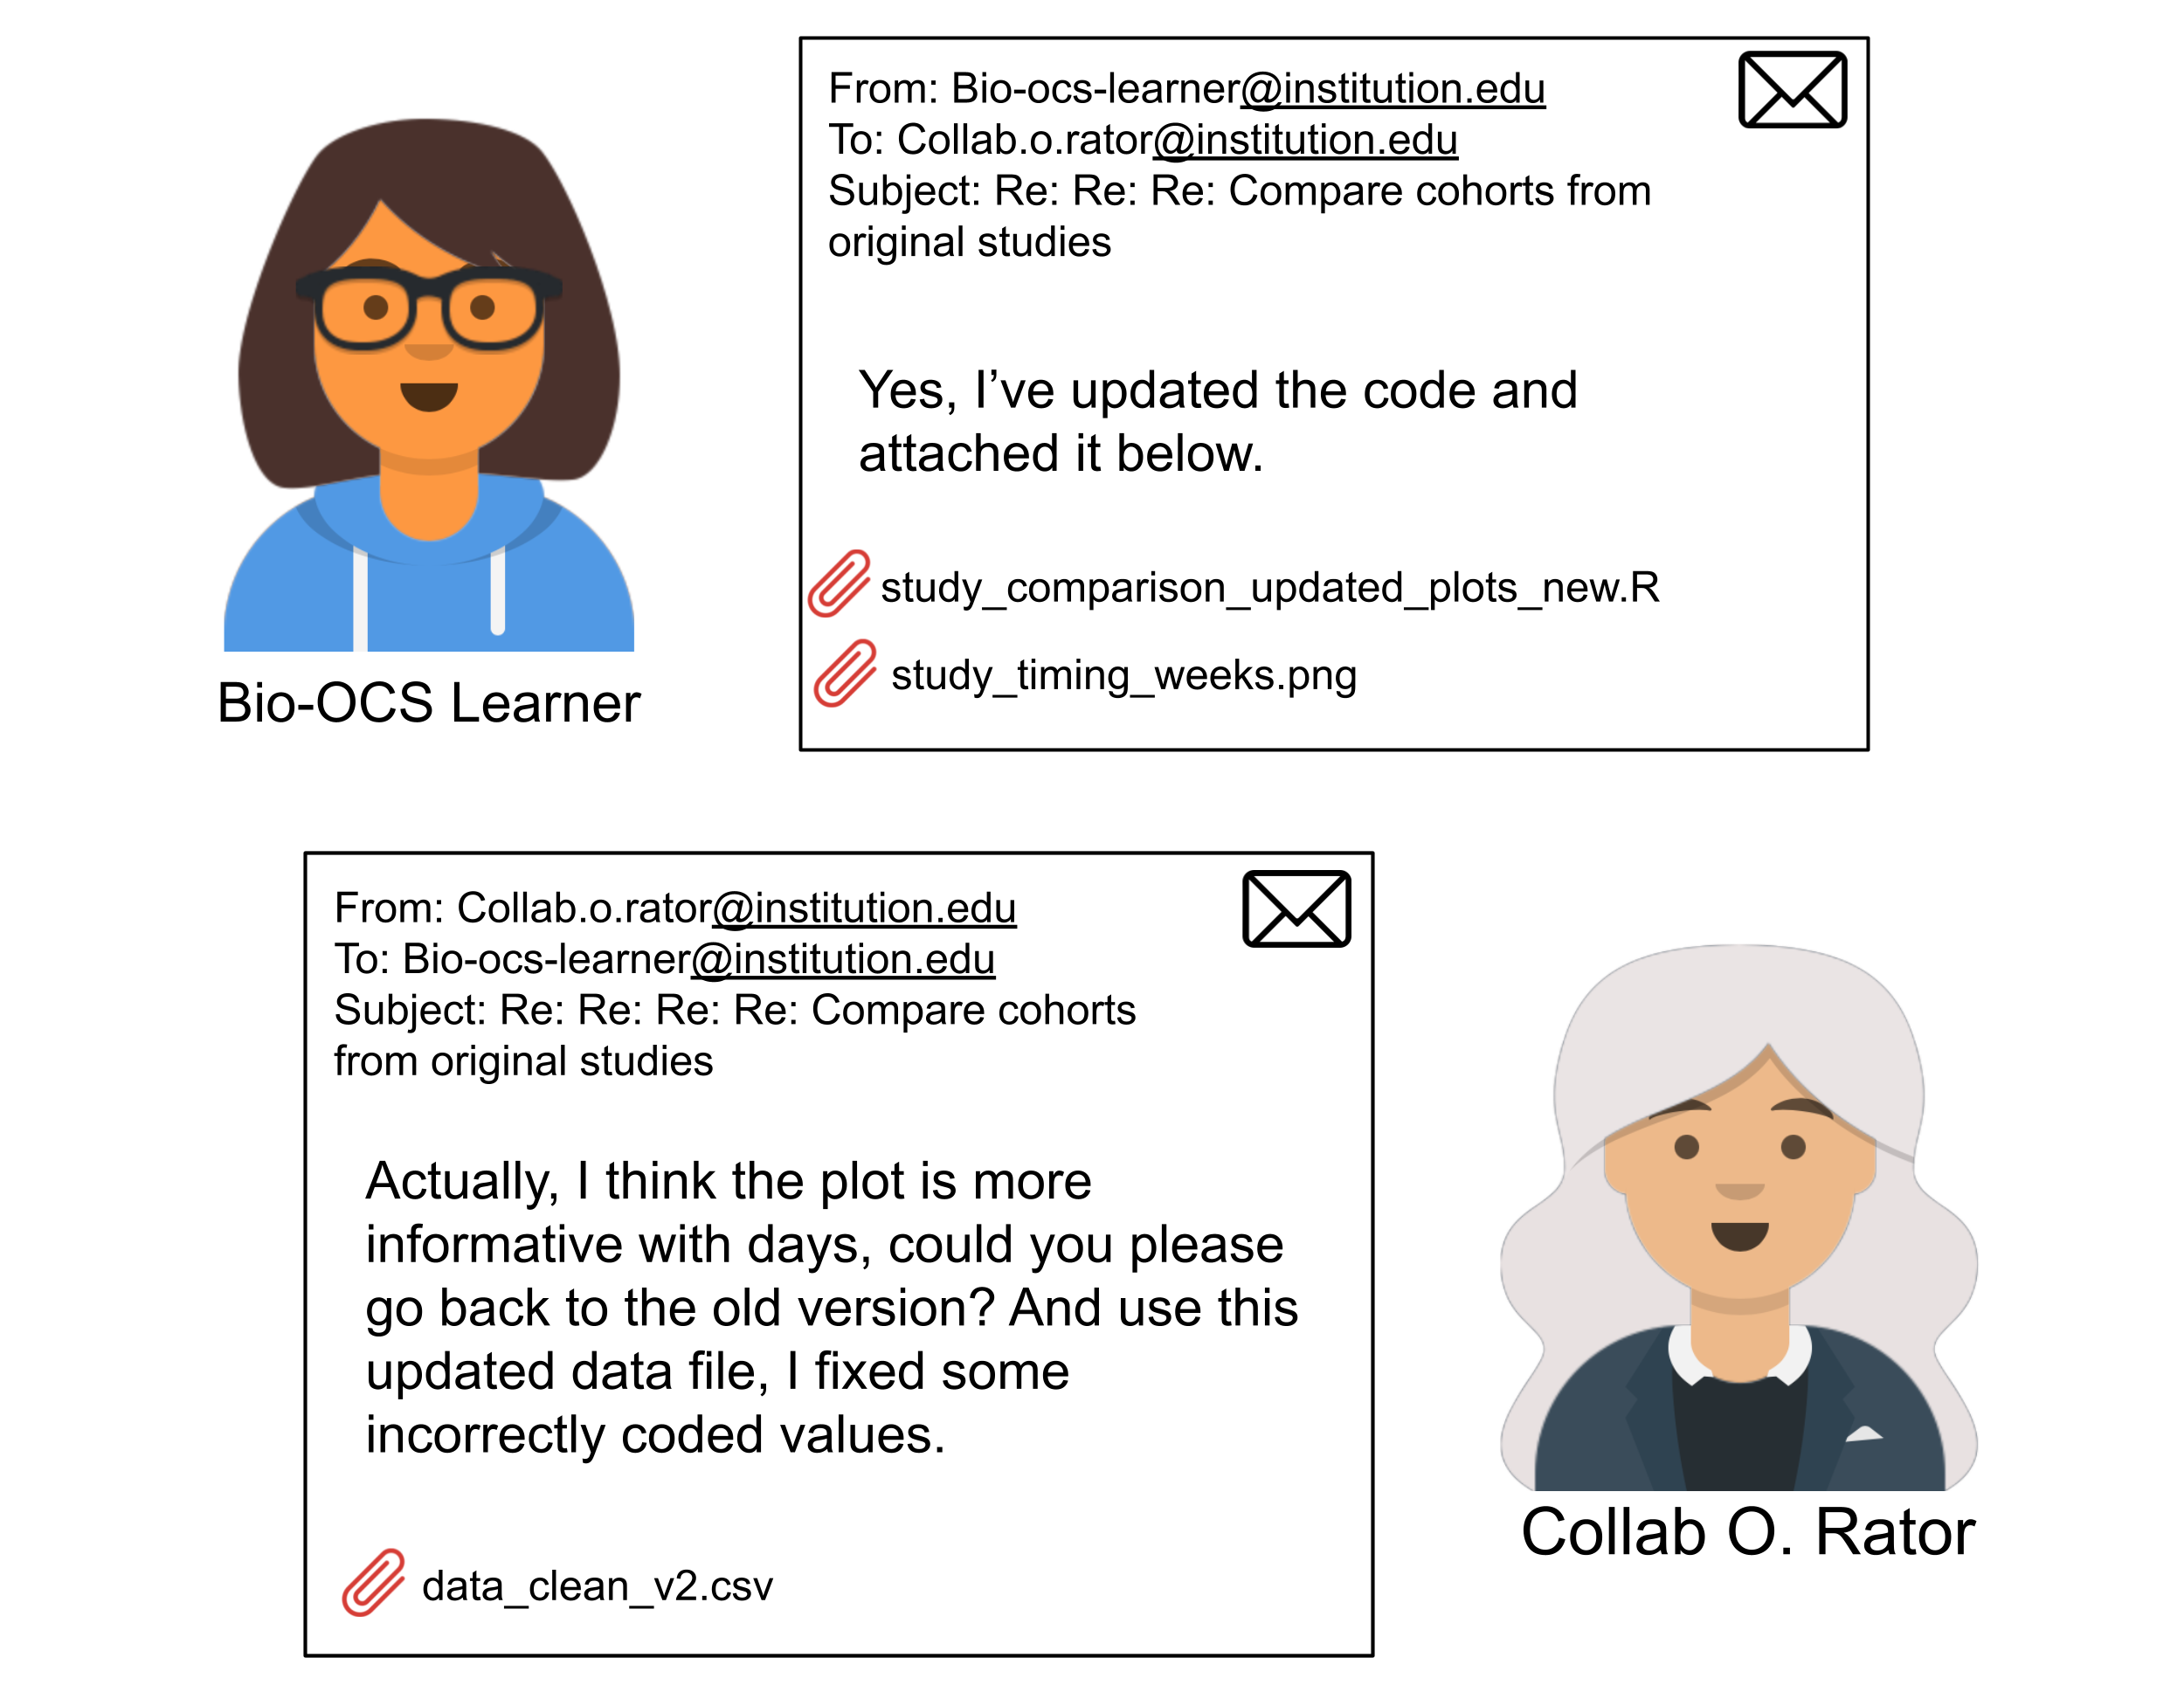
Between your own edits as you work on this project and the back-and-forth with your collaborator, it will quickly become challenging to keep track of all of the files and changes to them over time. A solution to this is !
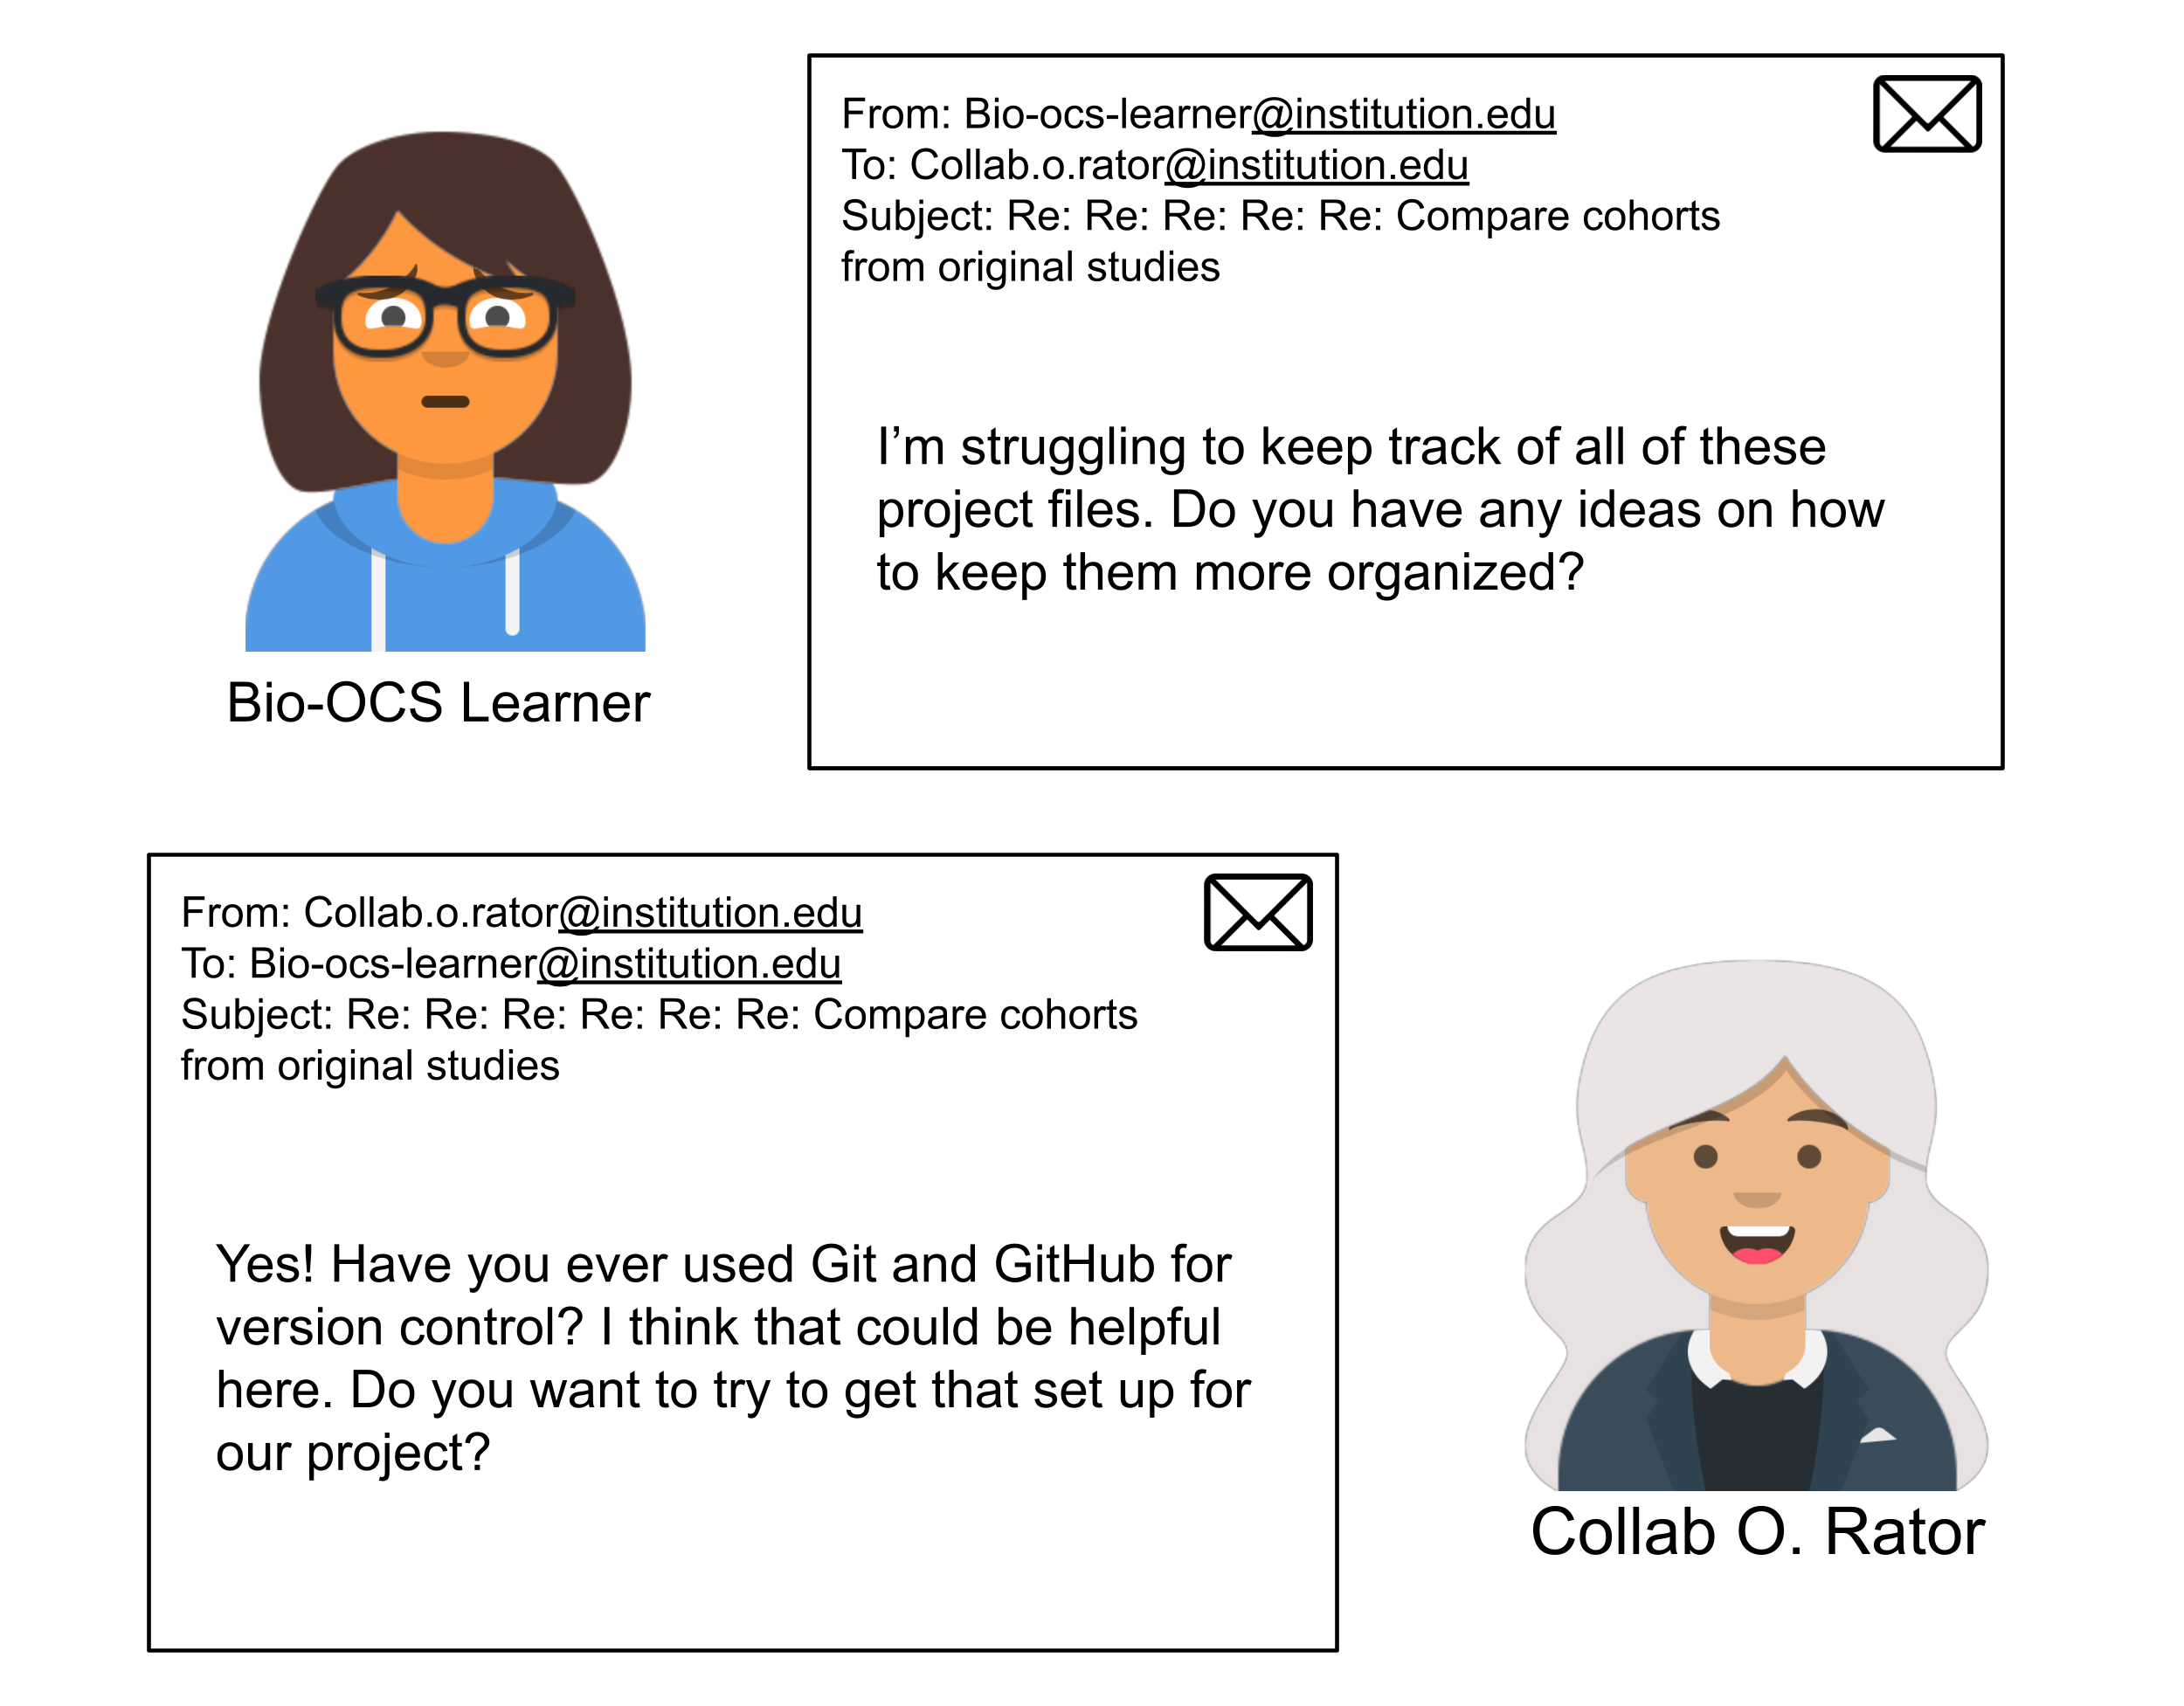
In this case study, you will learn how to use and for version control. You will also learn how version control can facilitate collaboration and make a scientific project more transparent and . Along the way, you will use a as a motivating example and practice using R to visualize differences among the studies included in the meta-analysis.
You will learn more about version control, and specifically Git and GitHub, in the Introduction to Git and GitHub Section below. Much of the information in that section is described in the following papers (Blischak, Davenport, and Wilson (2016) and Bryan (2018)). They both provide a helpful introduction to version control with Git and GitHub.
Version control resources:
- Blischak, J. D., Davenport, E. R., & Wilson, G (2016). A Quick Introduction to Version Control with Git and GitHub, PLoS Computational Biology, 12(1).
- this paper provides an overview of Git and GitHub for scientists who primarily work with the command line
- Bryan, J (2018). Excuse Me, Do You Have a Moment to Talk About Version Control? The American Statistician, 72(1), 20-27.
- this paper provides an overview of Git and GitHub for scientists and data scientists who primarily work with R and RStudio
Main Question
Our main question(s)
- How does the use of version control contribute to transparent and reproducible science?
- How can Git and GitHub be used to facilitate collaboration on a research project?
- In this meta-analysis of infant gut microbiome samples, how do the original studies compare in their sampling designs?
Learning Objectives
In this case study, we will introduce version control and describe why and how to use it to track a scientific project. We will use Git and GitHub to track a comparison of the sampling designs of studies used in a meta-analysis.
The skills, methods, and concepts that students will be familiar with by the end of this case study are:
Data Science Learning Objectives:
- Describe ways in which version control facilitates reproducible science.
- Explain how version control works by recording differences between versions of a project.
- Follow a workflow to create and make changes to a repository with Git and GitHub.
- Open a pull request to propose changes to a codebase and request a code review from a collaborator.
- Organize a repository for a project with a README file and folders for data, figures, and results.
Biological/Bioinformatics Objectives:
- Identify the benefits and limitations of combining data from multiple studies in a meta-analysis.
- Create visualizations to compare sampling designs across a set of studies.
Objectives Map
The following collapsed table shows where specific learning goals can be found in the case study.
NoteObjectives Map: Where It Is Covered
| Learning Goal | Explanation / Practice | Location |
|---|---|---|
| Understand how version control facilitates reproducible science | Learn what reproducibility means and how version control contributes to reproducible analyses. | Introduction to Git and GitHub |
| Understand how version control works | Learn about how version control works in terms of differences between commits. | Introduction to Git and GitHub |
| Create and make changes to a repository with Git and GitHub | Create new repositories (both locally with Git and remotely with GitHub) and track changes over the course of an analysis. | Introduction to Git and GitHub, Data Visualization |
| Make a pull request | Open a pull request to propose changes to a codebase, practice requesting a review from a collaborator. | Pull Requests |
| Organize a repository | Learn about why the files in this project are organized in this way, understand best practices in scientific project organization. | Scientific Project Organization |
| Learn about meta-analyses | Learn about what meta-analyses are, why they are used, and limitations to combining data from multiple studies. | Context |
| Use visualizations to compare sampling designs | Make plots to compare the sampling designs of the original studies used in the meta-analysis described in this case study. | Data Visualization |
Context
Before we explore , we will explore some of the scientific context for the data and methods we will encounter in this case study.
What is a microbiome?
A microbiome is a collection of microorganisms that live in a particular environment. One commonly studied microbiome is the human gut microbiome. The bacteria that live in our gut help regulate our metabolism, protect us against pathogens, and perform other important roles in our health (Han et al. 2026). Studies have shown associations between changes to the gut microbiome and many diseases, including diabetes, autoimmune diseases, and Alzheimer’s disease.
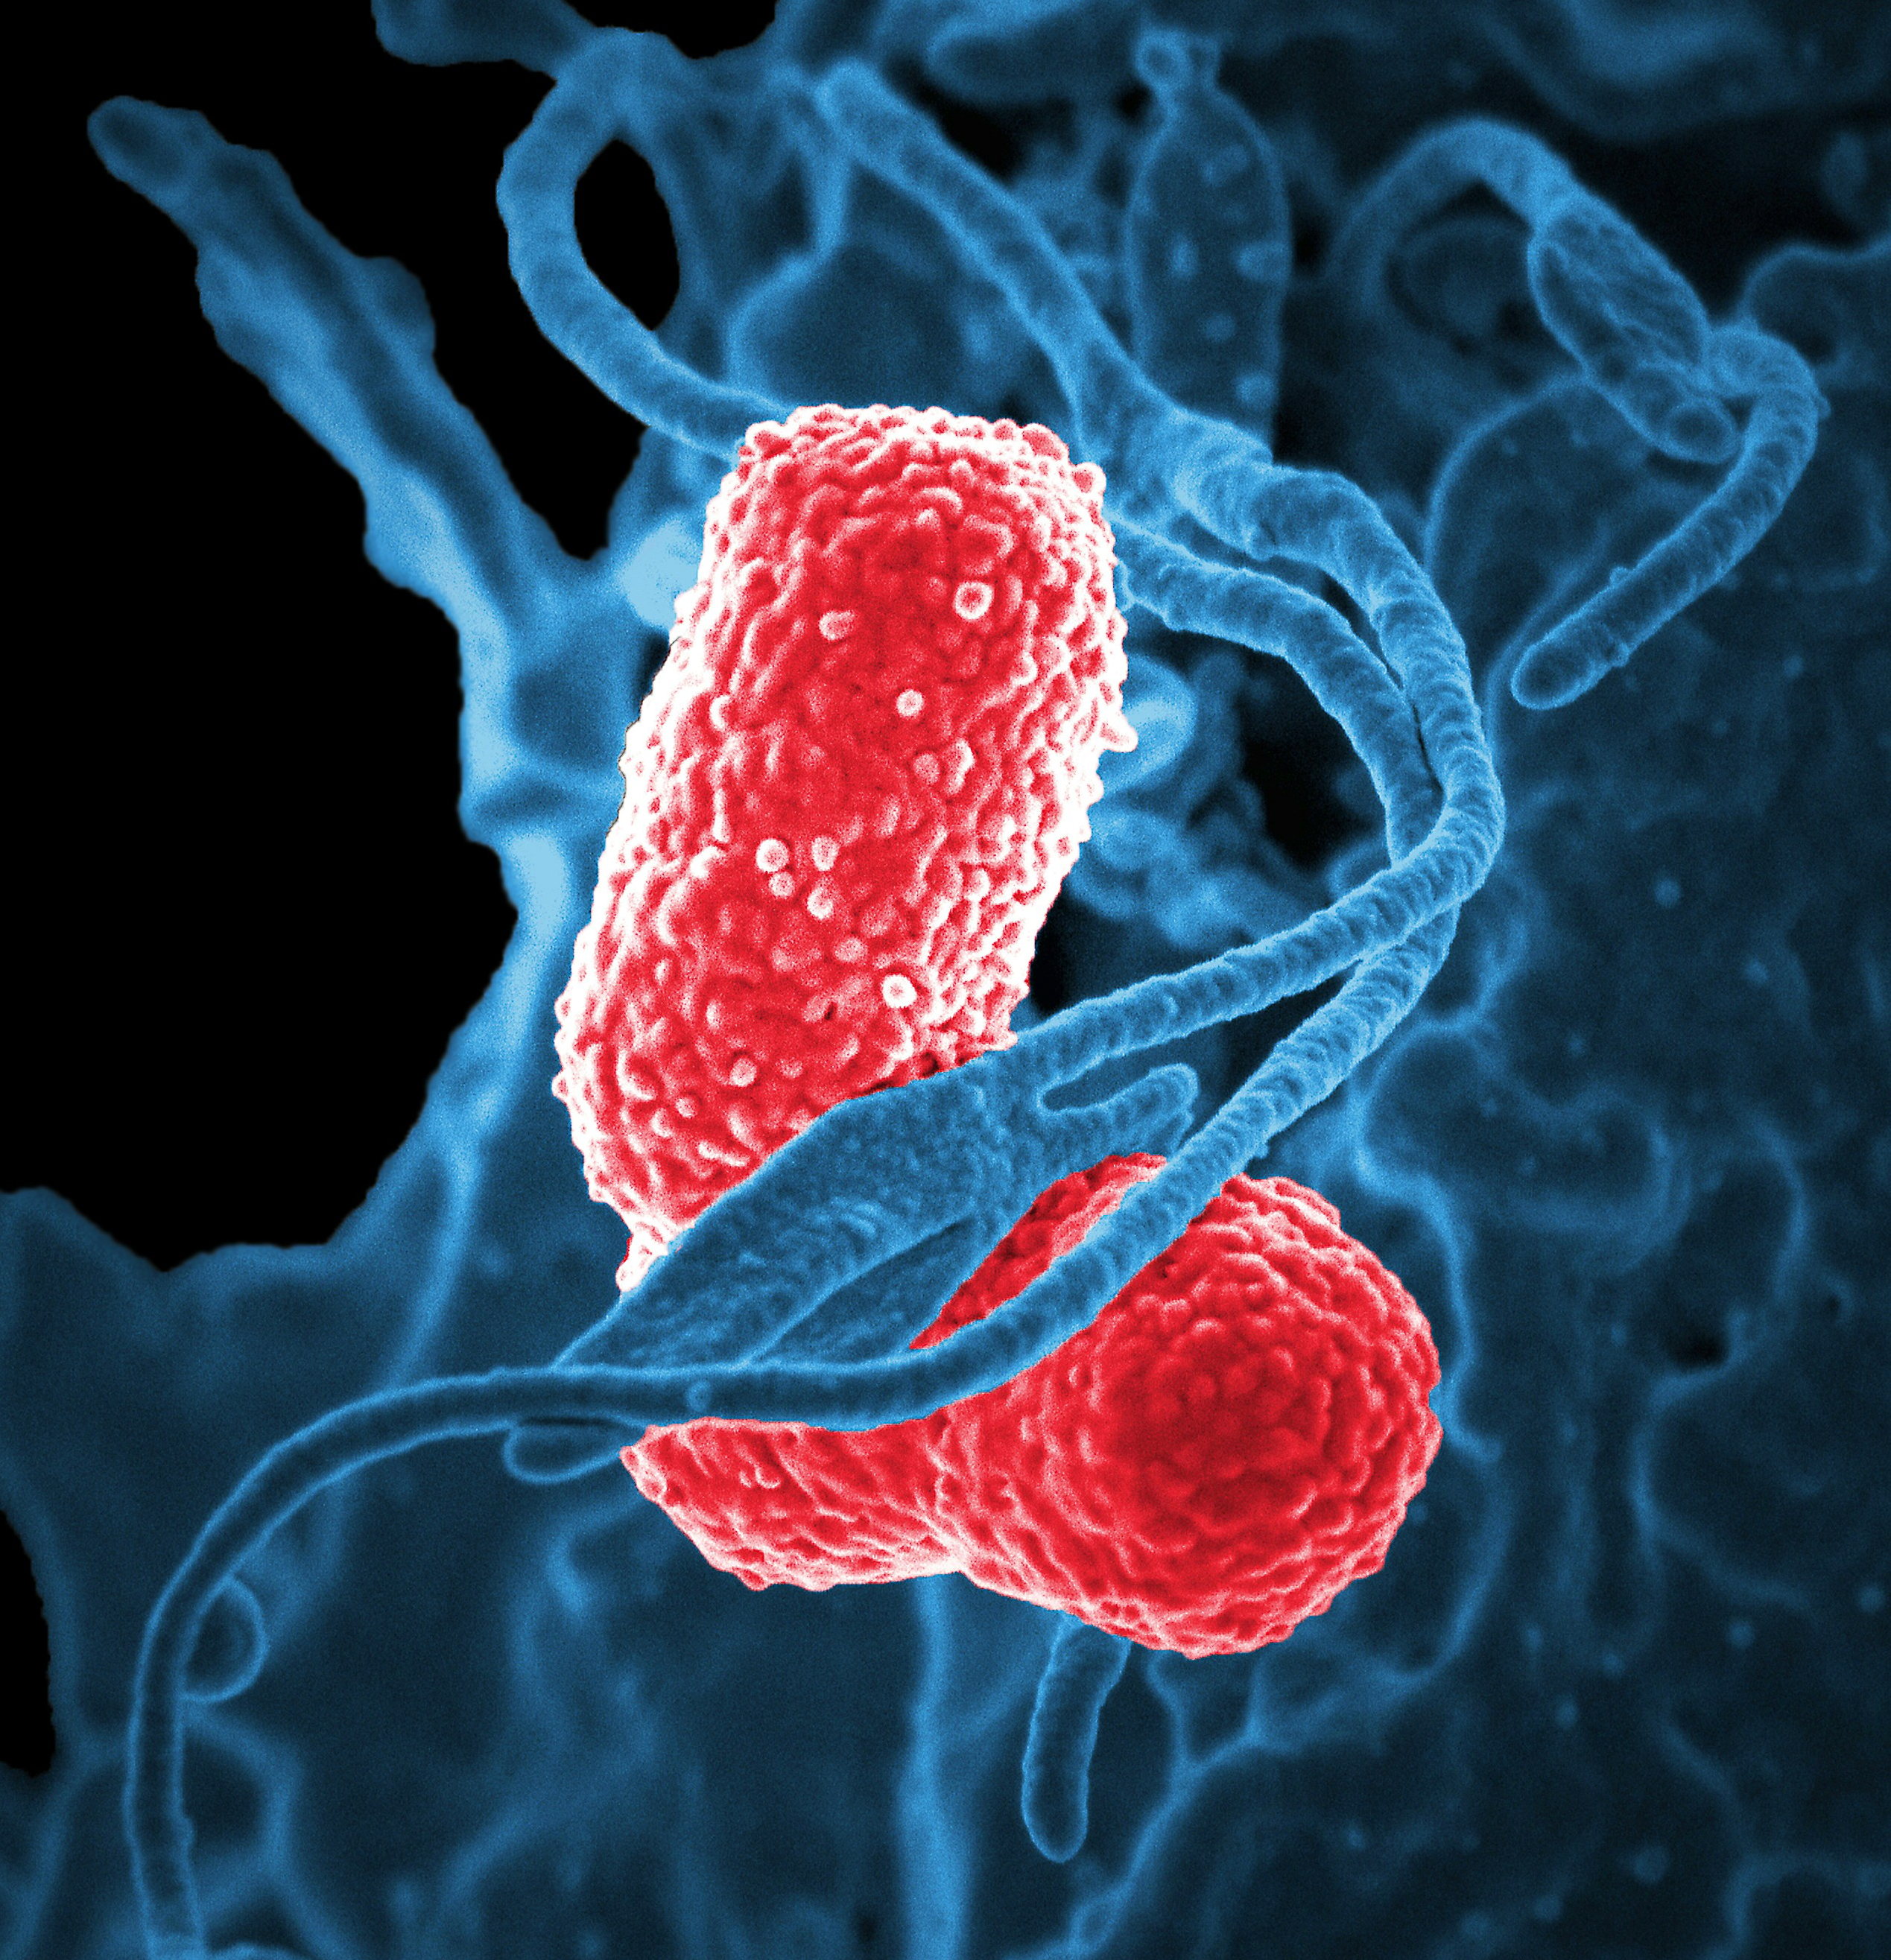
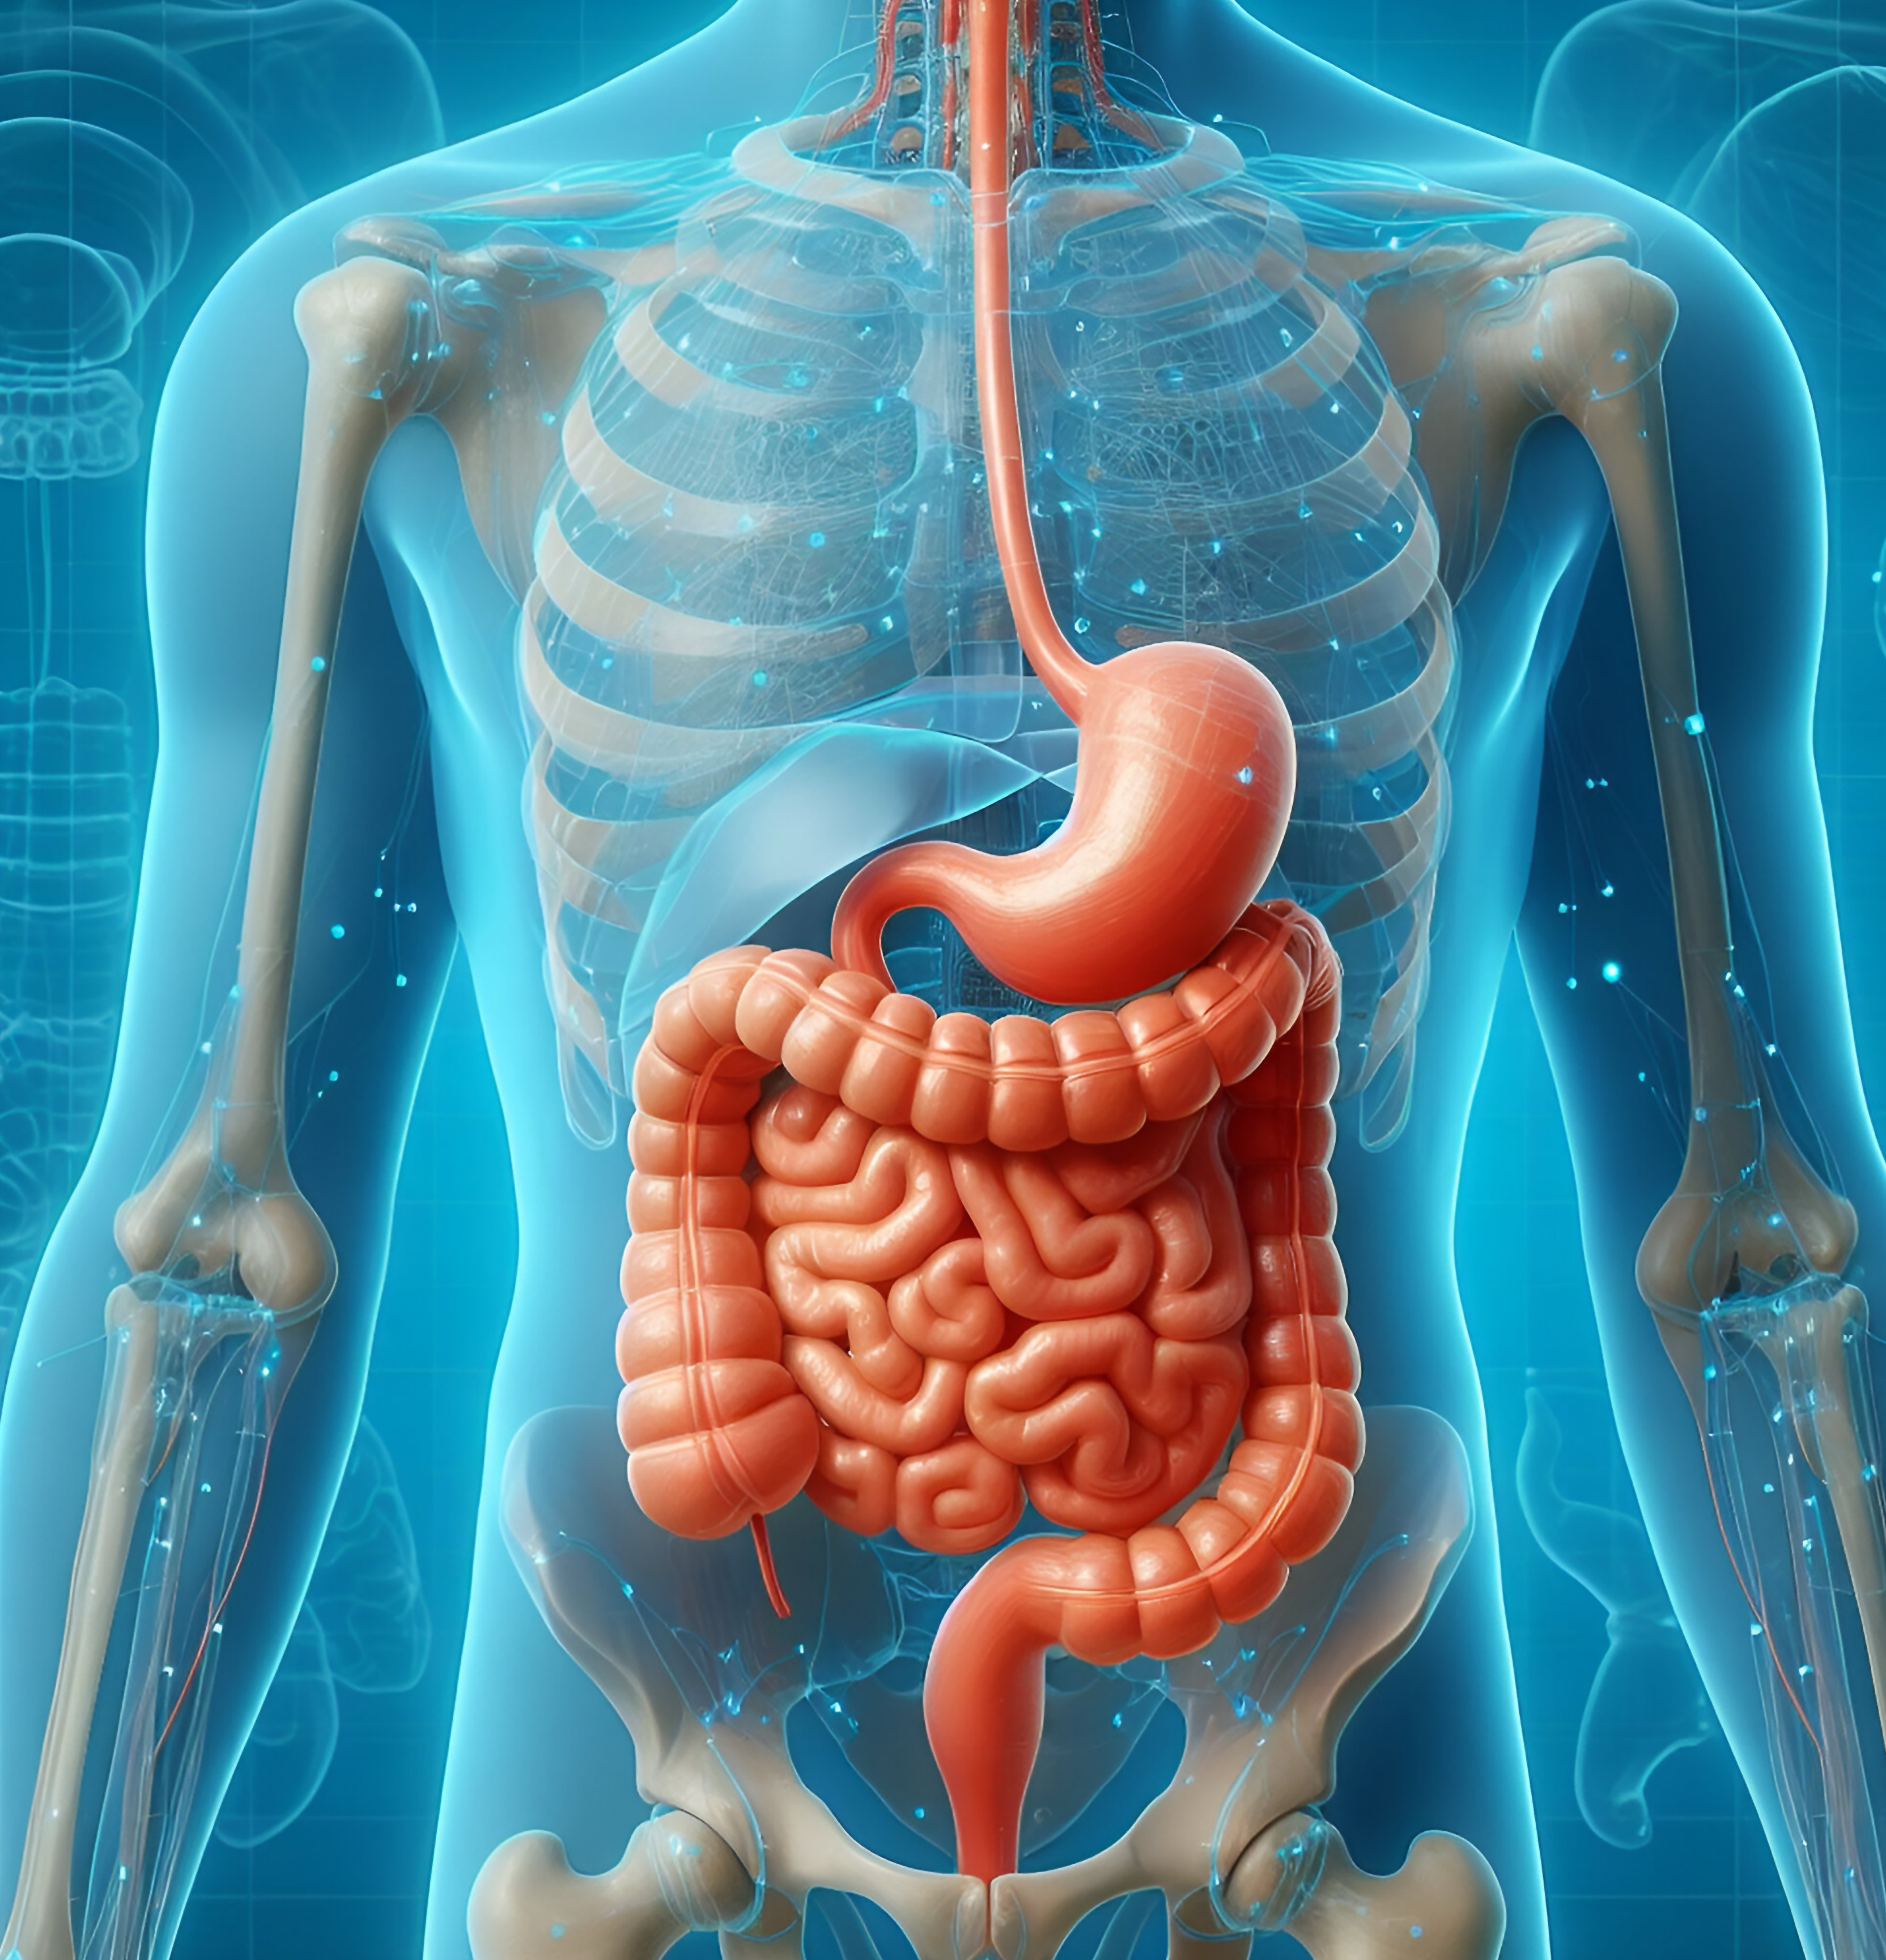
Many features of the gut microbiome are established early in life, making the infant gut microbiome an important area of study (Wang et al. 2021). Researchers are particularly interested in understanding how the infant gut microbiome develops over time and how it relates to the maternal microbiome. To address these questions, several studies have collected samples from infant-mother pairs. Sequencing microbiome samples is expensive, and individual studies are often limited in size. Wang et al. (2021) conducted a meta-analysis of eight of these studies, using this large data set to compare gut microbiome composition (which microbes are there?) and functional potential (what are the microbes capable of doing?) between infants and mothers. We will use data from Wang et al. (2021) in this case study.
What is a meta-analysis?
A meta-analysis combines data or results from multiple studies investigating a common research question (DerSimonian and Laird 1986). By pooling information across studies, researchers can increase sample size, make better use of existing data, and generate a consensus result from a set of studies. However, meta-analyses must be conducted with care, as combining data from studies with different participant populations and different study designs can lead to misleading results.
One approach to meta-analysis combines summary results from each study. Another approach combines the original data from all studies and re-analyzes them jointly, accounting for systematic differences between studies (Andrade 2025). The latter approach (also referred to as “mega-analysis”) requires access to the raw data from each study, but allows researchers to ask new questions and analyze the data from all studies using a common protocol.
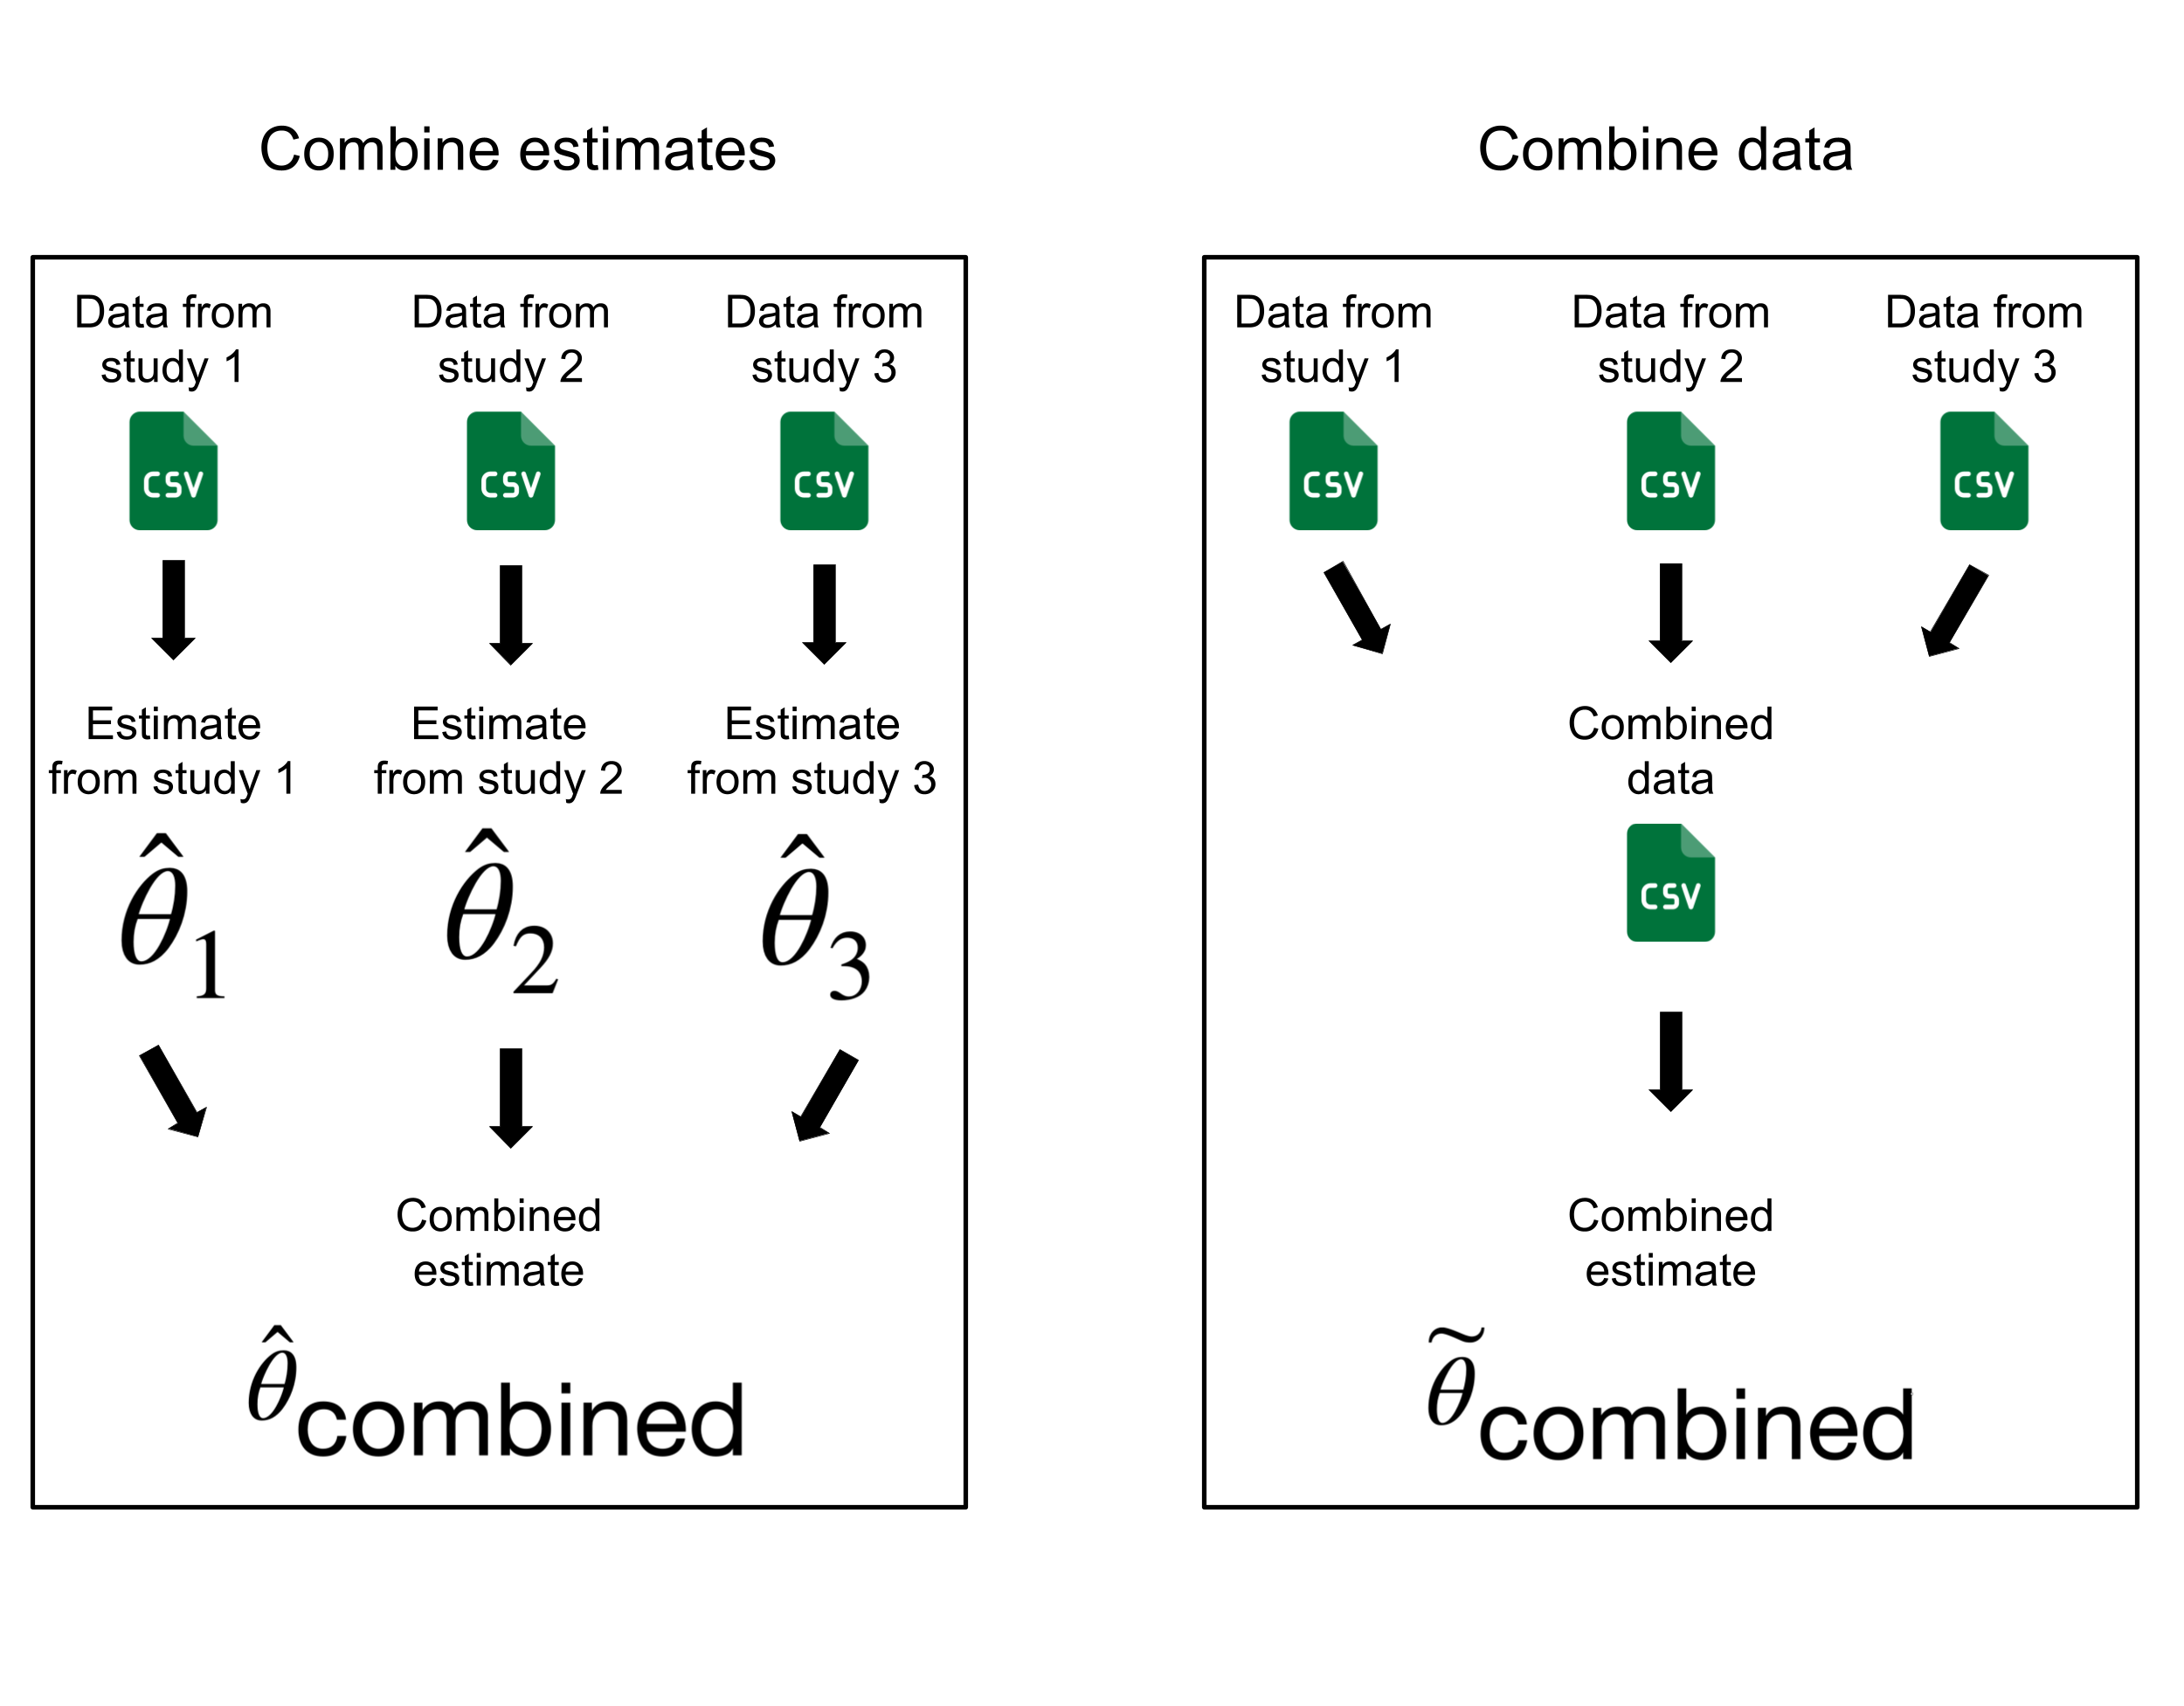
Wang et al. (2021), mentioned above, used the second meta-analysis approach. They pulled the raw data from eight studies of infant and mother gut microbiomes, processed all samples with a unified protocol, and conducted analyses on the pooled dataset while accounting for differences between studies. However, the success of this approach depends on how comparable the original studies are. This motivates our exploration of the similarities and differences between the various study cohorts. We want to understand how comparable these studies are, both in terms of sample size (how many samples are in each study?) and in terms of their longitudinal study design (when in the lifespan of the infants were samples taken?). While differences in study designs would not make a meta-analysis of these studies invalid, they can influence how analyses should be conducted and how results should be interpreted. Accounting for these differences can reduce the risk that conclusions primarily reflect the largest cohorts and help minimize confounding due to differences in the age ranges and developmental stages represented across studies.
Introduction to Git and GitHub
Before we start to address your project with Collab O. Rator, we will provide an introduction to version control with Git and GitHub. In this section, you will learn more about what Git and GitHub are, create a GitHub account, download Git software, and create your first version controlled project. Towards the end of this section we will return to the infant microbiome meta-analysis project.
Reproducibility and version control
Reproducibility
The ability for someone else to run the same analysis on the same data and get the same results as the original researcher.
Good scientific practice relies on finding consistent patterns in data that can be verified. If another researcher can use your data and code and reproduce the same results, then your conclusions are more credible to the scientific community. Version control is a tool that enables reproducible research by recording changes to a project over time. It has the following benefits:
- When used carefully, it gives a complete history of changes made over the course of a project. This can be helpful for a research team to better understand what they did in one of their own previous studies!
- It provides a digital backup and an online repository of code and possibly also data (if it doesn’t contain sensitive data). This can be very valuable if something happens to your computer.
- Version control makes collaboration easier, automating the sharing of work in-progress and providing a system to propose and accept changes.
While several tools exist for version control, we will introduce Git and GitHub, two of the most commonly used version control tools. Common alternatives to GitHub include GitLab and Bitbucket.
More information on how reproducibility fits into the scientific process.
Reproducibility considerations
Reproducibility is one concept that helps ensure that scientific projects and their results are valid and can be trusted by the scientific community. It can be considered as the intermediate goal between repeatability and replicability.
An experiment or analysis is repeatable if the same researcher can run it a second time, with the same data and code, and get the same results.
For that experiment or analysis to be reproducible, a new researcher needs to be able to run it with the same data and code and get the same result.
Finally, conclusions from an experiment or analysis are replicable if a new researcher can run the same experiment or analysis with new data and draw the same conclusions.
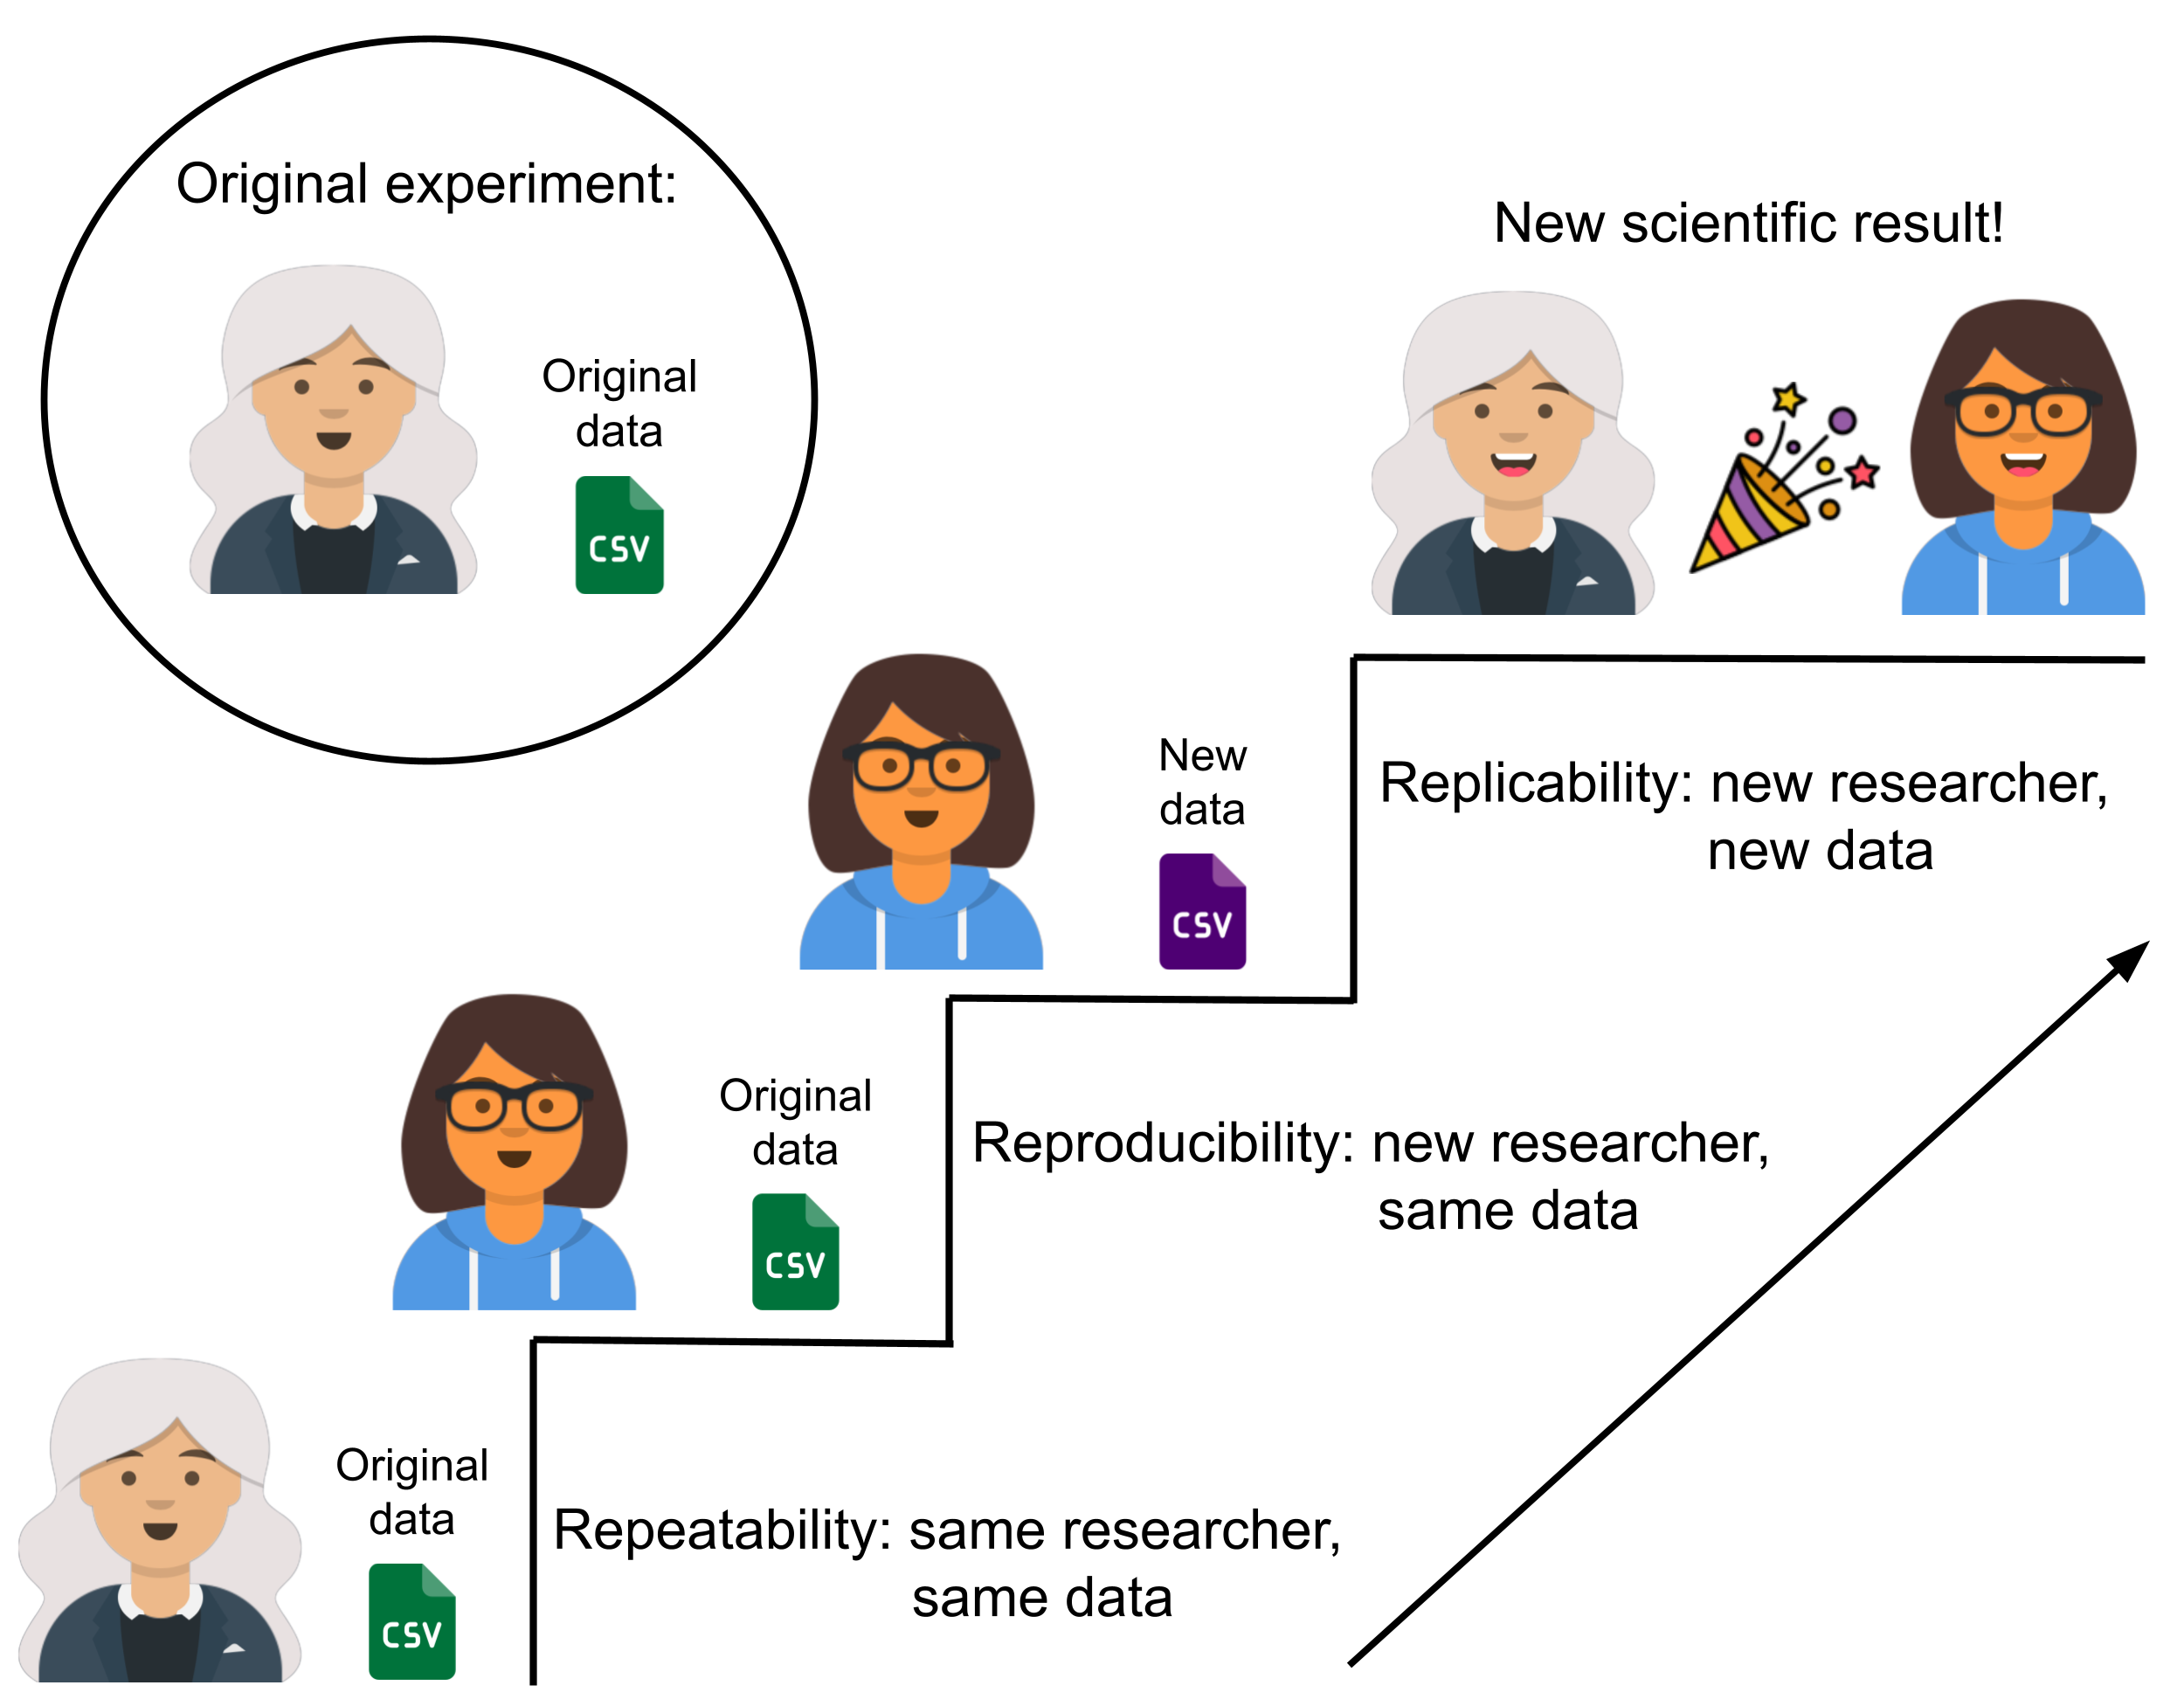
Note that while reproducibility is an important consideration in the scientific process, a result that is reproducible is not necessarily correct or valid. Research can be reproducibly wrong. However, version control with Git and GitHub promotes transparent code and collaborative work with code review, and therefore provides more opportunities to identify and correct mistakes.
For additional recommendations about reproducible research practices, you can read these course notes about reproducible research.
Why use version control?
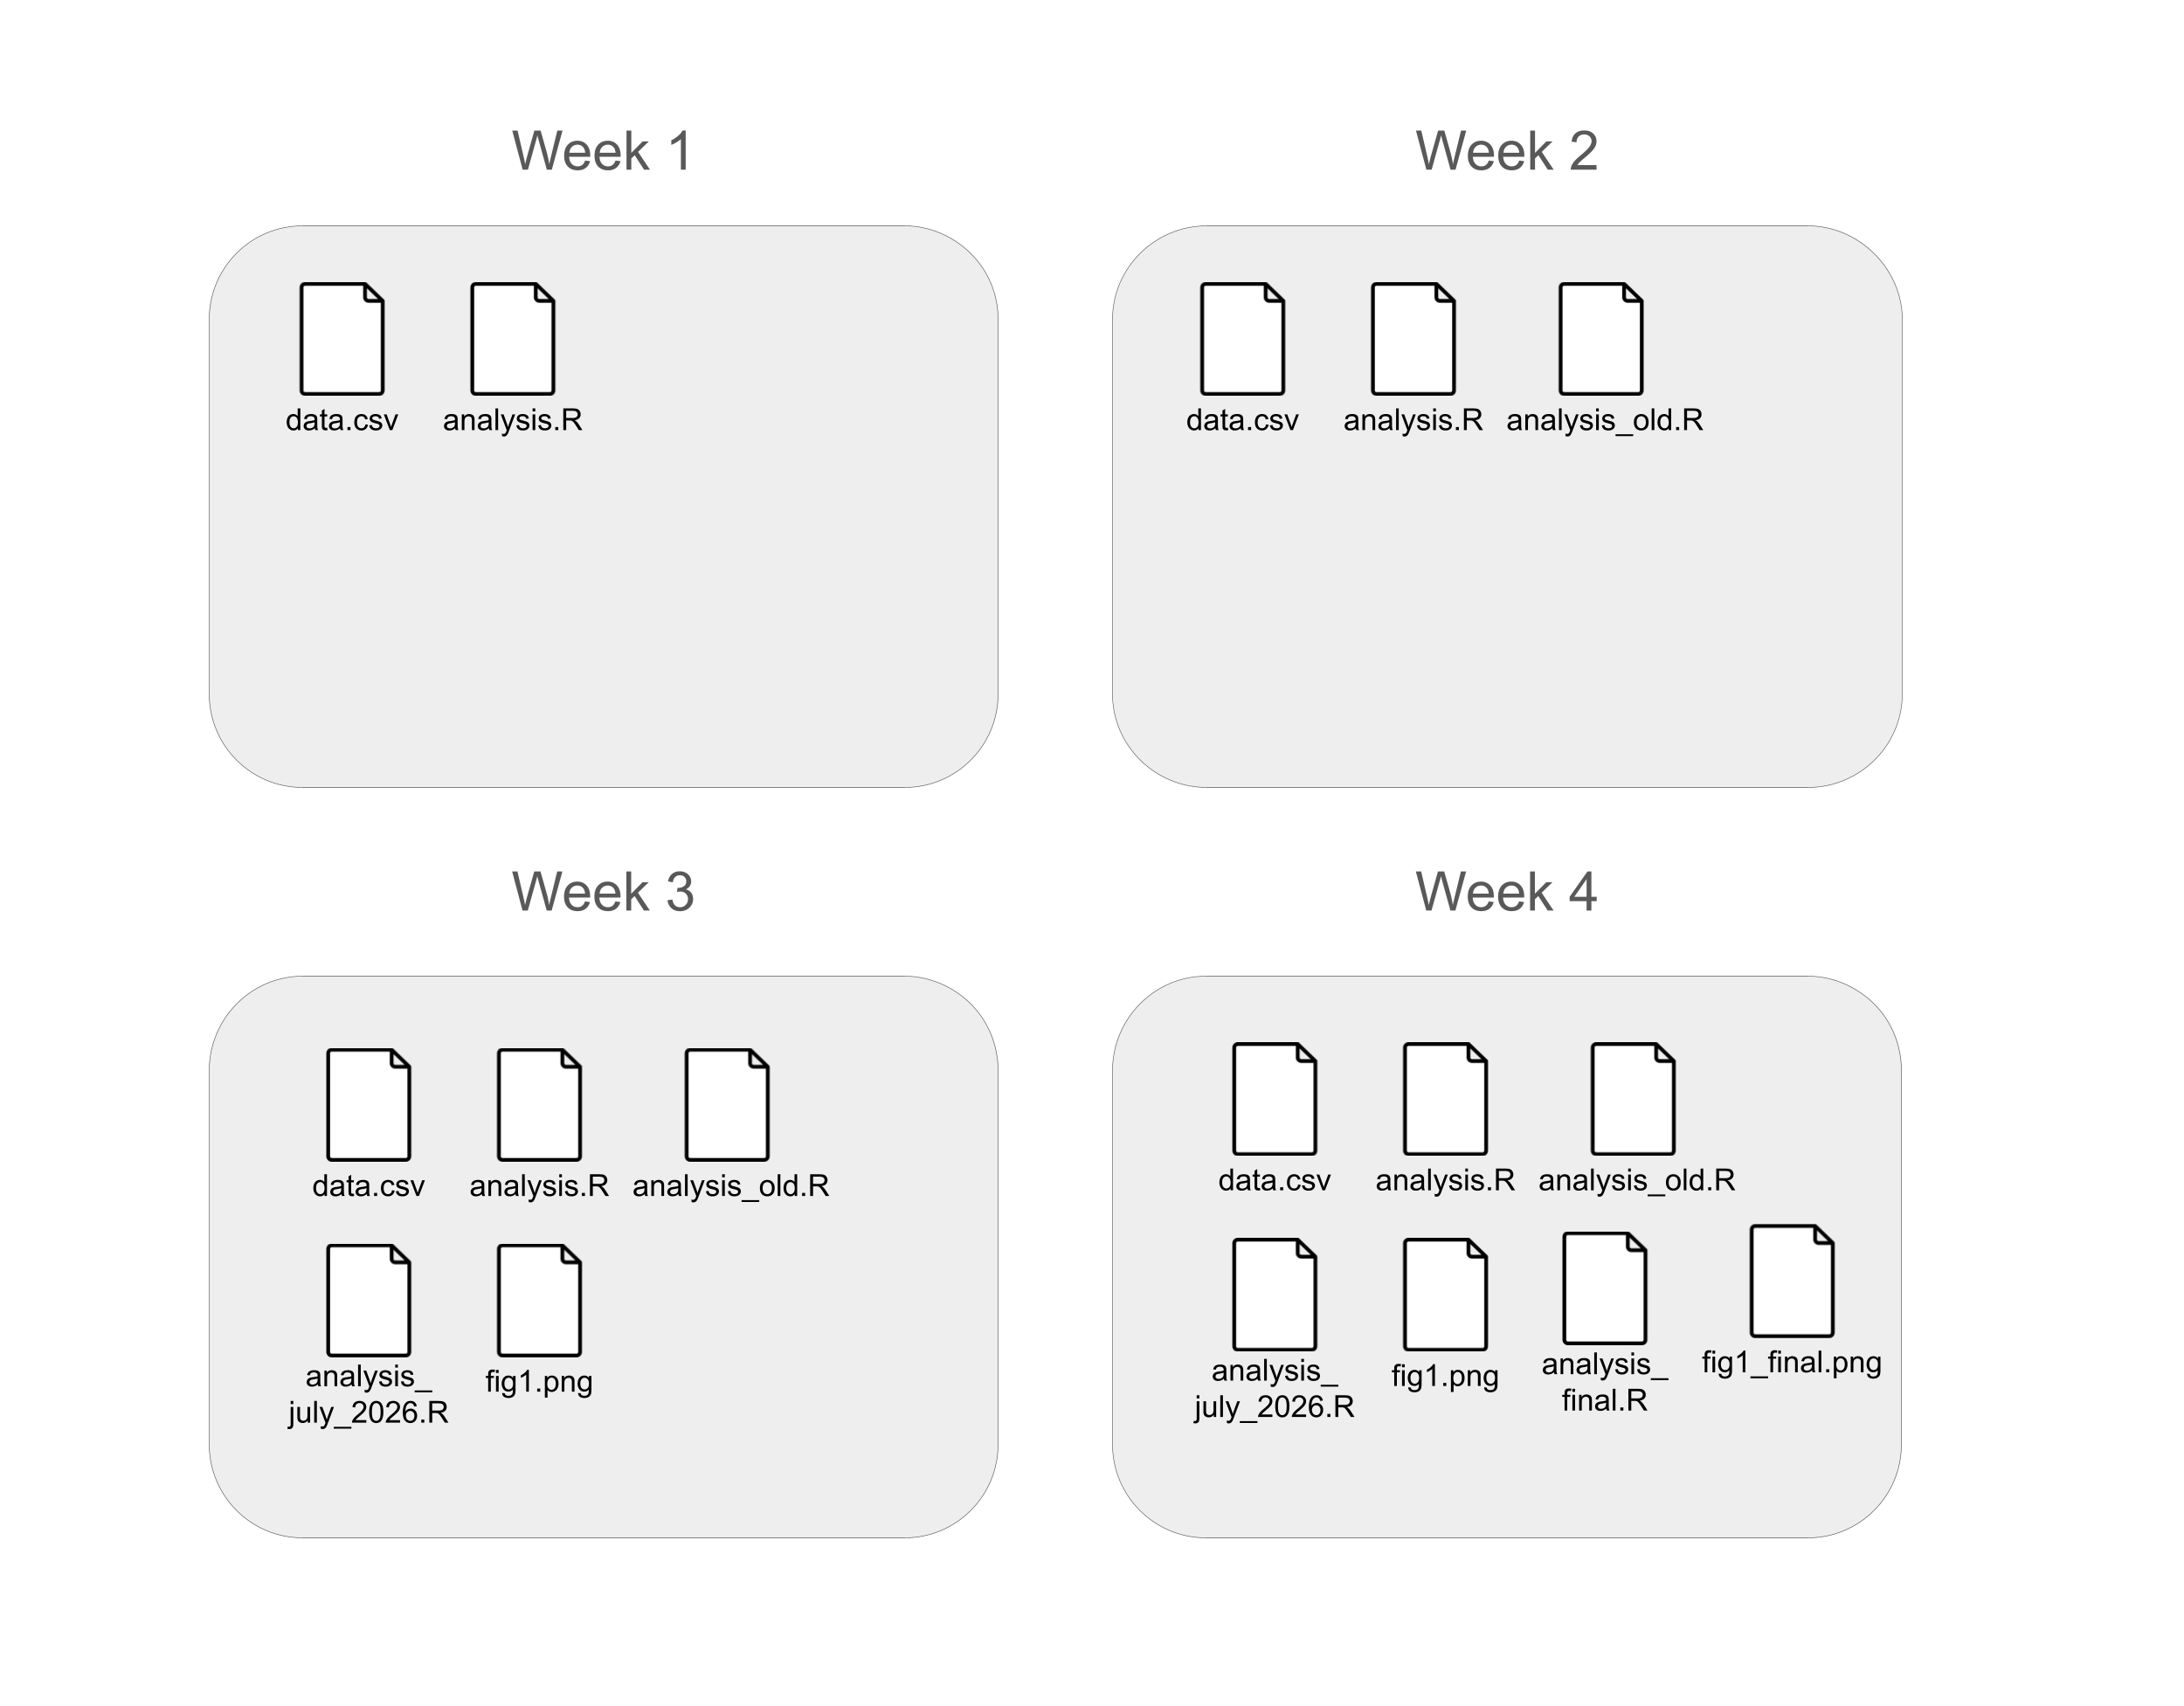
Consider a typical workflow when you have a project with multiple files (for example: data, code, resulting figures). You likely have a folder on your computer where you keep these files. When you edit a file and save it, you have access to the most recent version. You might run into a situation where you want to try something new, so you save project_file_old.R along with project_file_updated.R or perhaps project_file_july_2026.R or eventually project_file_final_version_4_final.R. If you haven’t saved an older version of a file but you wish you could revert to the version from last week before you tried something new, you would be out of luck.
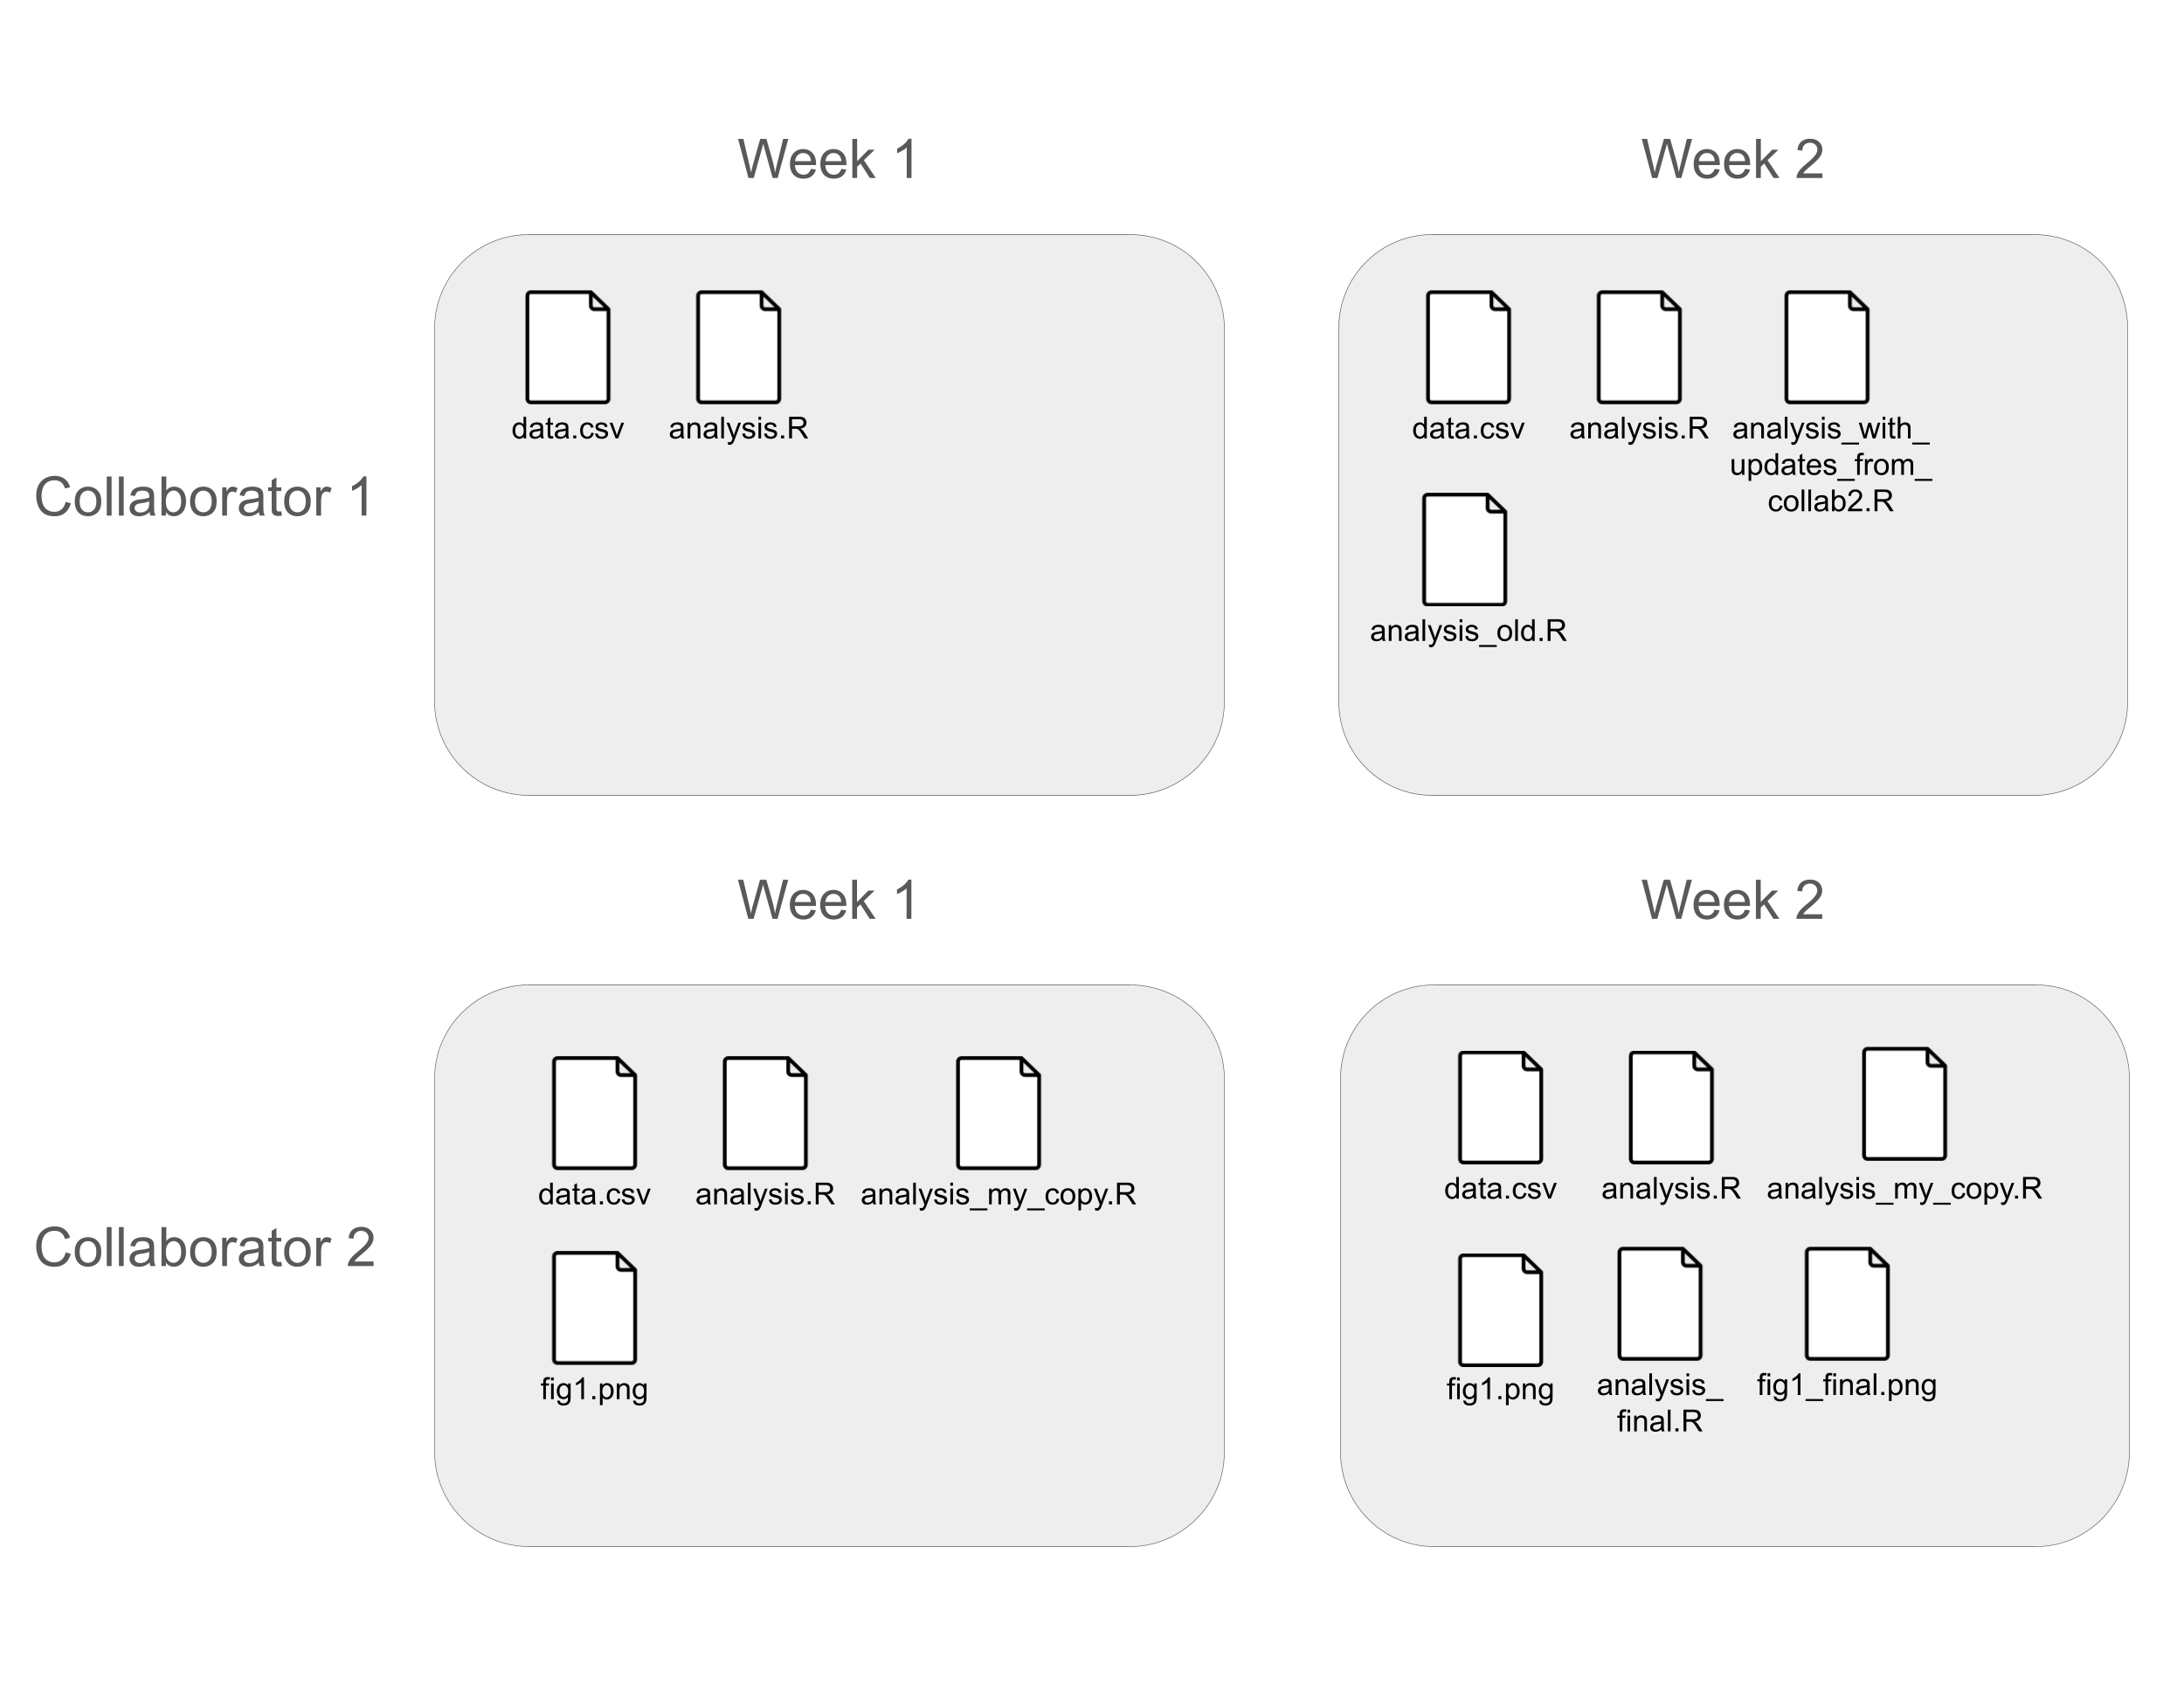
Similarly, think about how you might work on that same project with a collaborator. Perhaps you both have a folder on your computer for that project. When you make an update, you email the file to your collaborator, and they copy that update into their file, or save your file in their folder. Perhaps the two of you update the same file at the same time. Then you have to go through line by line to merge the updates into a single version of the file.
While both of these organizational systems can work well when carefully maintained, they are time consuming and prone to error. Version control is a tool that makes it easier to manage sets of files for projects. It automates several of the processes described above, and makes others dramatically easier. While version control was originally made for software engineers to work together on large projects, it is now commonly used for scientific projects as well.
At its core, version control lets the user track sequential changes to a set of files, with a short message attached to each version. Multiple people can work with the same version controlled folder, and different versions of files can automatically be merged, unless they are directly in conflict.
Our discussion of version control is inspired by the following two papers. They both provide a helpful introduction to version control with Git and GitHub.
Version control resources:
- Blischak, J. D., Davenport, E. R., & Wilson, G (2016). A Quick Introduction to Version Control with Git and GitHub, PLoS Computational Biology, 12(1).
- this paper provides an overview of Git and GitHub for scientists who primarily work with the command line
- Bryan, J (2018). Excuse Me, Do You Have a Moment to Talk About Version Control? The American Statistician, 72(1), 20-27.
- this paper provides an overview of Git and GitHub for scientists and data scientists who primarily work with R and RStudio
What are Git and GitHub?
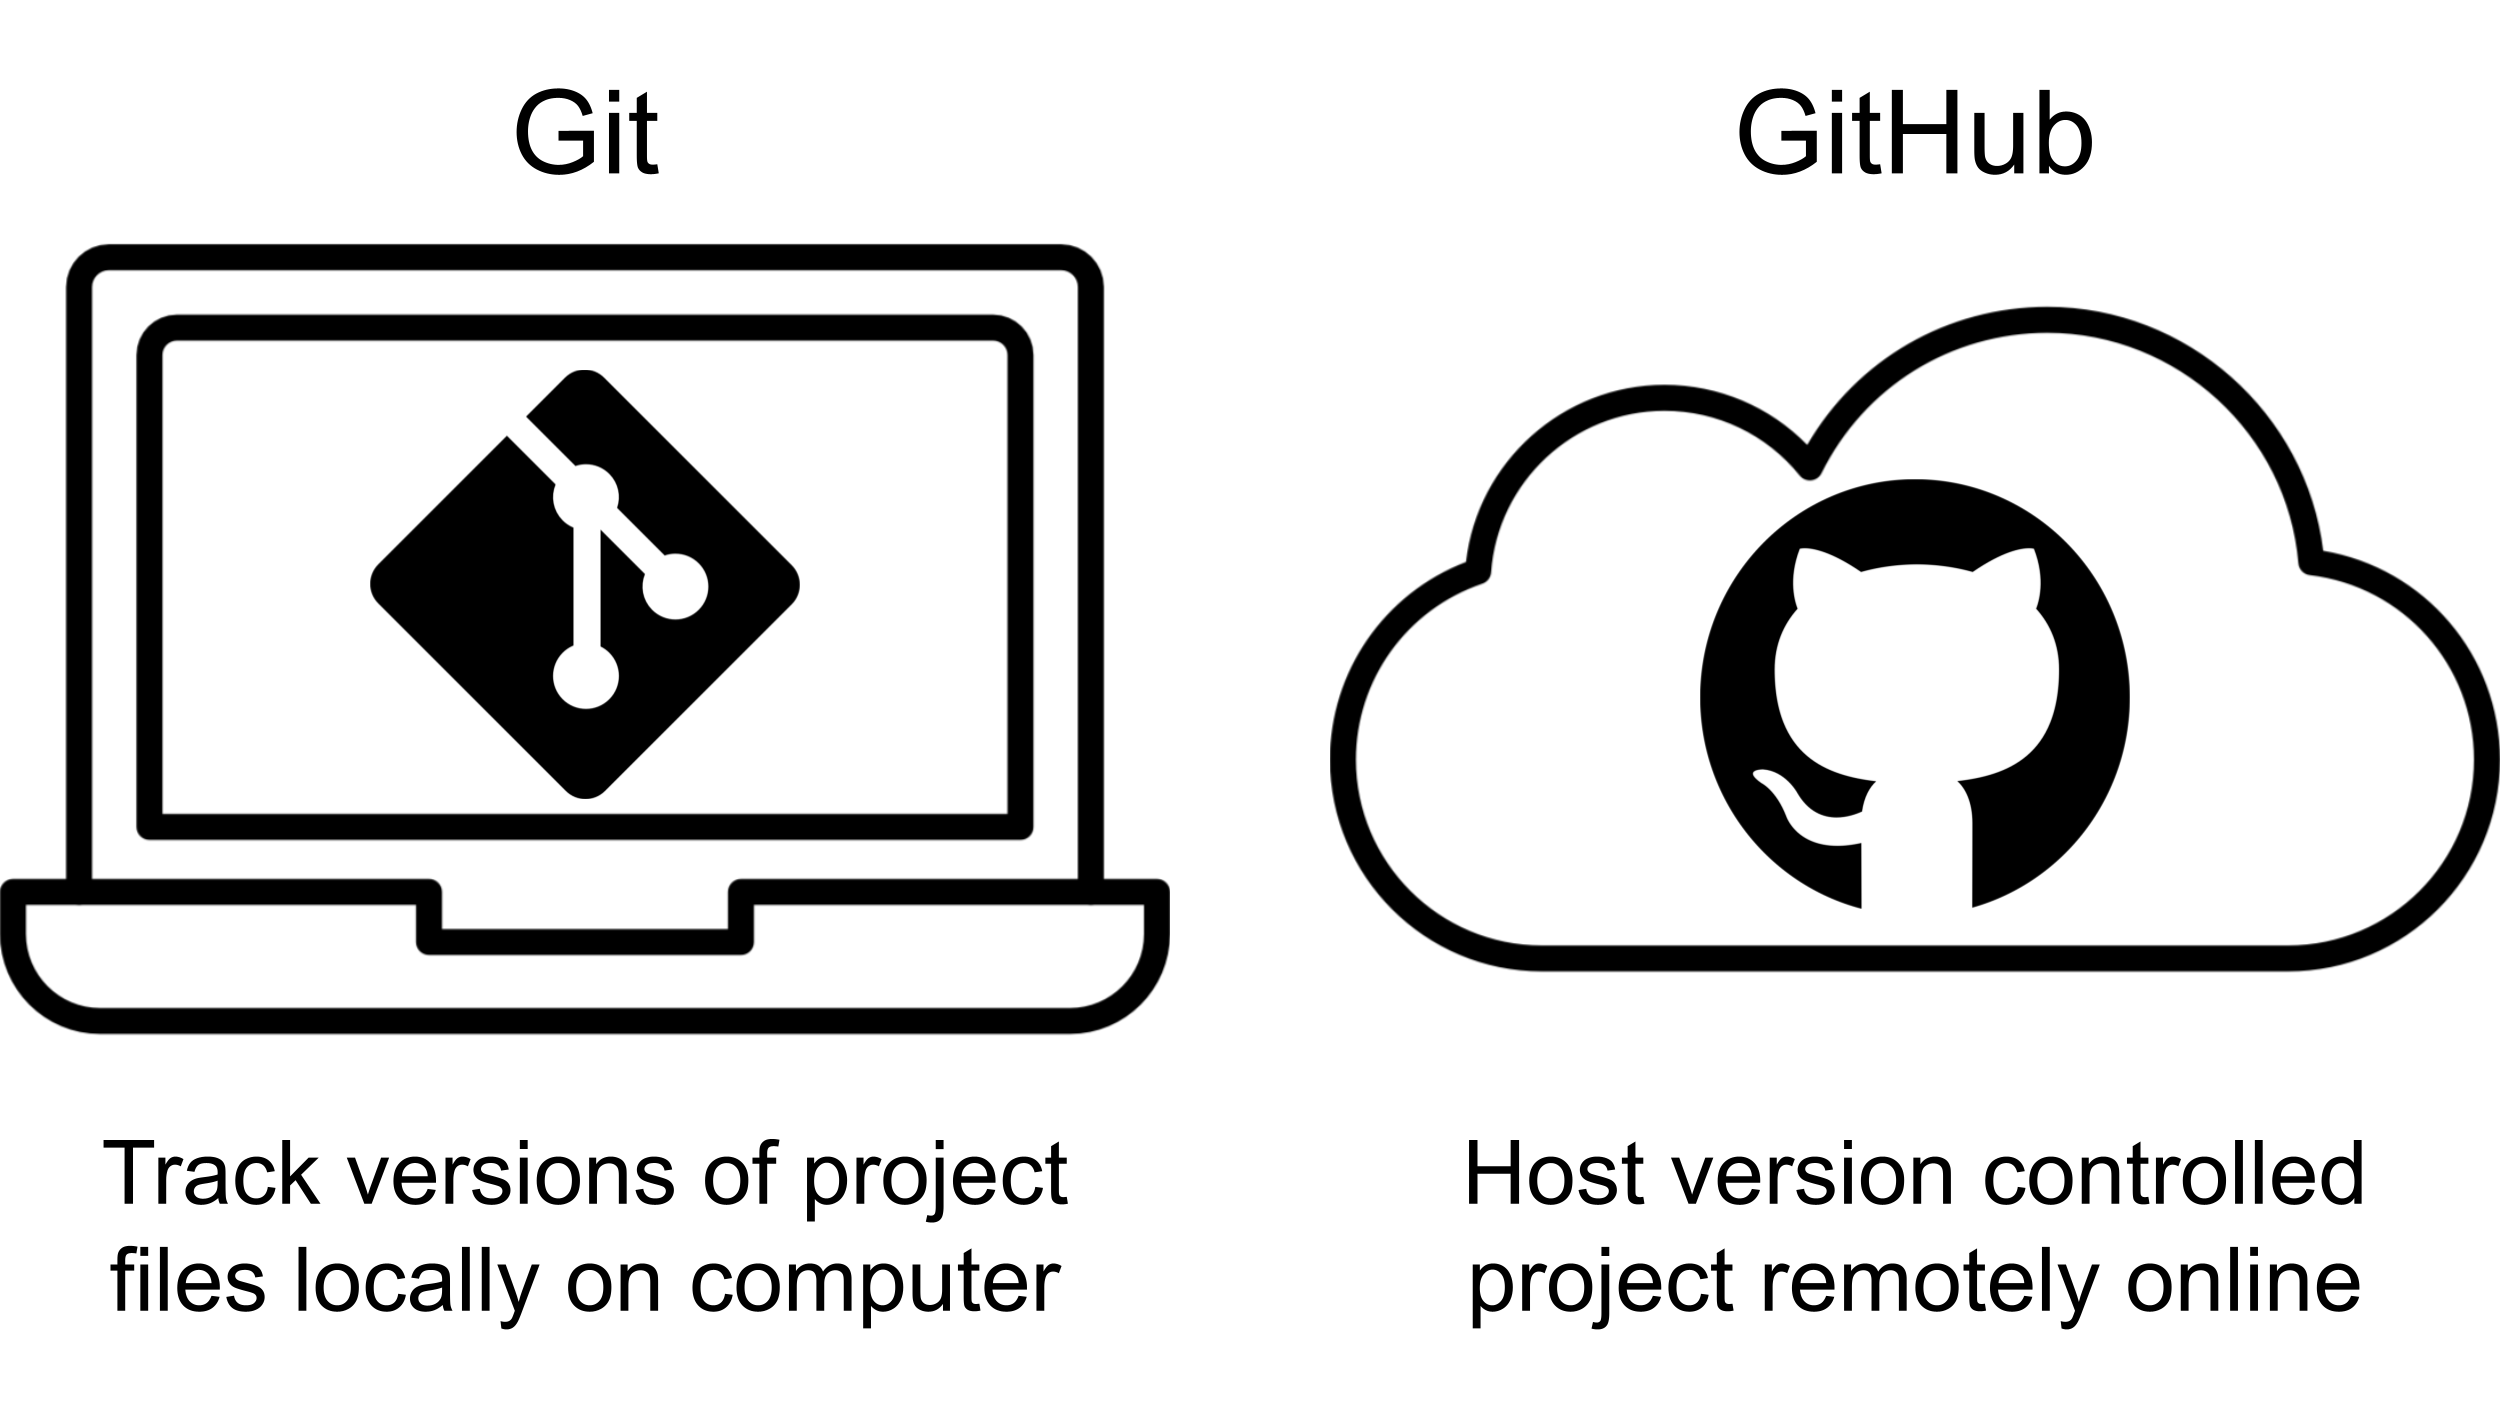
Git is a version control tool, and GitHub is a website for hosting files that are tracked with Git. Git works locally on your computer to record different versions of a project, and GitHub works online to provide a digital backup of files, let you connect with collaborators, and optionally create a web presence for your project.
Git
The files that are tracked as part of a version controlled project are contained in a repository.
Repository (or repo for short)
A folder in Git that contains all of the files to be tracked for a project.
When you set up a repository, Git will save an initial version of the files in that repository. Git works by tracking the evolution of files in a repository through a series of .
Commit
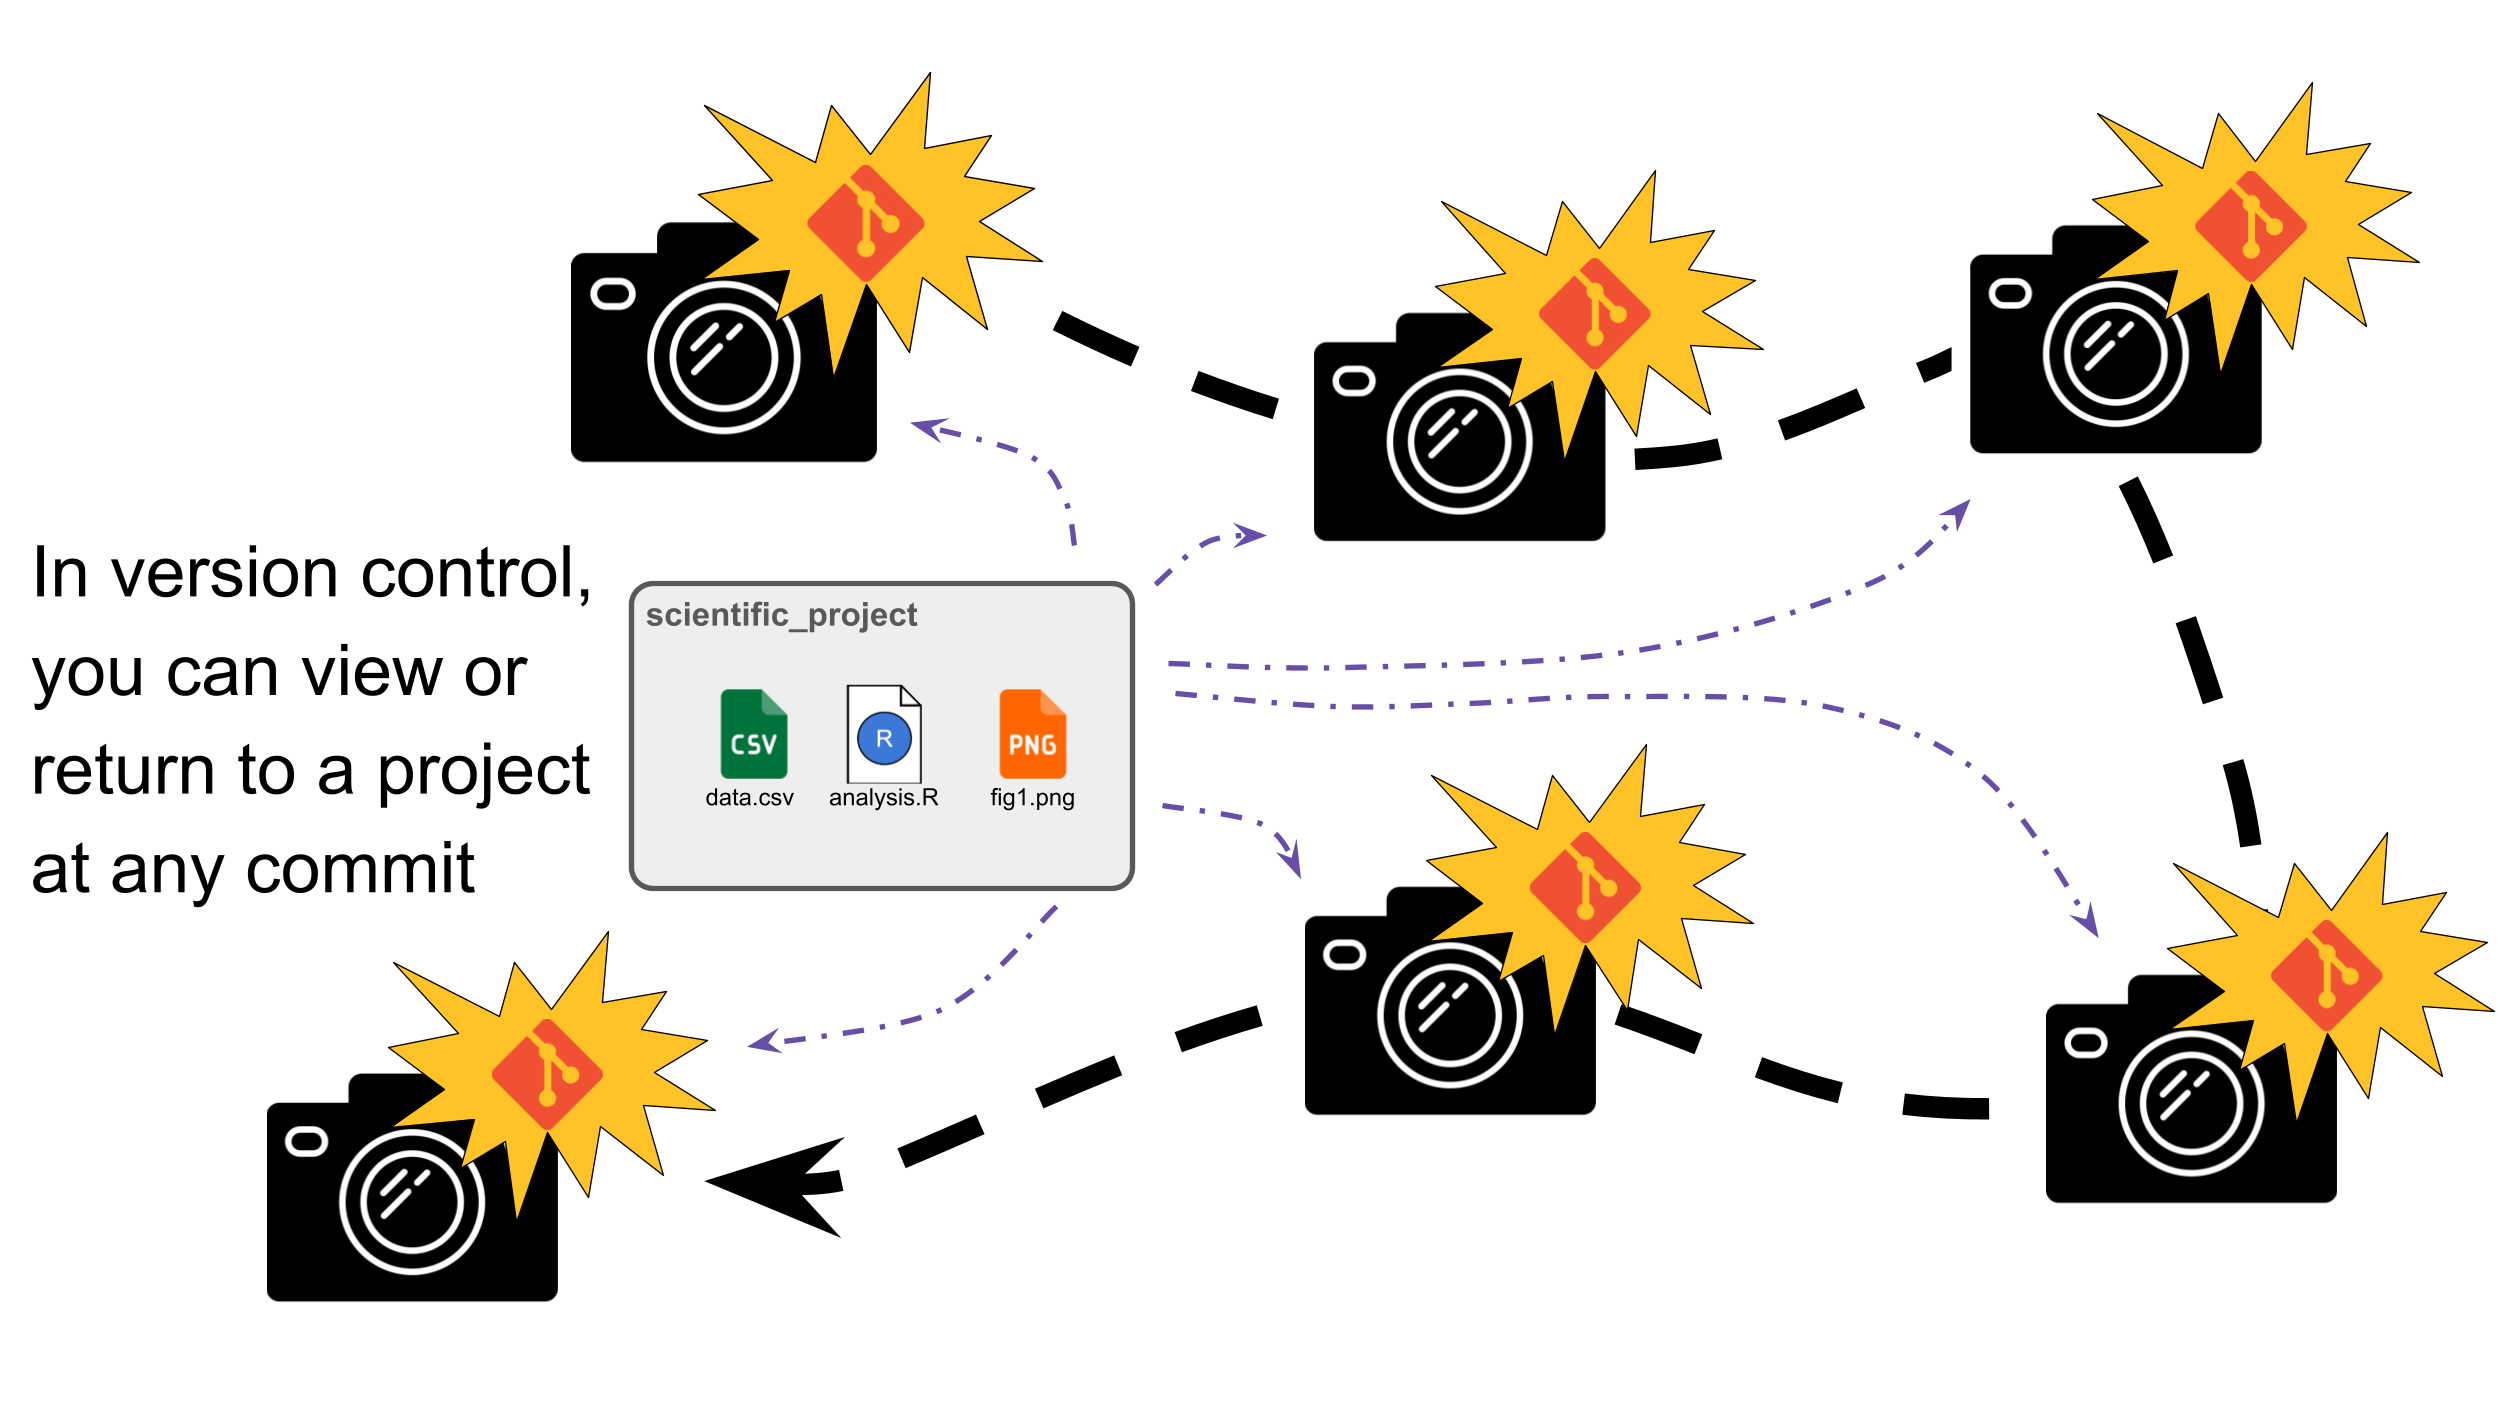
A snapshot of the files in a repository at a certain time.
Another way to think about a commit is as a save point in a video game. Just as a player can return to a previously saved game state, a researcher can return to a previous commit. In a video game, if you progress past a save point and lose a life, you typically restart from the most recent save rather than from an arbitrary moment in the game.
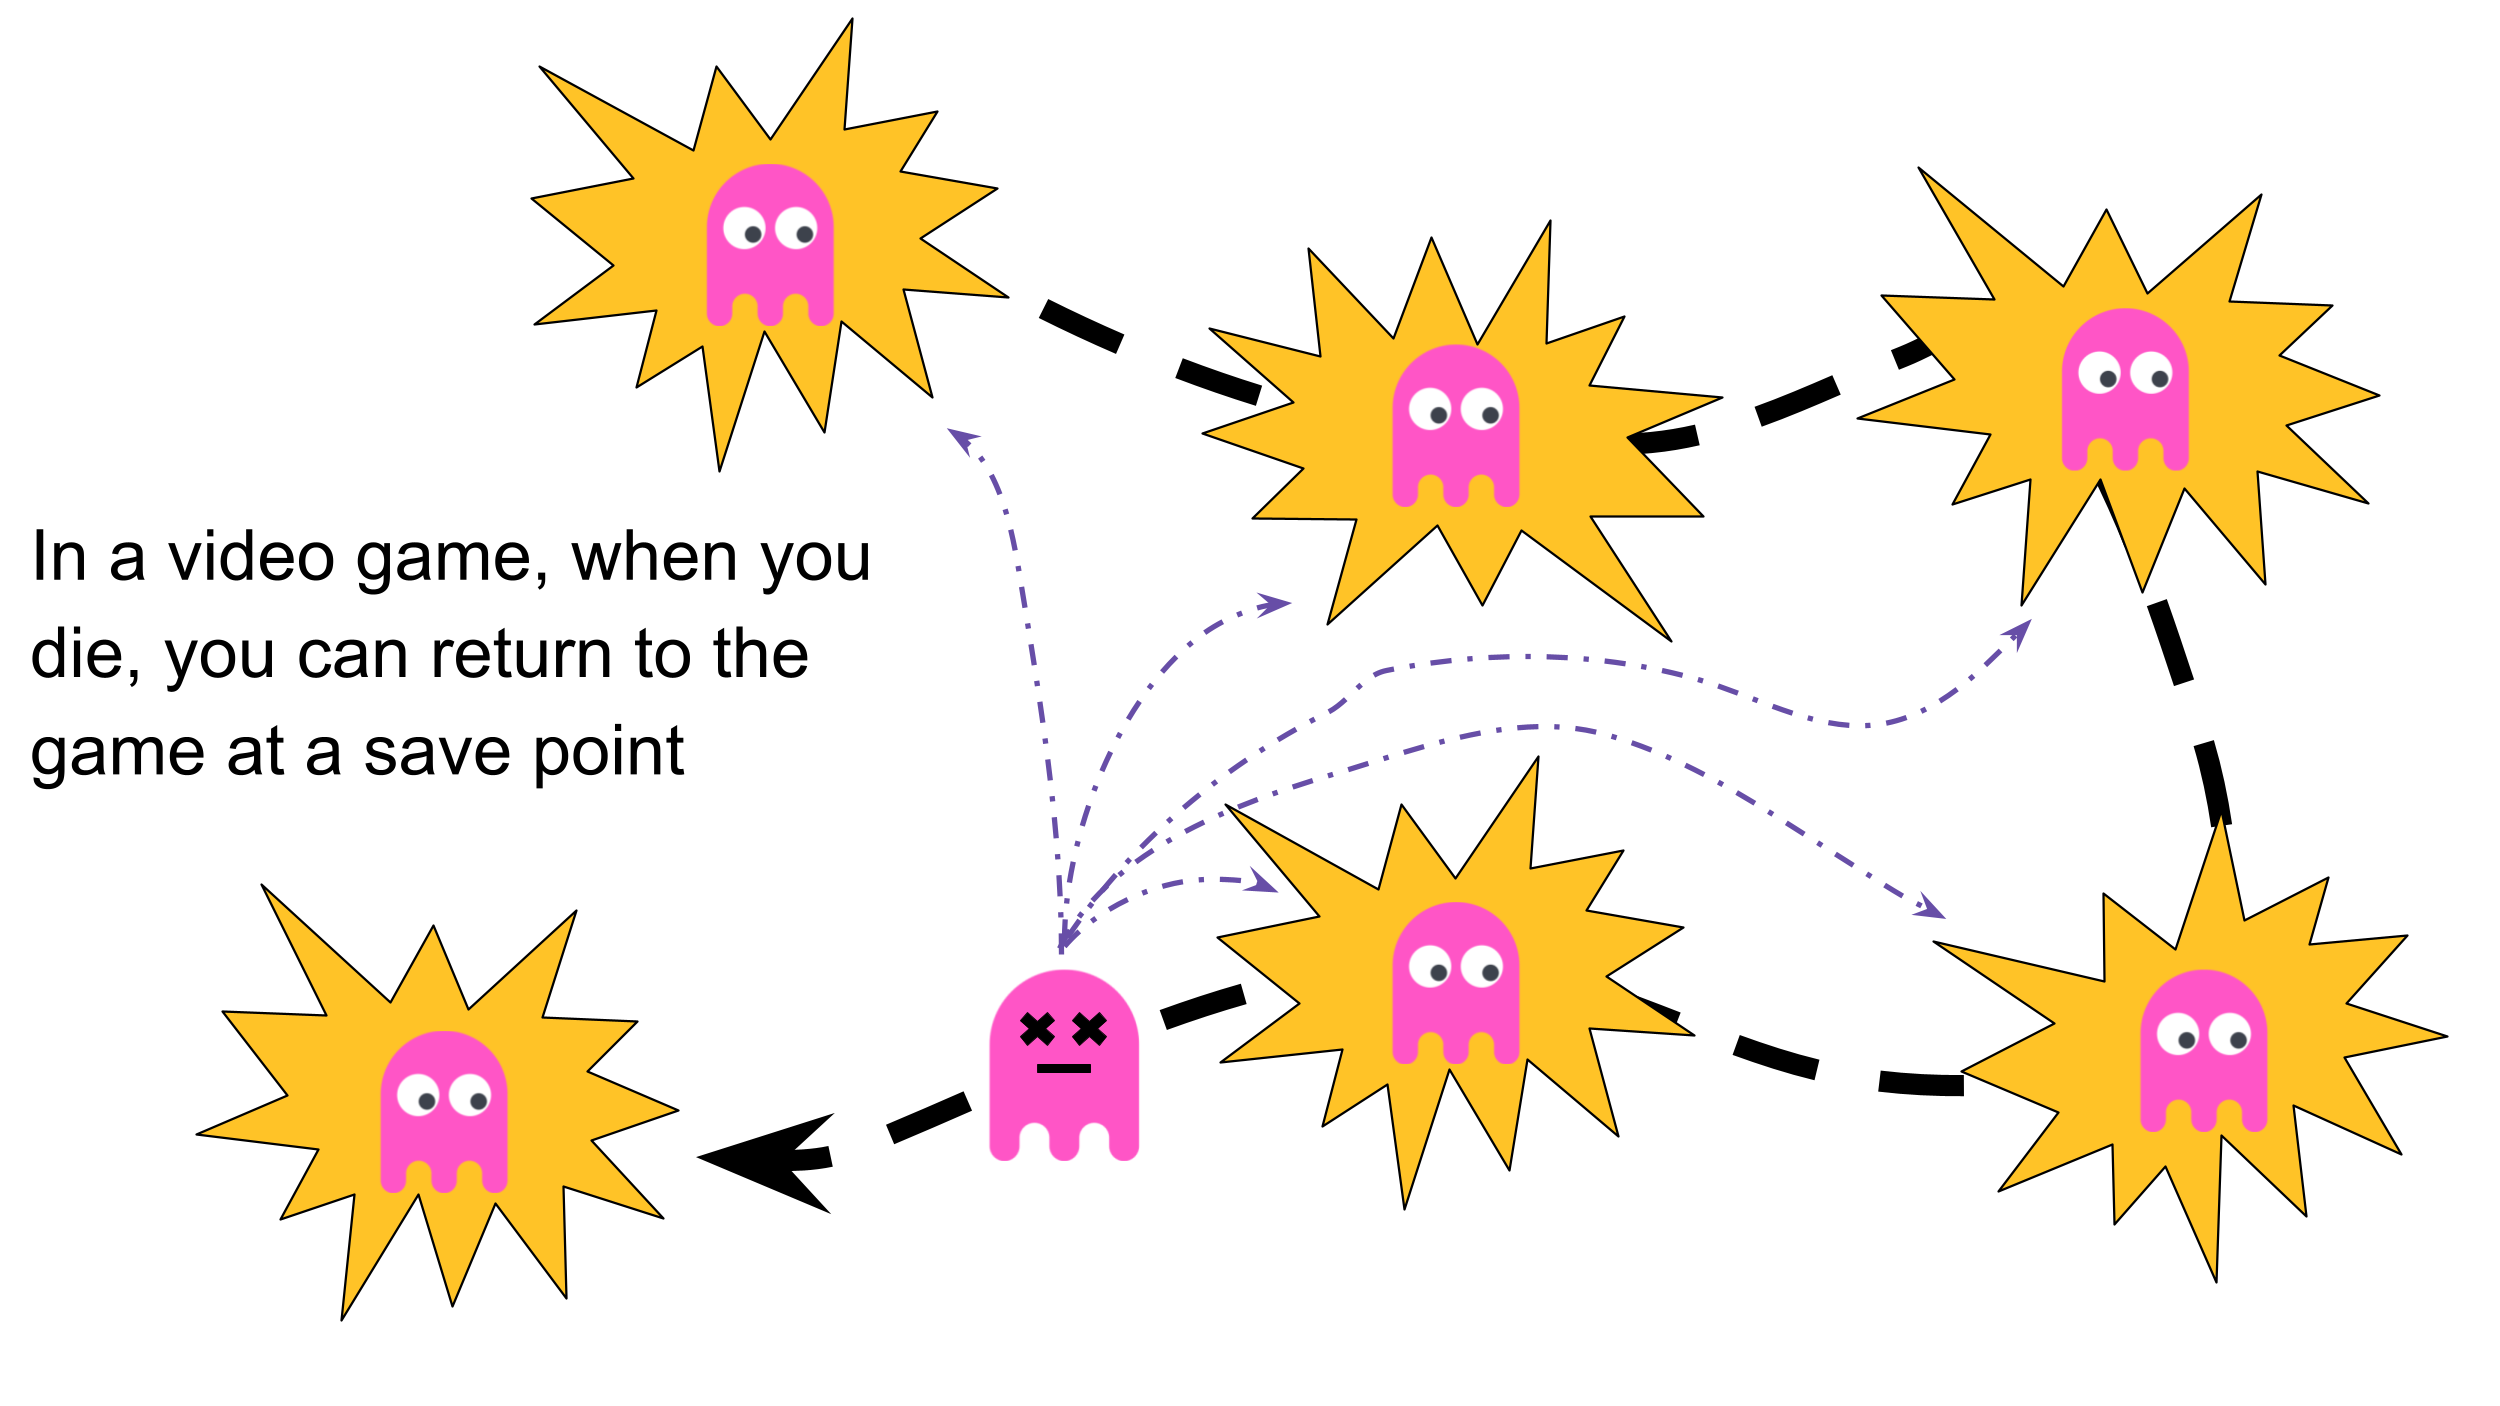
Similarly, if you continue working on a project without committing your changes, those updates will not be recorded in the version control history. Because Git only records the state of a project when a commit is made, you can return to versions of your files that were saved in commits, but not to arbitrary moments between commits. However, Git is more forgiving than a typical video game. While video games often limit your number of available save points, Git allows you to create as many commits as you need and retains the history of all commits, making it easy to revisit earlier versions of your work.
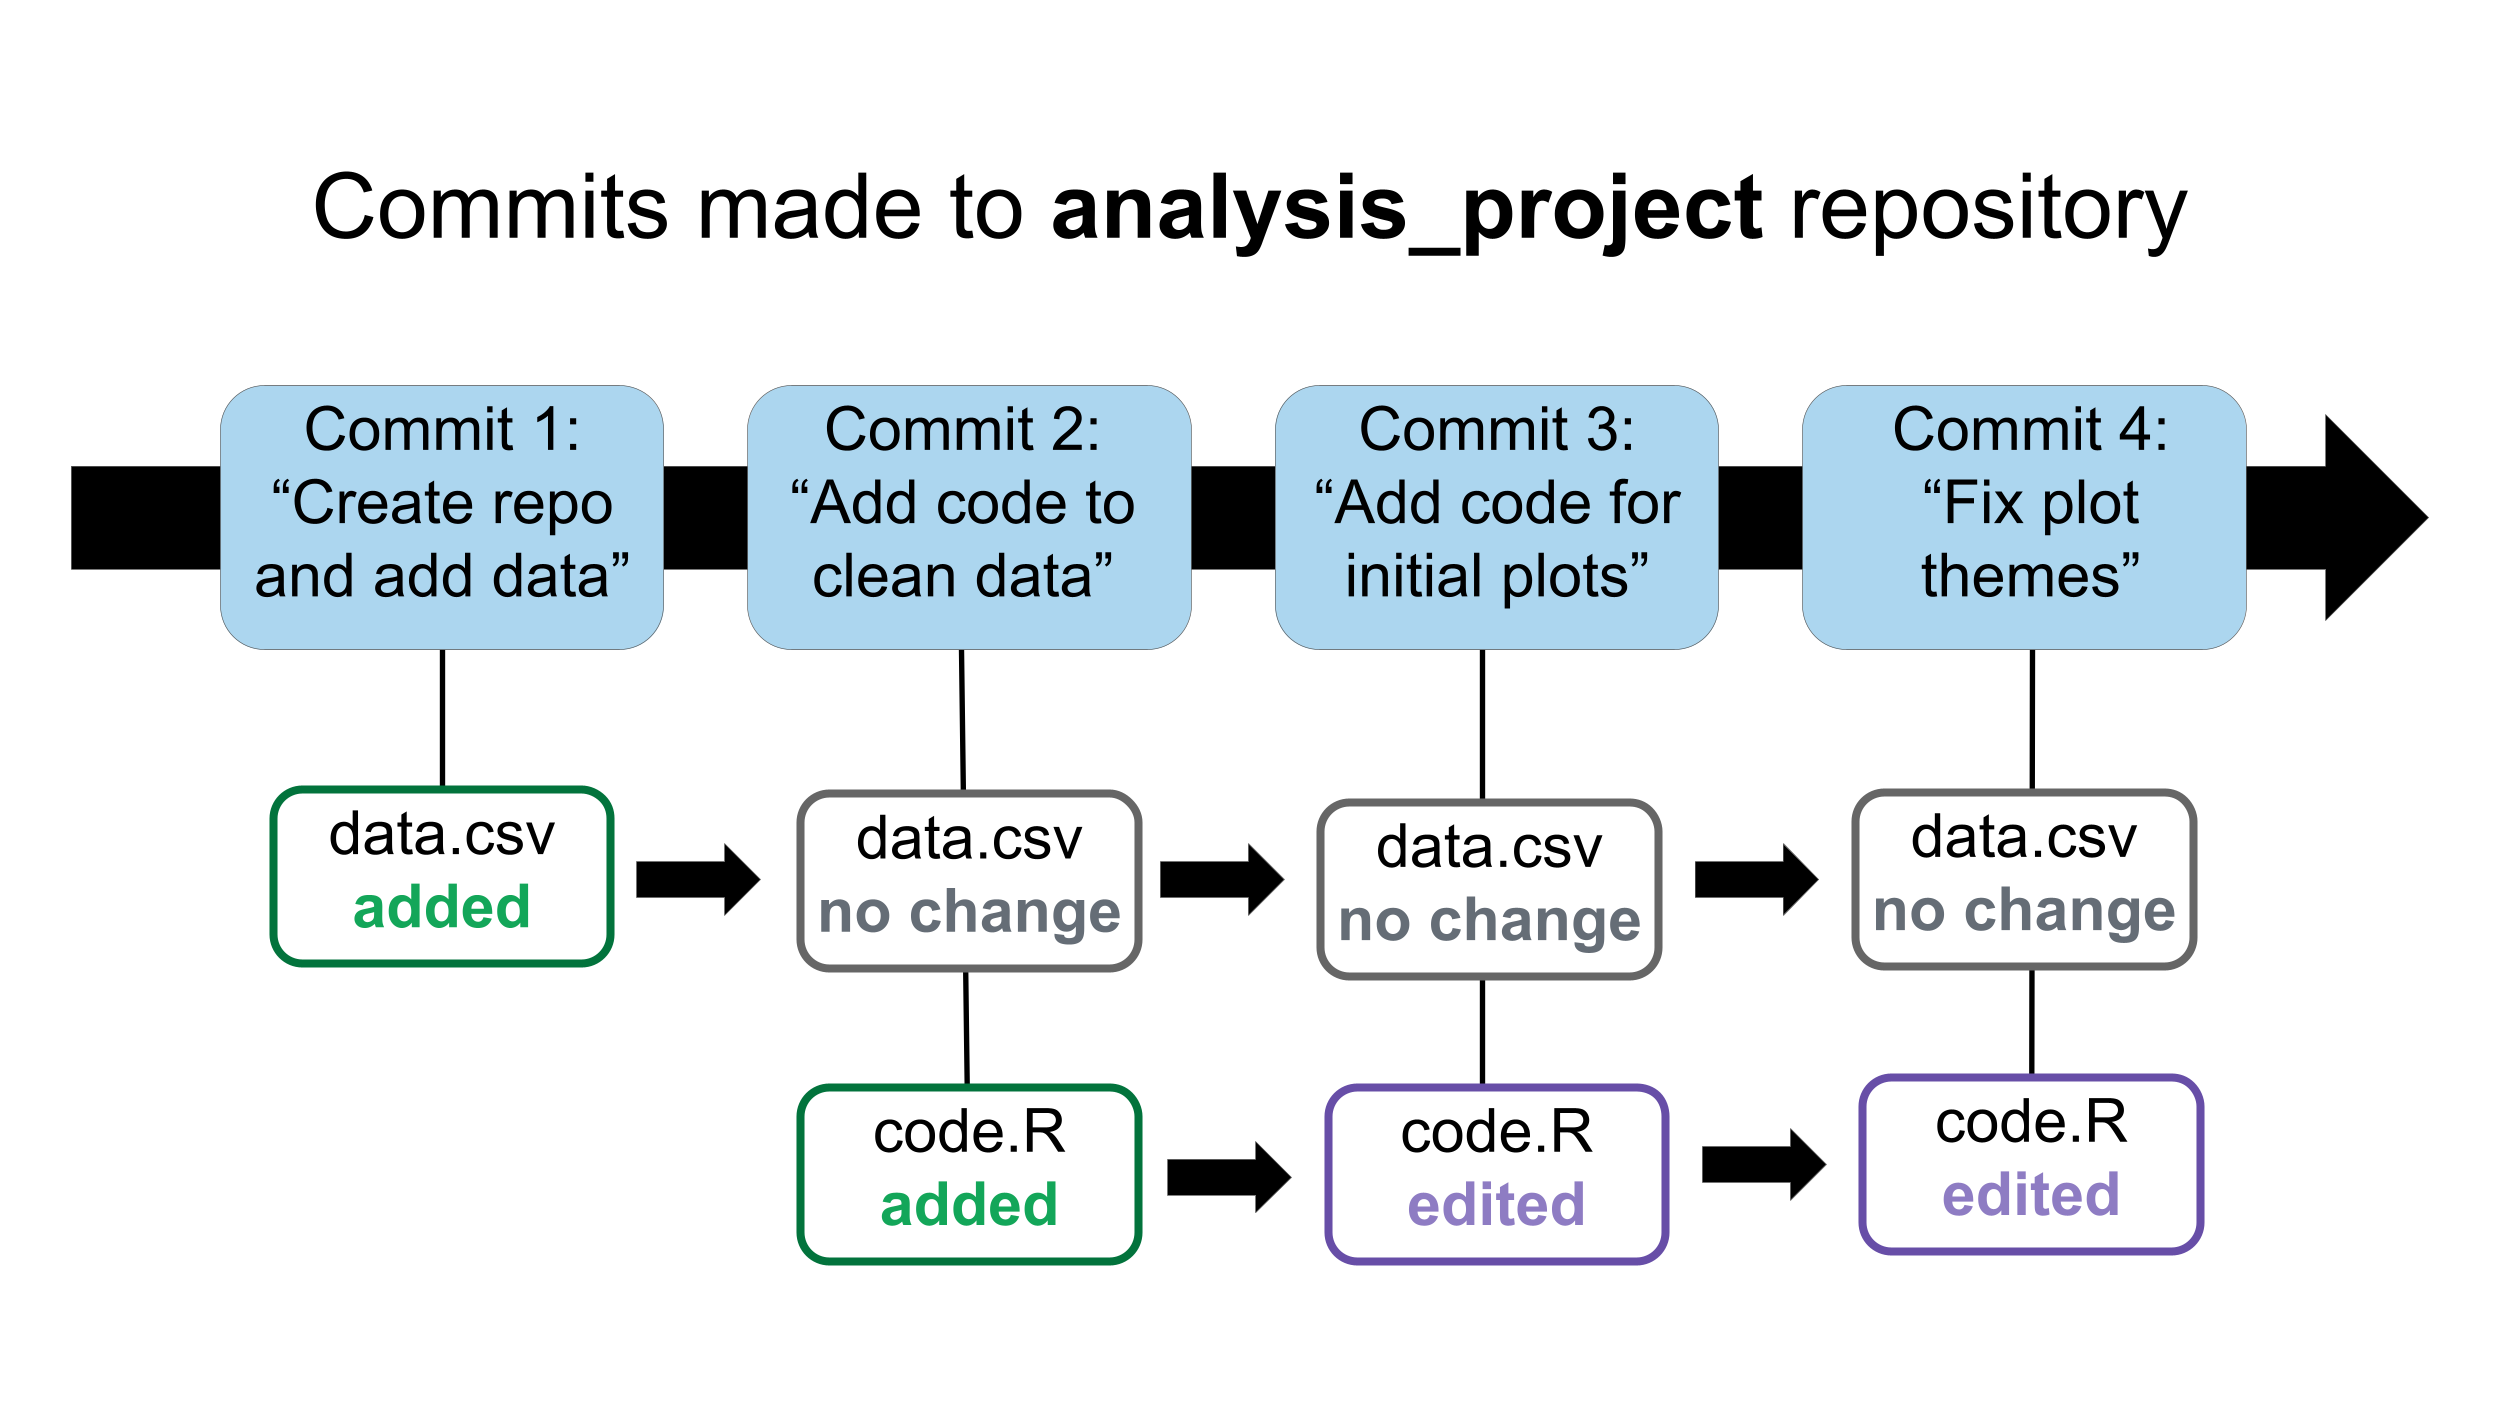
In the image below, a repository called analysis_project is tracked using version control, and it is made up of four commits. Each commit has a message that explains what work the commit represents. Within a commit, files can be added, edited, left unchanged, or deleted.
Each time that you tell Git to commit a version of your project, it will save it as a series of changes that list the differences between each file in the most recent commit and the current commit. We can look closer at an individual file and see how it changes across commits.
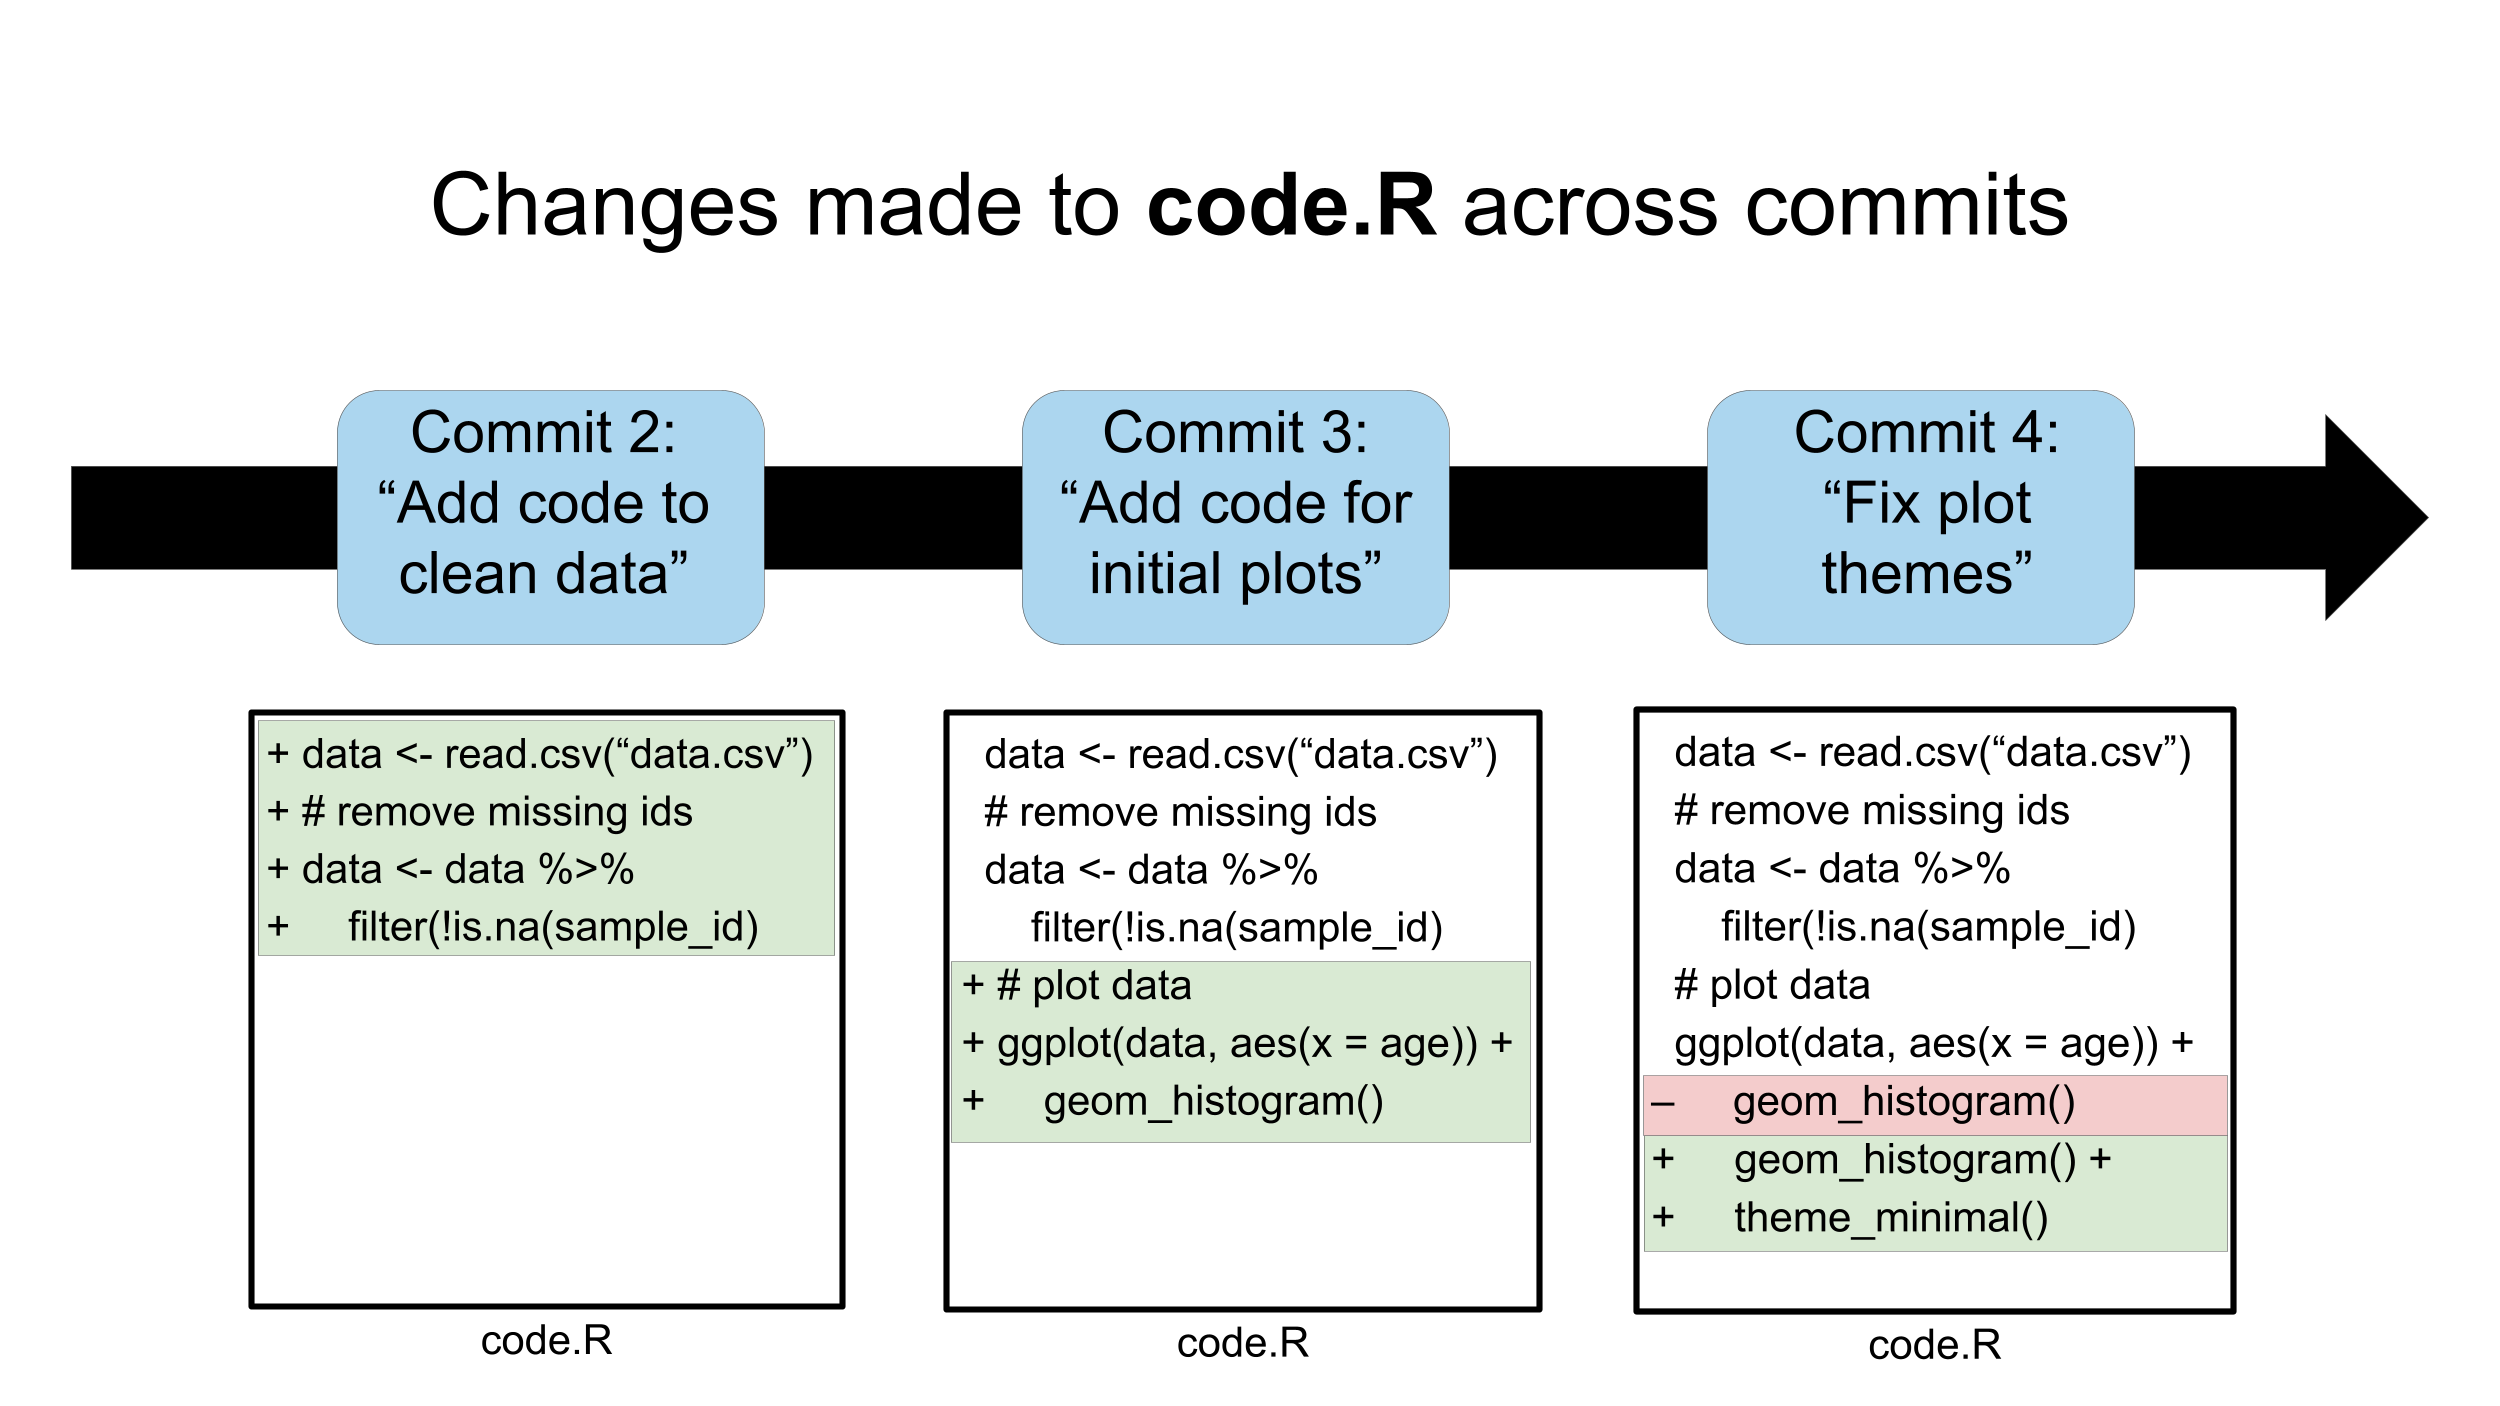
Here you can see that green colored sections are additions and red colored sections are deletions. Git will not automatically make commits for you. You need to decide when to commit. If you want to return to a previous version of a project, you can only return to the version of files at any commit.
GitHub
While you could only use Git locally to track versions of files, it is much more powerful when combined with GitHub. You can use GitHub to host a Git-tracked repository online. We will use the terms local repository and remote repository to distinguish between these.
Local
The Git-tracked repository on your computer.
Remote
The online version of the repository tracked on GitHub.
There are several benefits to pairing your local repositories with remote repositories on GitHub.
- You have a backup of files in case something happens to your computer.
- You can easily work with collaborators.
- You have a central location where your data (if appropriate) and code are stored for a project that can be viewed by and shared with other scientists. Each file has an associated URL, so if you would like to share a code or data file you can share the URL where the file can be viewed online, instead of emailing a file that must be downloaded to view.
Reproducibility considerations
A scientific paper is more reproducible if the data (or instructions to access the data) and code are publicly available, because other researchers can directly inspect and reproduce the analysis. While some papers have data and code “available upon request”, hosting code (and data if appropriate) on GitHub makes it easier to share these files without requiring additional time and effort from the authors to respond to emails. This aligns with the open science movement, which aims to make research, data, and scientific software more transparent and accessible. Keeping project files in a GitHub repository also helps adhere to FAIR principles, which suggest that digital resources should be findable, accessible, interoperable, and reusable.
Creating new repositories
There are two ways to start new version controlled projects with Git and GitHub. You could create a new remote repository on GitHub and then it to your computer, creating a local version. Or, you could create a new repository locally on your computer, track it with Git, and then it to GitHub, creating a remote version of the repo. We will provide examples of both workflows in the next section.
Clone
Create a local repository that is a copy of a remote repository on GitHub.
Push
Send commits from the local version of a repository to the remote version of the repository on GitHub.
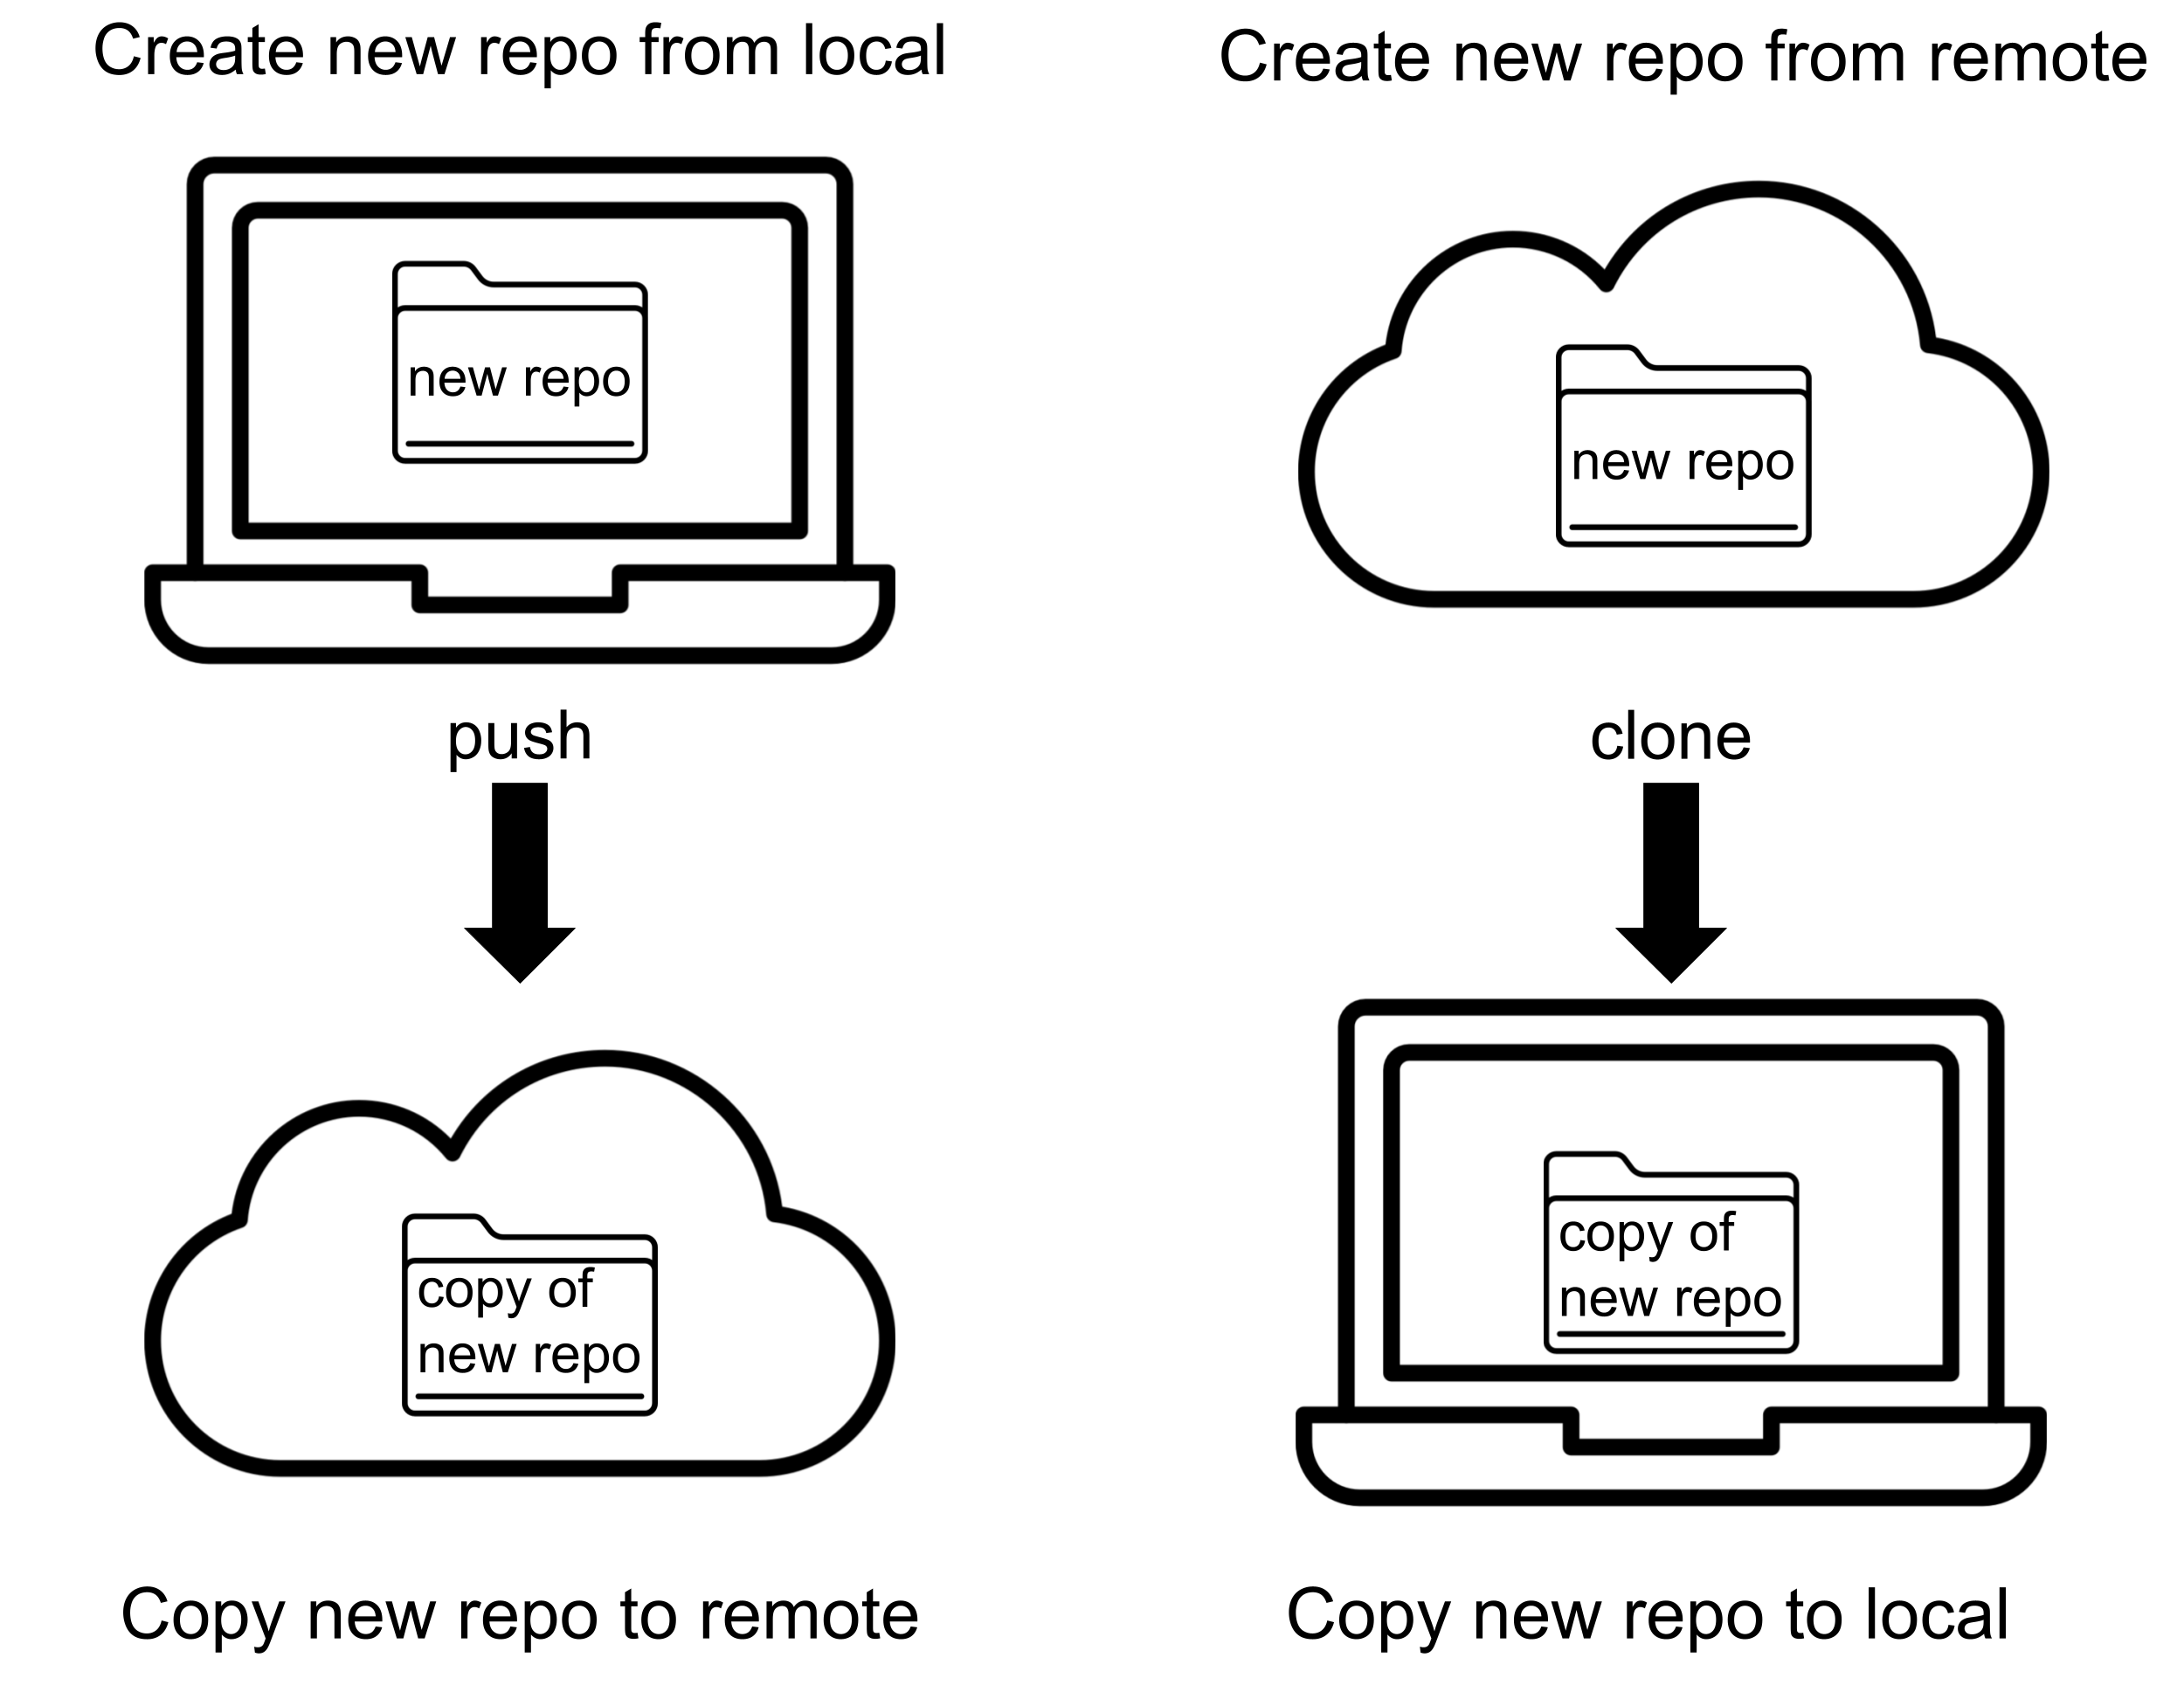
Typically, it is easier to create a new repository remotely with GitHub when started a version-controlled project from scratch. However, when you have already started work on a project and decide to version-control existing resources, you will want to create your new repository locally.
In this case study we will practice both approaches. First, in the following section, you will practice creating a new repository from GitHub and cloning it to your local computer. Later, in the section in which you create a repository for the case study analysis, you will practice working with an existing set of files and version-controlling them locally with Git.
Getting started with Git and GitHub
Creating a GitHub account
We will start with GitHub. If you do not have an account, make one here.
When you choose a username, consider advice from Jenny Bryan (a data scientist who has thought a lot about version control). She suggests choosing a username that incorporates your real name and that you would be comfortable sharing with professional colleagues.
Creating a new GitHub repository
Now that you have confirmed that you have a GitHub account, you can create a new repository (perhaps your first GitHub repository!). In this section, you will practice creating a new GitHub repository, connecting it to your local computer and Git, and making version-controlled changes to the repository. You will later make another repository to use for the case study analysis.
To create your repository:
This will take you to a new page. GitHub will automatically set you as the owner of the repository, and you can choose a name.
A few notes on naming repositories:
- keep the name descriptive but short
- don’t use spaces, instead use
-,_, or.
Next, do the following:
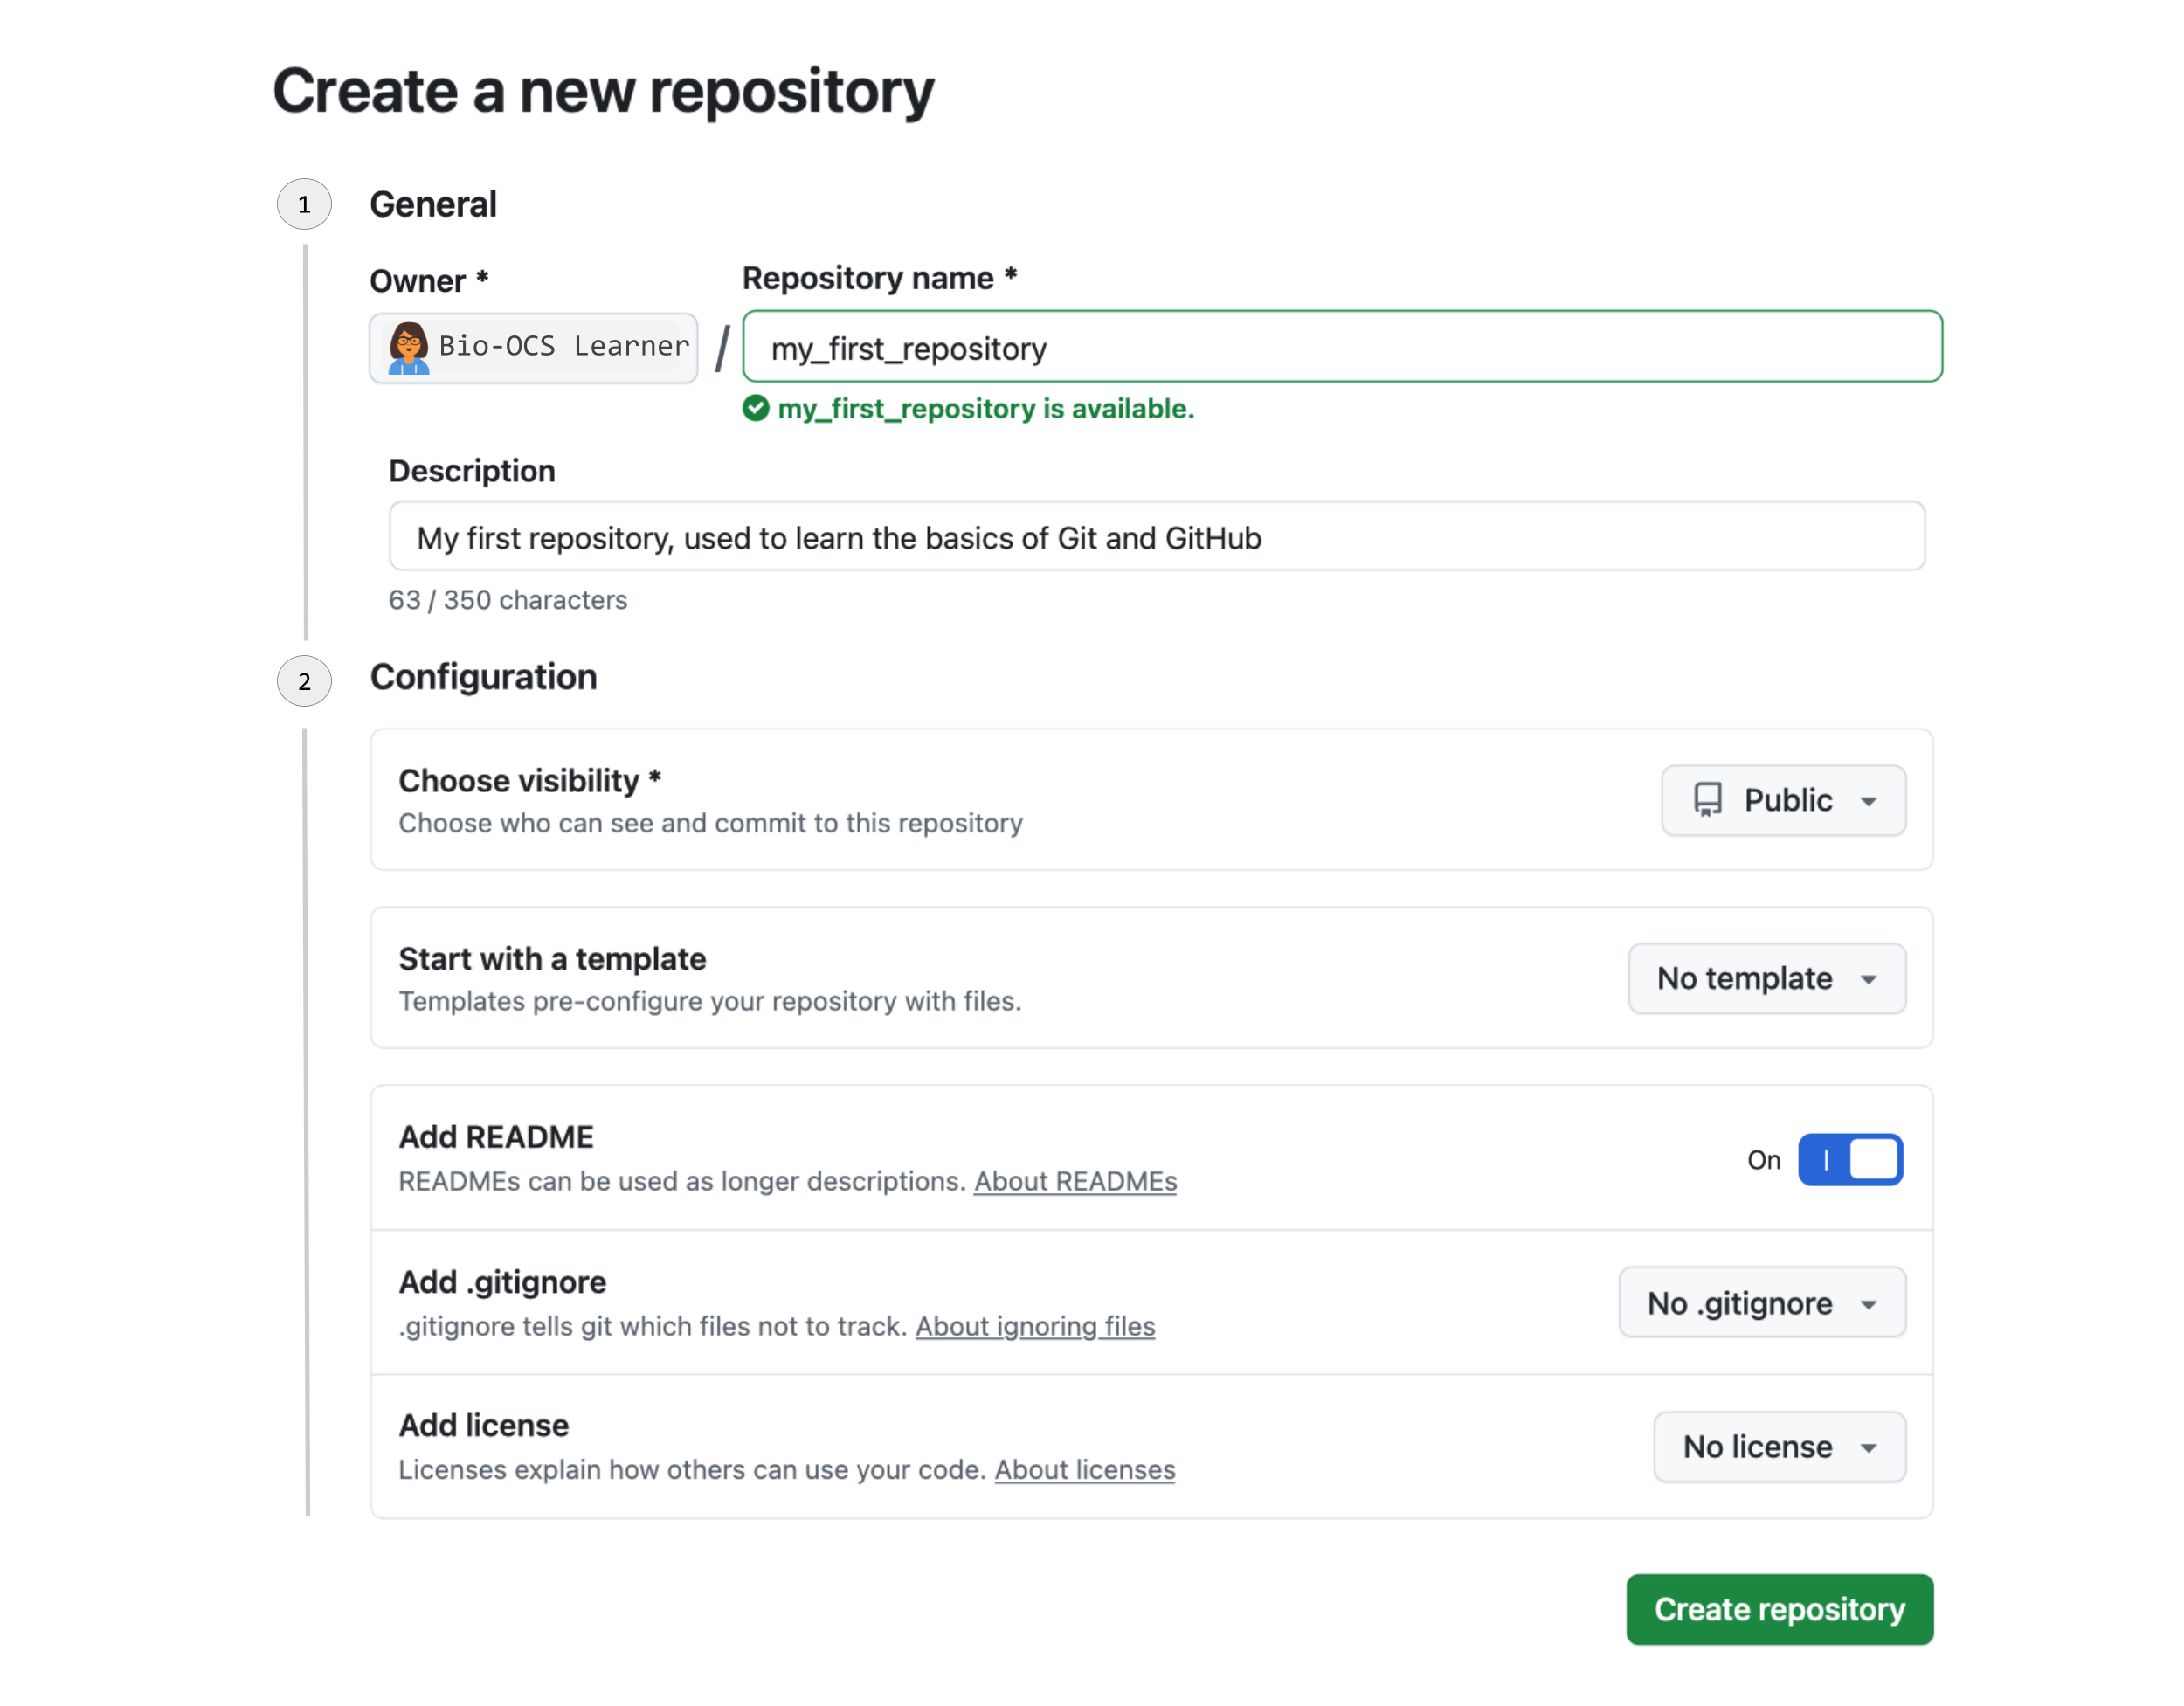
Use the drop-down sections to learn about each of the configuration options.
Visibility
By default your repository will be set to public, which means that anyone can view all of the files contained in it. If you would prefer that only you and collaborators that you add can view the contents, you can set the visibility to private. Please note that this is not truly private, so be careful not to host protected heath information (PHI) or other forms of data that require extra protection on GitHub even with a private repo.
Template
A template is an existing repository that you can use as a template for new repositories. A repository made from this template will have the same folders and files as the template repository. You can make any repository that you have access to into a template. Typically, you will not use a template when creating a new repository.
README
We will discuss README.md files in more detail in the project organization section, but a README.md file describes the purpose and contents of a repository. If you are creating a repository from scratch, we strongly suggest that you include a README.md file.
.gitignore
You may have files in your repository that you don’t want to commit, such as large data files or intermediate files (we will discuss which files you may not want to commit later in the project organization section). If there is a file that you don’t want to track with version control, you can add it to the .gitignore file, to tell Git to ignore it. When you click the down arrow next to “No .gitignore” it will provide several templates. For a project using R, the “R” template is a good place to start. It includes files often associated with projects in R that are not typically tracked with version control.
License
A license is a legal document that states who can use your code. Although it may seem counterintuitive, a license typically makes your code more “open”, which means that other people can use it with fewer restrictions. There are two main types of licenses used for most R projects hosted on GitHub: permissive (MIT) and copyleft (GPL). A permissive license means that people can use your code with minimal restrictions. A copyleft license means that any code that incorporates your code must also be open-source. You can read more about licenses for open-source projects here, or use this resource to see what license might be most appropriate for your project.
For more information on any of these components of a new repository, see GitHub’s documentation for creating new repositories.
Once you click “Create repository”, you will be brought to the GitHub page for your repository. GitHub URLs all have the same format: https://github.com/your_user_name/your_repository_name.
If you look at your repository, you will see that it has one file: README.md (often referred to as the project’s README). This is where you will document what is contained in your repository, and it will serve as a homepage for your project. It is written in Markdown, a language that can be used to format documents (you can find more information about how Markdown works and its syntax here). You will now edit the README:
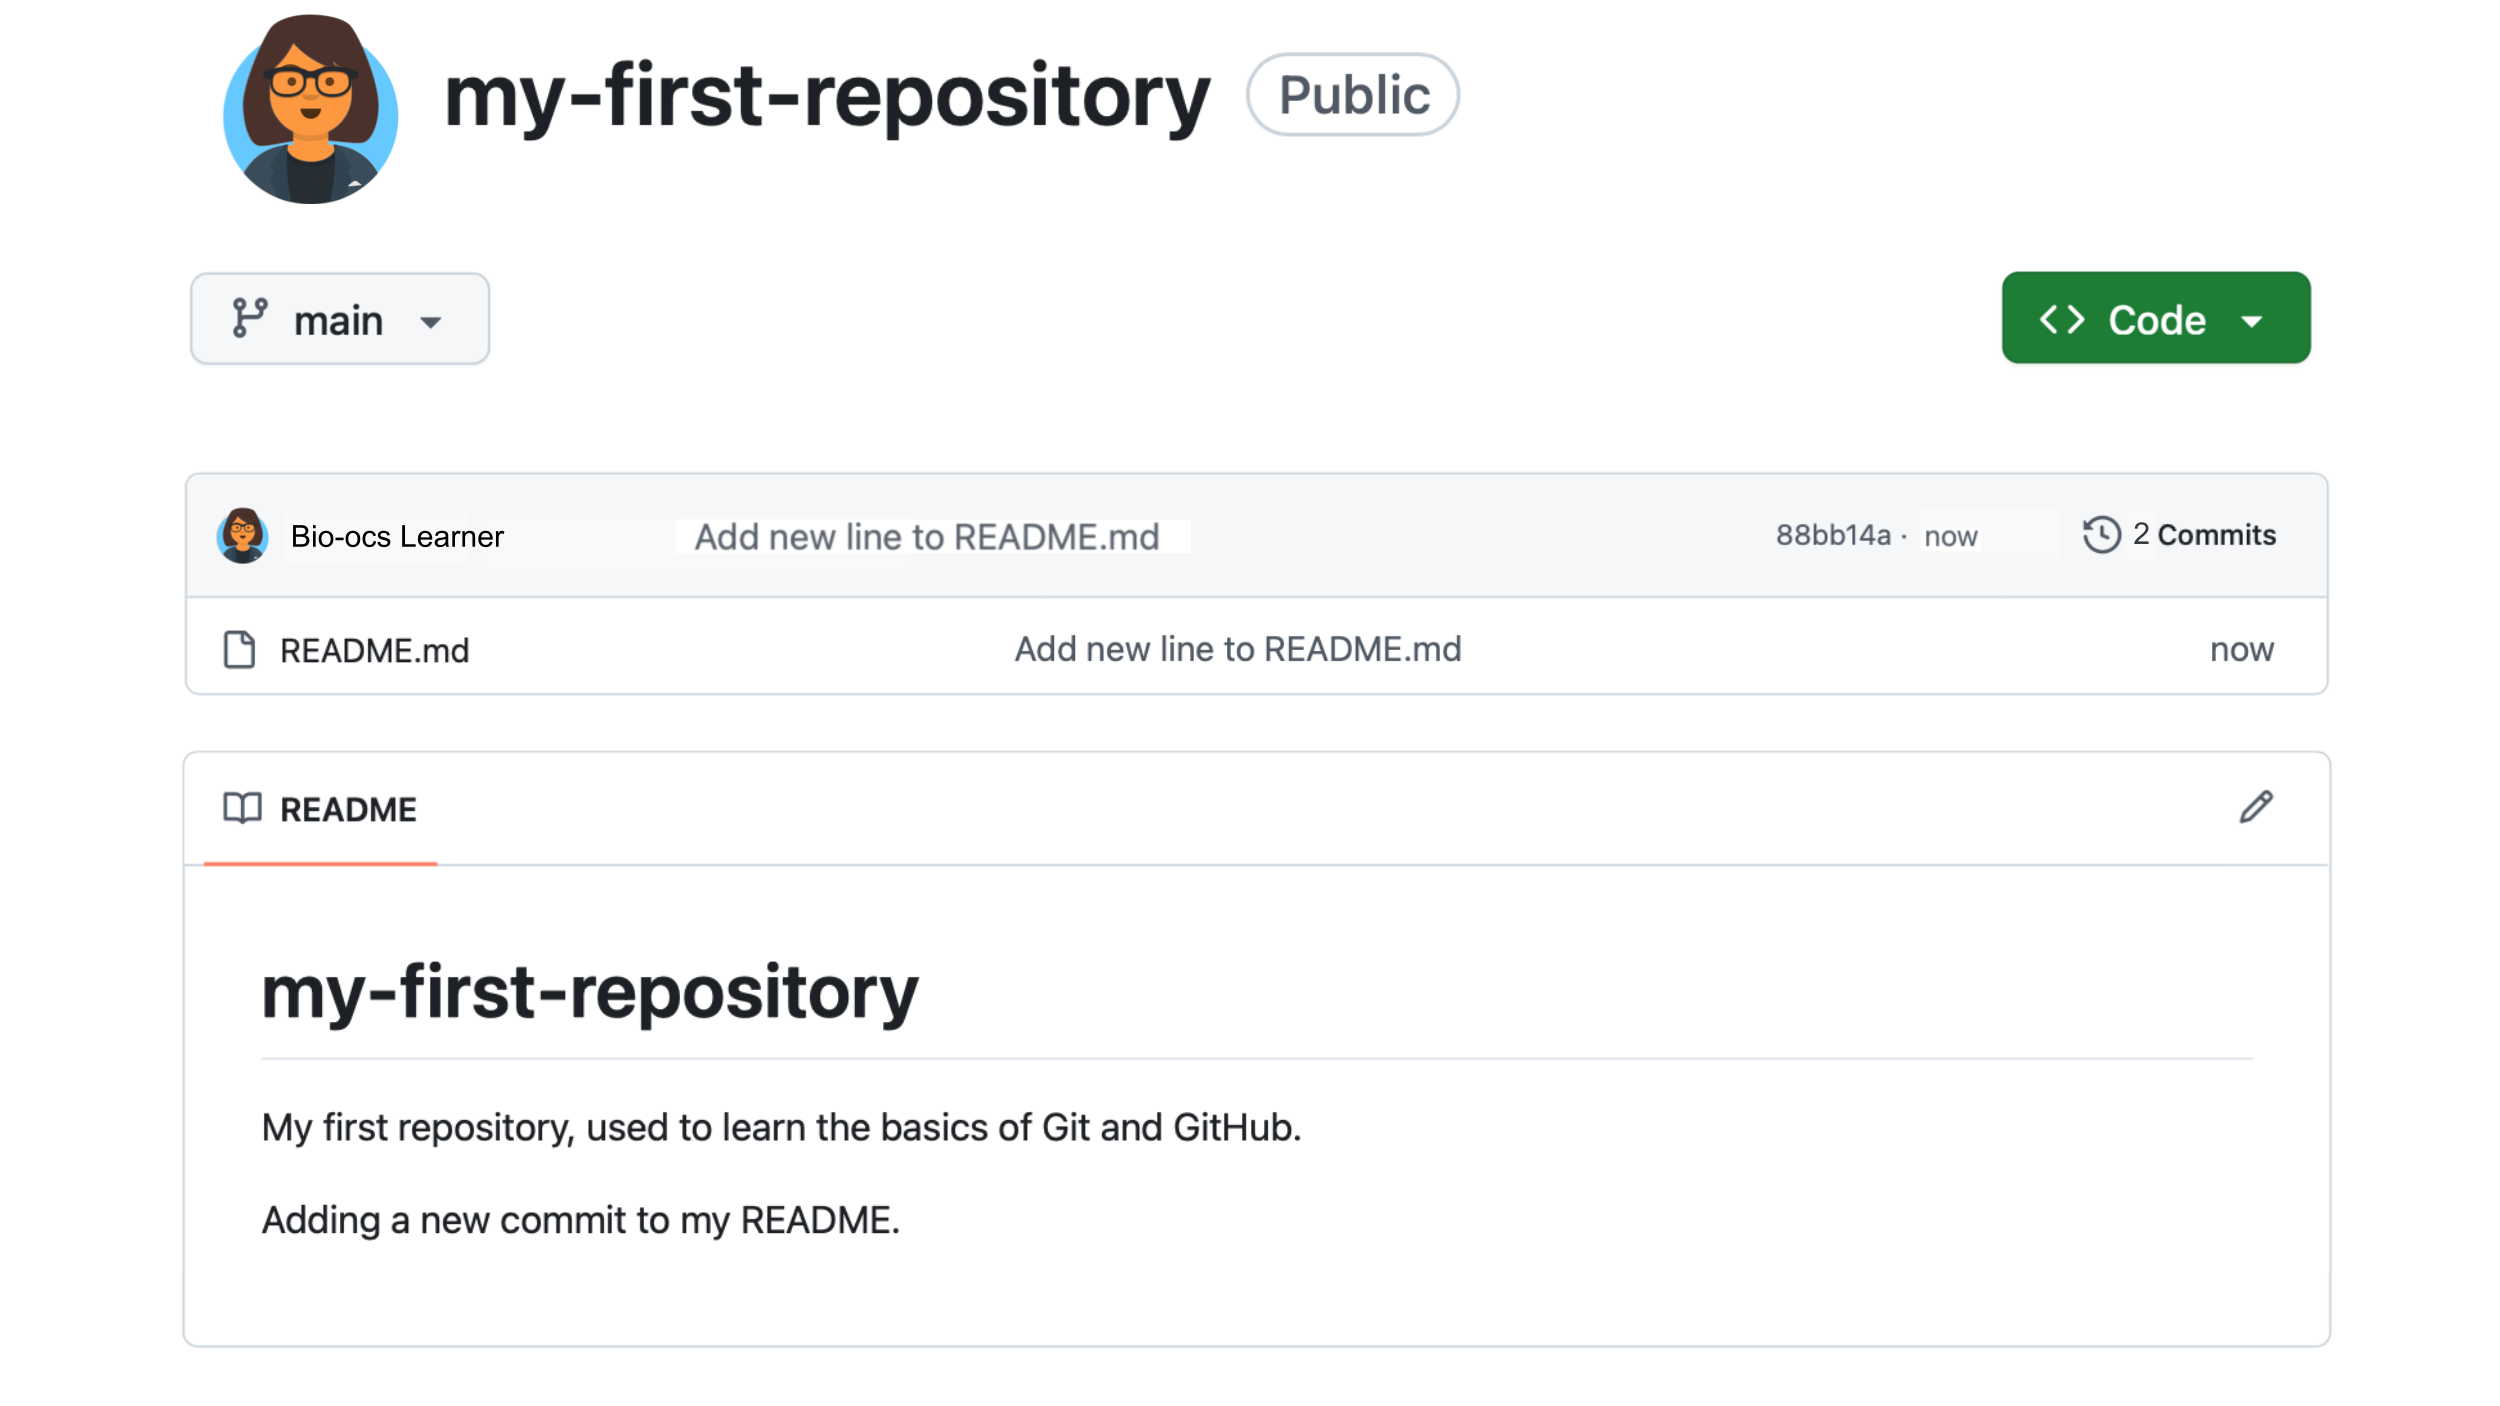
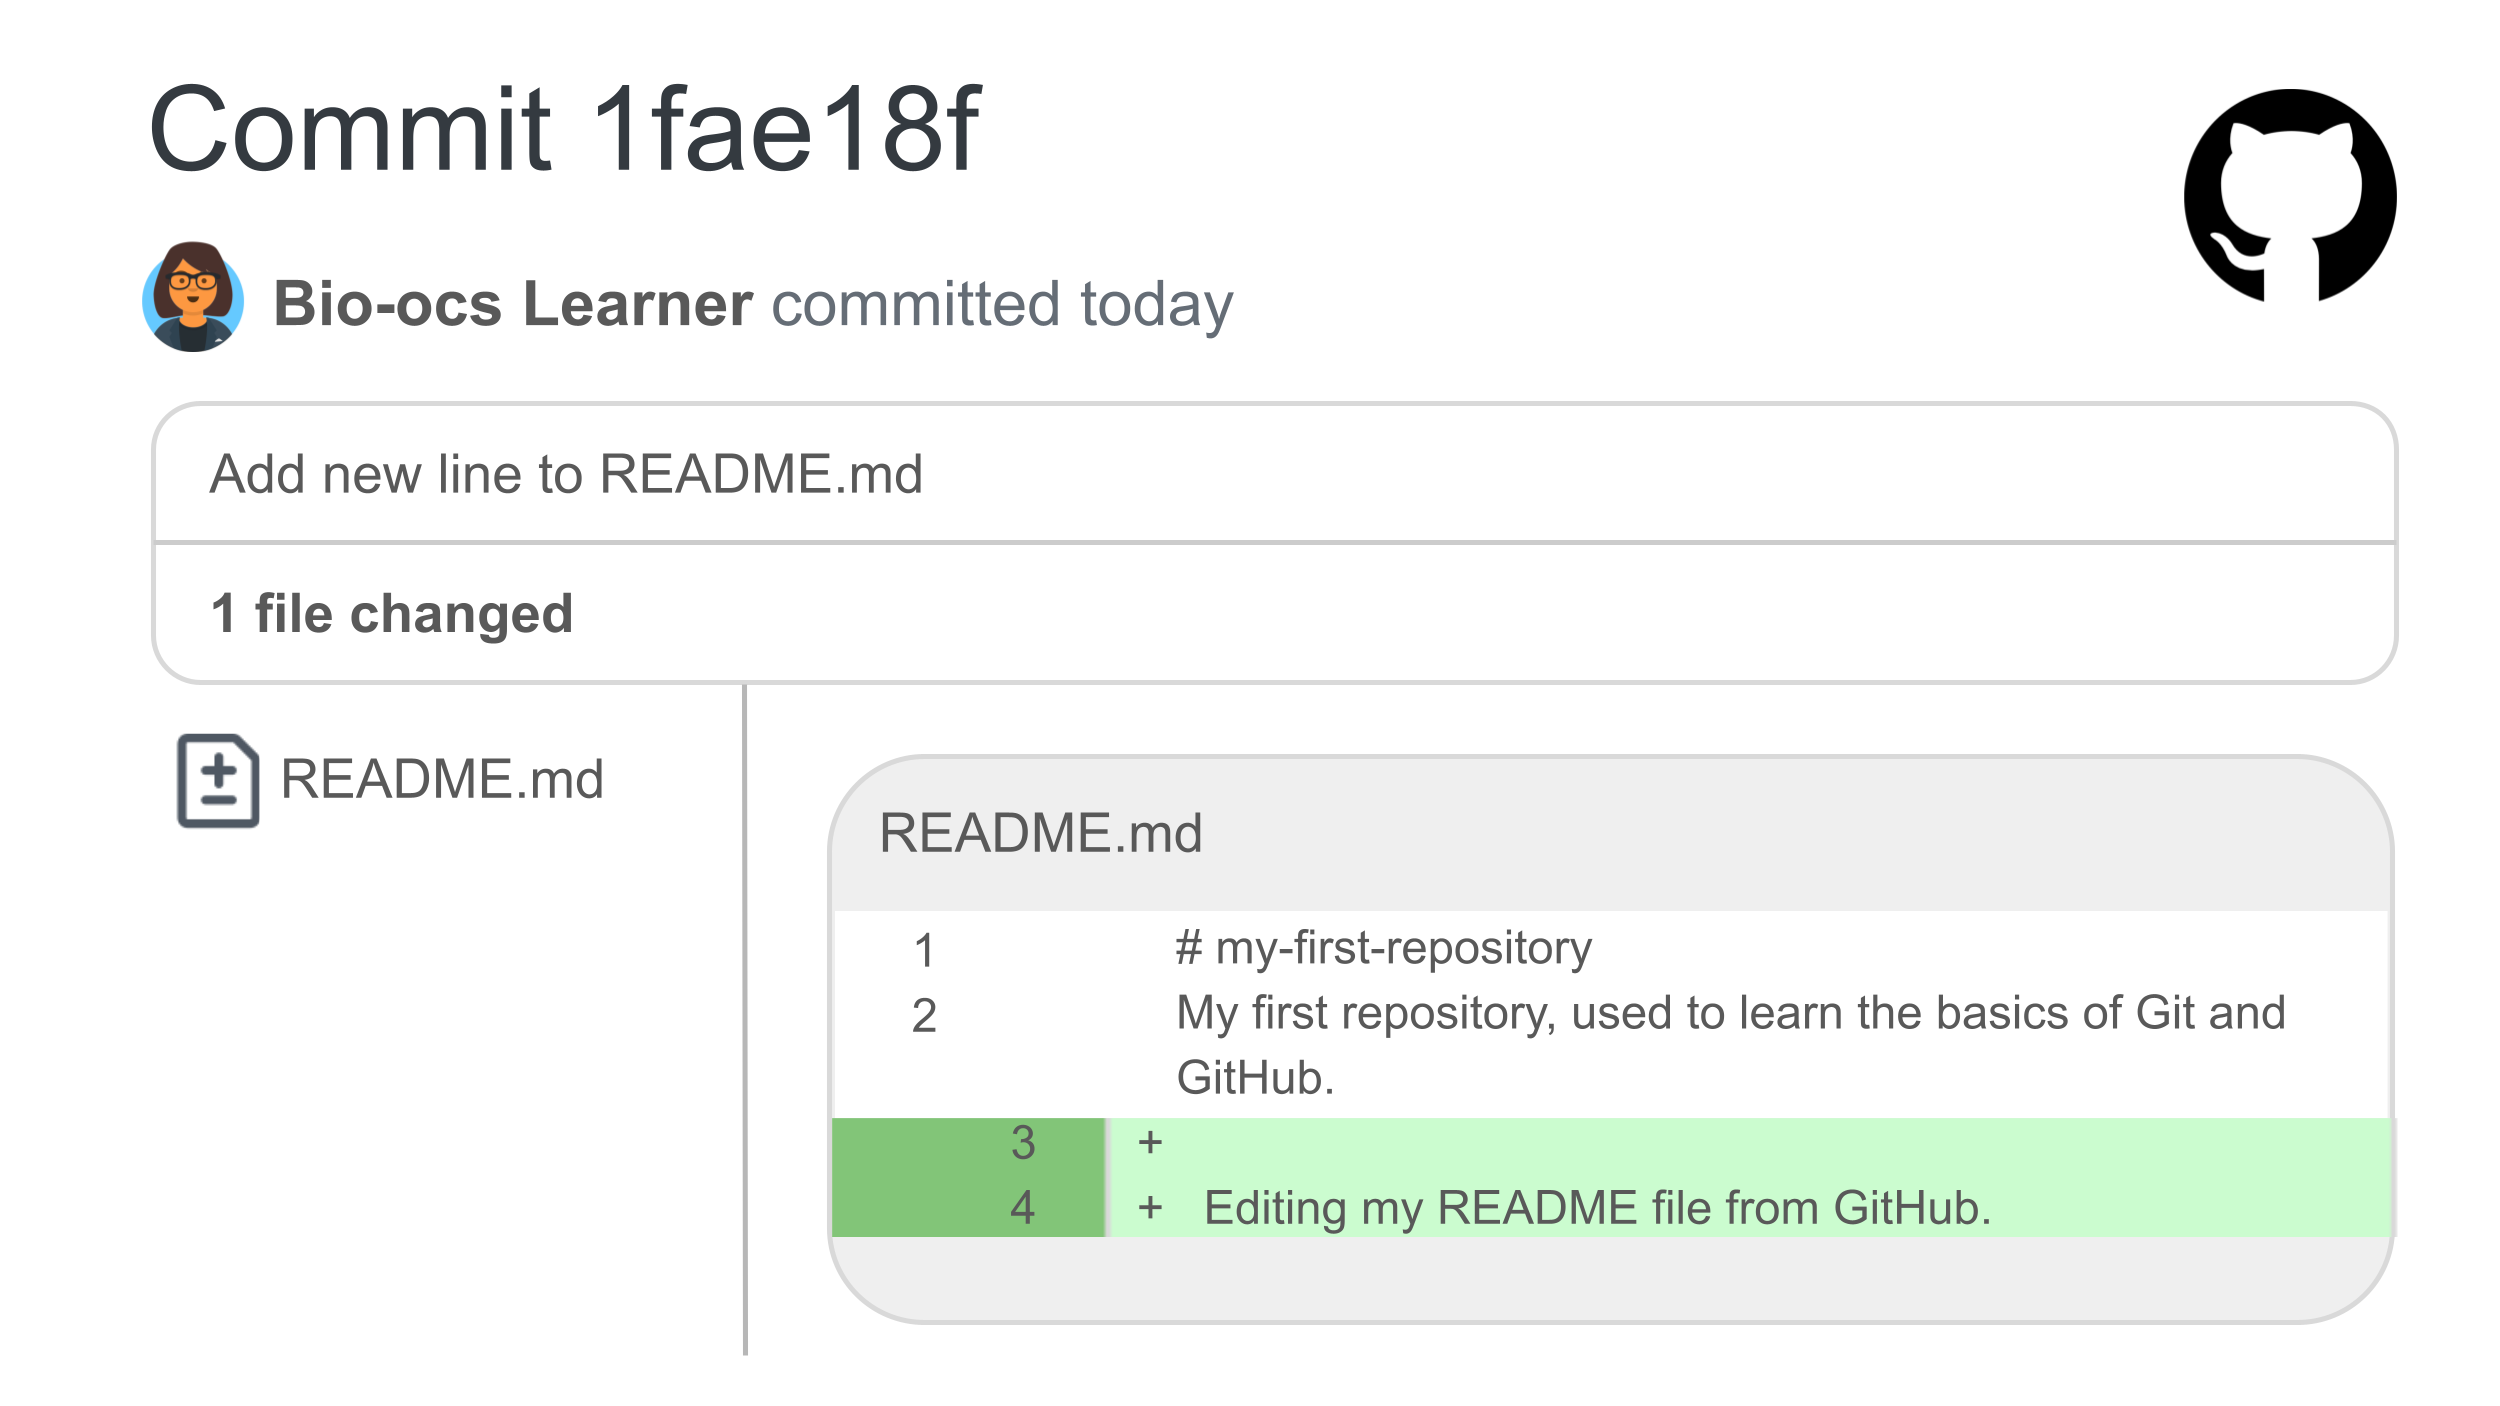
Let’s now look at the commit history for this repository:
This brings us to a list of commits for this repository. You should see two commits, the initial commit that created the repository and the one you just made when you edited the README.
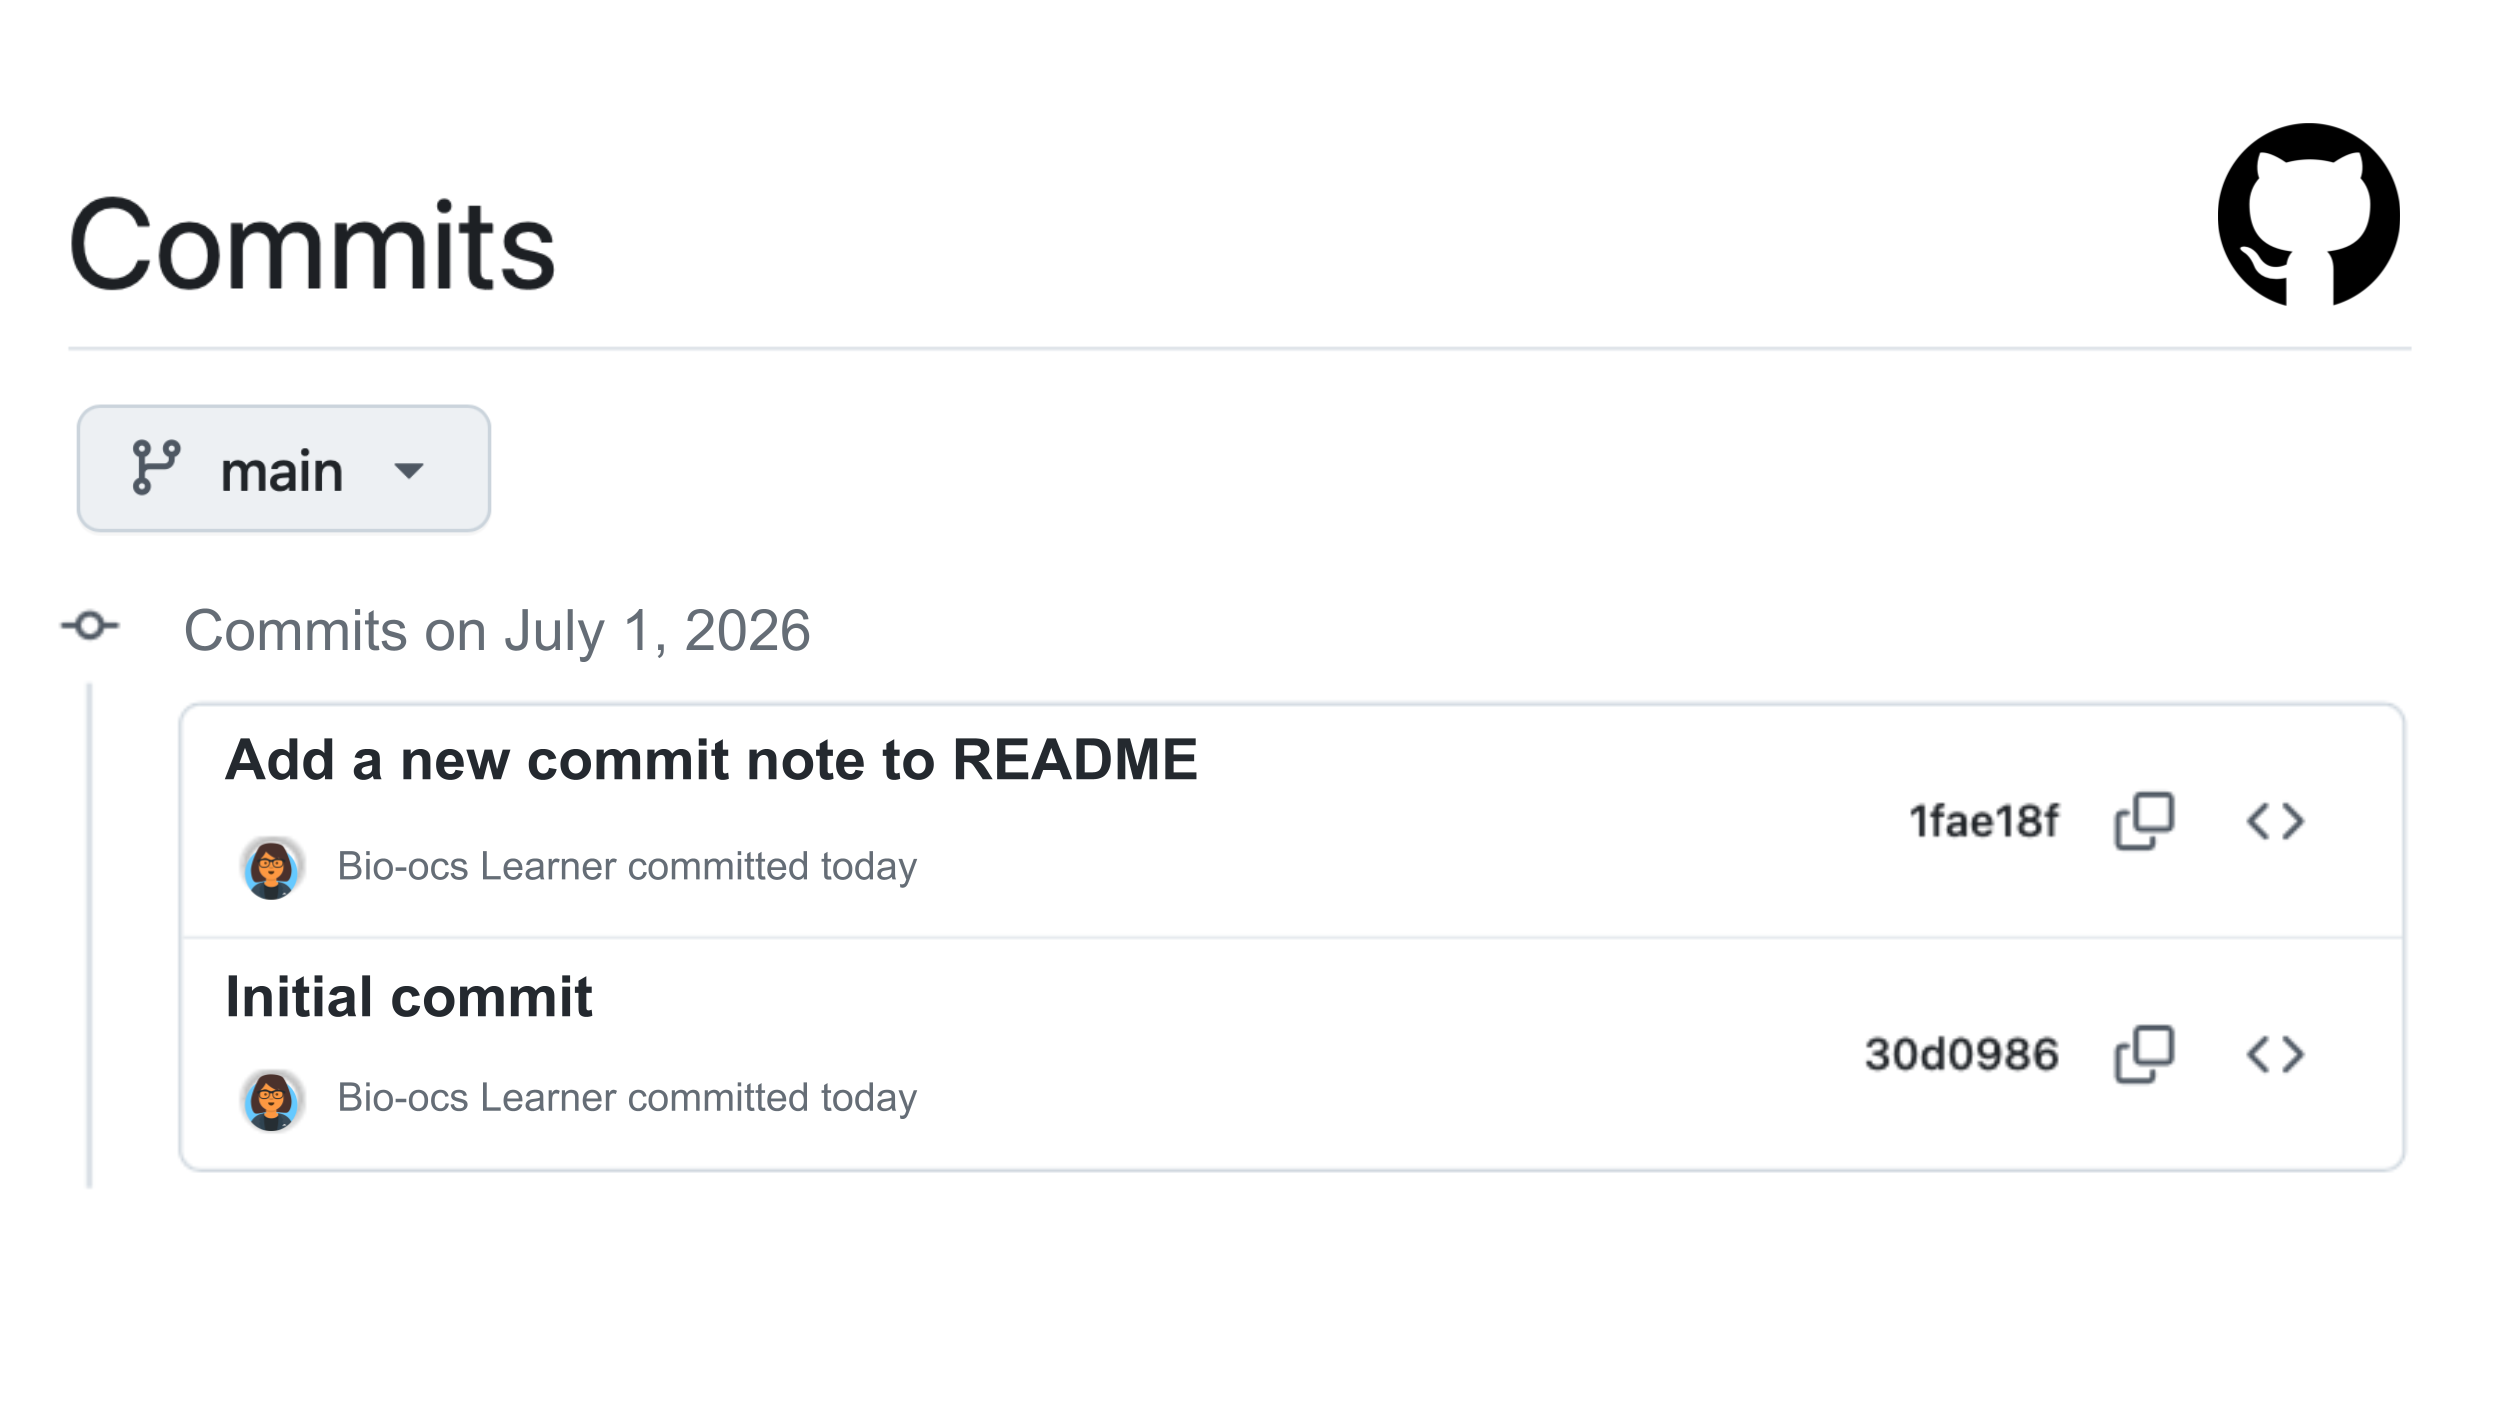
This will bring you to information about the commit. Each commit has an alphanumeric hash (set of letters and numbers), which uniquely identifies that commit. In this view, you can see each file that has been changed in your commit, as well as the changes to the files. Here, we can see with the plus signs that you’ve added a line to the README. This type of visual representation of a commit, in terms of the changes between files, can be helpful when you want to understand the history of a project.
GitHub issues: a convenient to-do list for your repository
One thing that you’ll see when looking at your new repository is a tab in the upper left corner (just above the repository name) that says “Issues”. Click on this “Issues” button.
An issue is a way to keep track of ideas, tasks to complete, errors to resolve, or anything else related to a GitHub repo (see how GitHub describes issues here). Issues are also a good place to collaborate. You can tag people with their GitHub usernames in an issue, which will let them know that you’d like to work together on this to-do. Multiple people can comment on an issue, so you can have a discussion about how to resolve the issue. The benefit of this over an email thread is that other collaborators can view the conversation, as well as other GitHub users who may want to know about the issue and resolution. Once an issue is considered resolved (for example, the task it mentions has been completed or the error it mentions has been fixed), then the issue can be closed. However, the GitHub repo will retain a searchable list of closed issues. Issues can also be referenced in pull requests (you will learn more in the pull request section), which lets you indicate which commits make changes that resolve a specific issue. When used frequently, issues can provide a helpful record of the development of a project.Installing GitHub Desktop
Next, we will move from interacting with GitHub to interacting with Git. First, we recommend that you install GitHub Desktop. This is a GUI (graphical user interface) that makes it easier for us to interact with Git locally. While we will use GitHub Desktop in this case study, another common way to interact with Git is through the on your computer. If you are already comfortable using the command line, you may prefer this to GitHub Desktop. When we use GitHub Desktop for version control tasks in this case study, we will also provide the command line code for all Git operations.
More information about the command line.
You may have also heard this called the shell, terminal, console, or command prompt. The command line lets us interact with our computers by typing commands (as opposed to using a graphical user interface (GUI) which involves clicking buttons and menus). These commands let you perform tasks such as navigating and modifying your file system, installing programs, running code, and working with Git. Each of these tasks can also be performed using a graphical interface. Some people prefer the visual layout of a GUI, while others prefer the simplicity and centralized control of the command line.
Follow this link to install GitHub Desktop.
If you are using a Mac, it will ask you if your Mac has an Apple silicon or Intel chip. Click here for more information.
To check whether your Mac has an Apple silicon chip or an Intel chip:
If the information window shows “Chip” then your Mac uses Apple silicon. If the information window shows “Processor” then your Mac uses an Intel processor.
Installing Git
If you have successfully installed GitHub Desktop, then Git is already installed on your system and no further installation is required.
If you are unable to install GitHub Desktop or would prefer not to install GitHub Desktop, you can install Git using the command line. Click here for more information.
First, we will see if Git is installed on your computer, and install it if not. We will start by opening the command line.
Open the application called Terminal. You can find this by using Spotlight Search and searching for Terminal.
Open the application called Command Prompt. You can find this by using the Start menu and searching for Command Prompt. You could instead use the PowerShell by searching for PowerShell instead.
Open the application called Terminal. You can find it by using your system’s application menu and searching for Terminal.
In the command line, type:
git versionIf the output tells you which version of Git is installed, then you already have Git. For example, if Git is already installed, the output may look like:
git version 2.50.1If you see a message like “git: command not found” or “git is not recognized” or a prompt to install something, then Git is not installed and you’ll need to install it.
To install Git, follow these instructions:
Connecting Git to GitHub
If you have GitHub Desktop installed, we can use it to authenticate your GitHub account with Git. We could also do this with the command line, but GitHub Desktop makes it easier.
When you open GitHub Desktop, it will prompt you to sign into GitHub. If it does not, then follow these instructions, choosing instructions for Mac or Windows based on your operating system.
Next, we will configure Git. This means that you will tell Git your name and email.
First we will tell Git your name and email address. Open the command line and enter the following:
git config --global user.name "Your name here"
git config --global user.email "Your email here"
git config --global --list
The third line should print your name and email correctly.
Next, you need to connect your GitHub account to your local Git.
GitHub no longer supports using passwords to connect Git and GitHub, so you’ll instead need to use a Personal Access Token (PAT). To create a token, click this link to go to your settings for tokens. In order to connect your token to your computer do the following:
Now, open the command line and run the following:
git config --global credential.helper osxkeychaingit config --global credential.helper managerIf available, run:
git config --global credential.helper managerIf that does not work, use:
git config --global credential.helper cacheThis tells Git to remember the login credentials that we will provide so you won’t need to enter them each time.
Next, we need to trigger a GitHub credentials check. We will the repository that you made. See this section if you still need to make the repository. Run the following, replacing “your_username” with your username:
git clone https://github.com/your_username/my-first-repository.git Running this command should prompt you to give a username and password. Use your GitHub username, and the PAT you just generated as the password (do not use your GitHub password). Git will now store these credentials so you won’t need to enter them again. Eventually your PAT will expire. When this happens (you’ll get a notification about this when you try to use Git), you will need to generate a new PAT (following the steps to generate a token above), and replace the old one. You can do this by first running the following command to remove the outdated PAT:
printf "protocol=https\nhost=github.com\n" | git credential-osxkeychain erasegit credential-manager erase https://github.comIf available, run:
git credential-manager erase https://github.comIf that does not work, use:
printf "protocol=https\nhost=github.com\n" | git credential rejectThen, run the Git action that you were trying to do again. You should then be prompted to provide a PAT, and can provide the new one that you created.
Creating a local clone of your GitHub repository
You’ve finished setting up GitHub, Git, and GitHub Desktop, great job! Now, we will the remote repository you made on GitHub to make a copy on your computer (this will be your local repository).
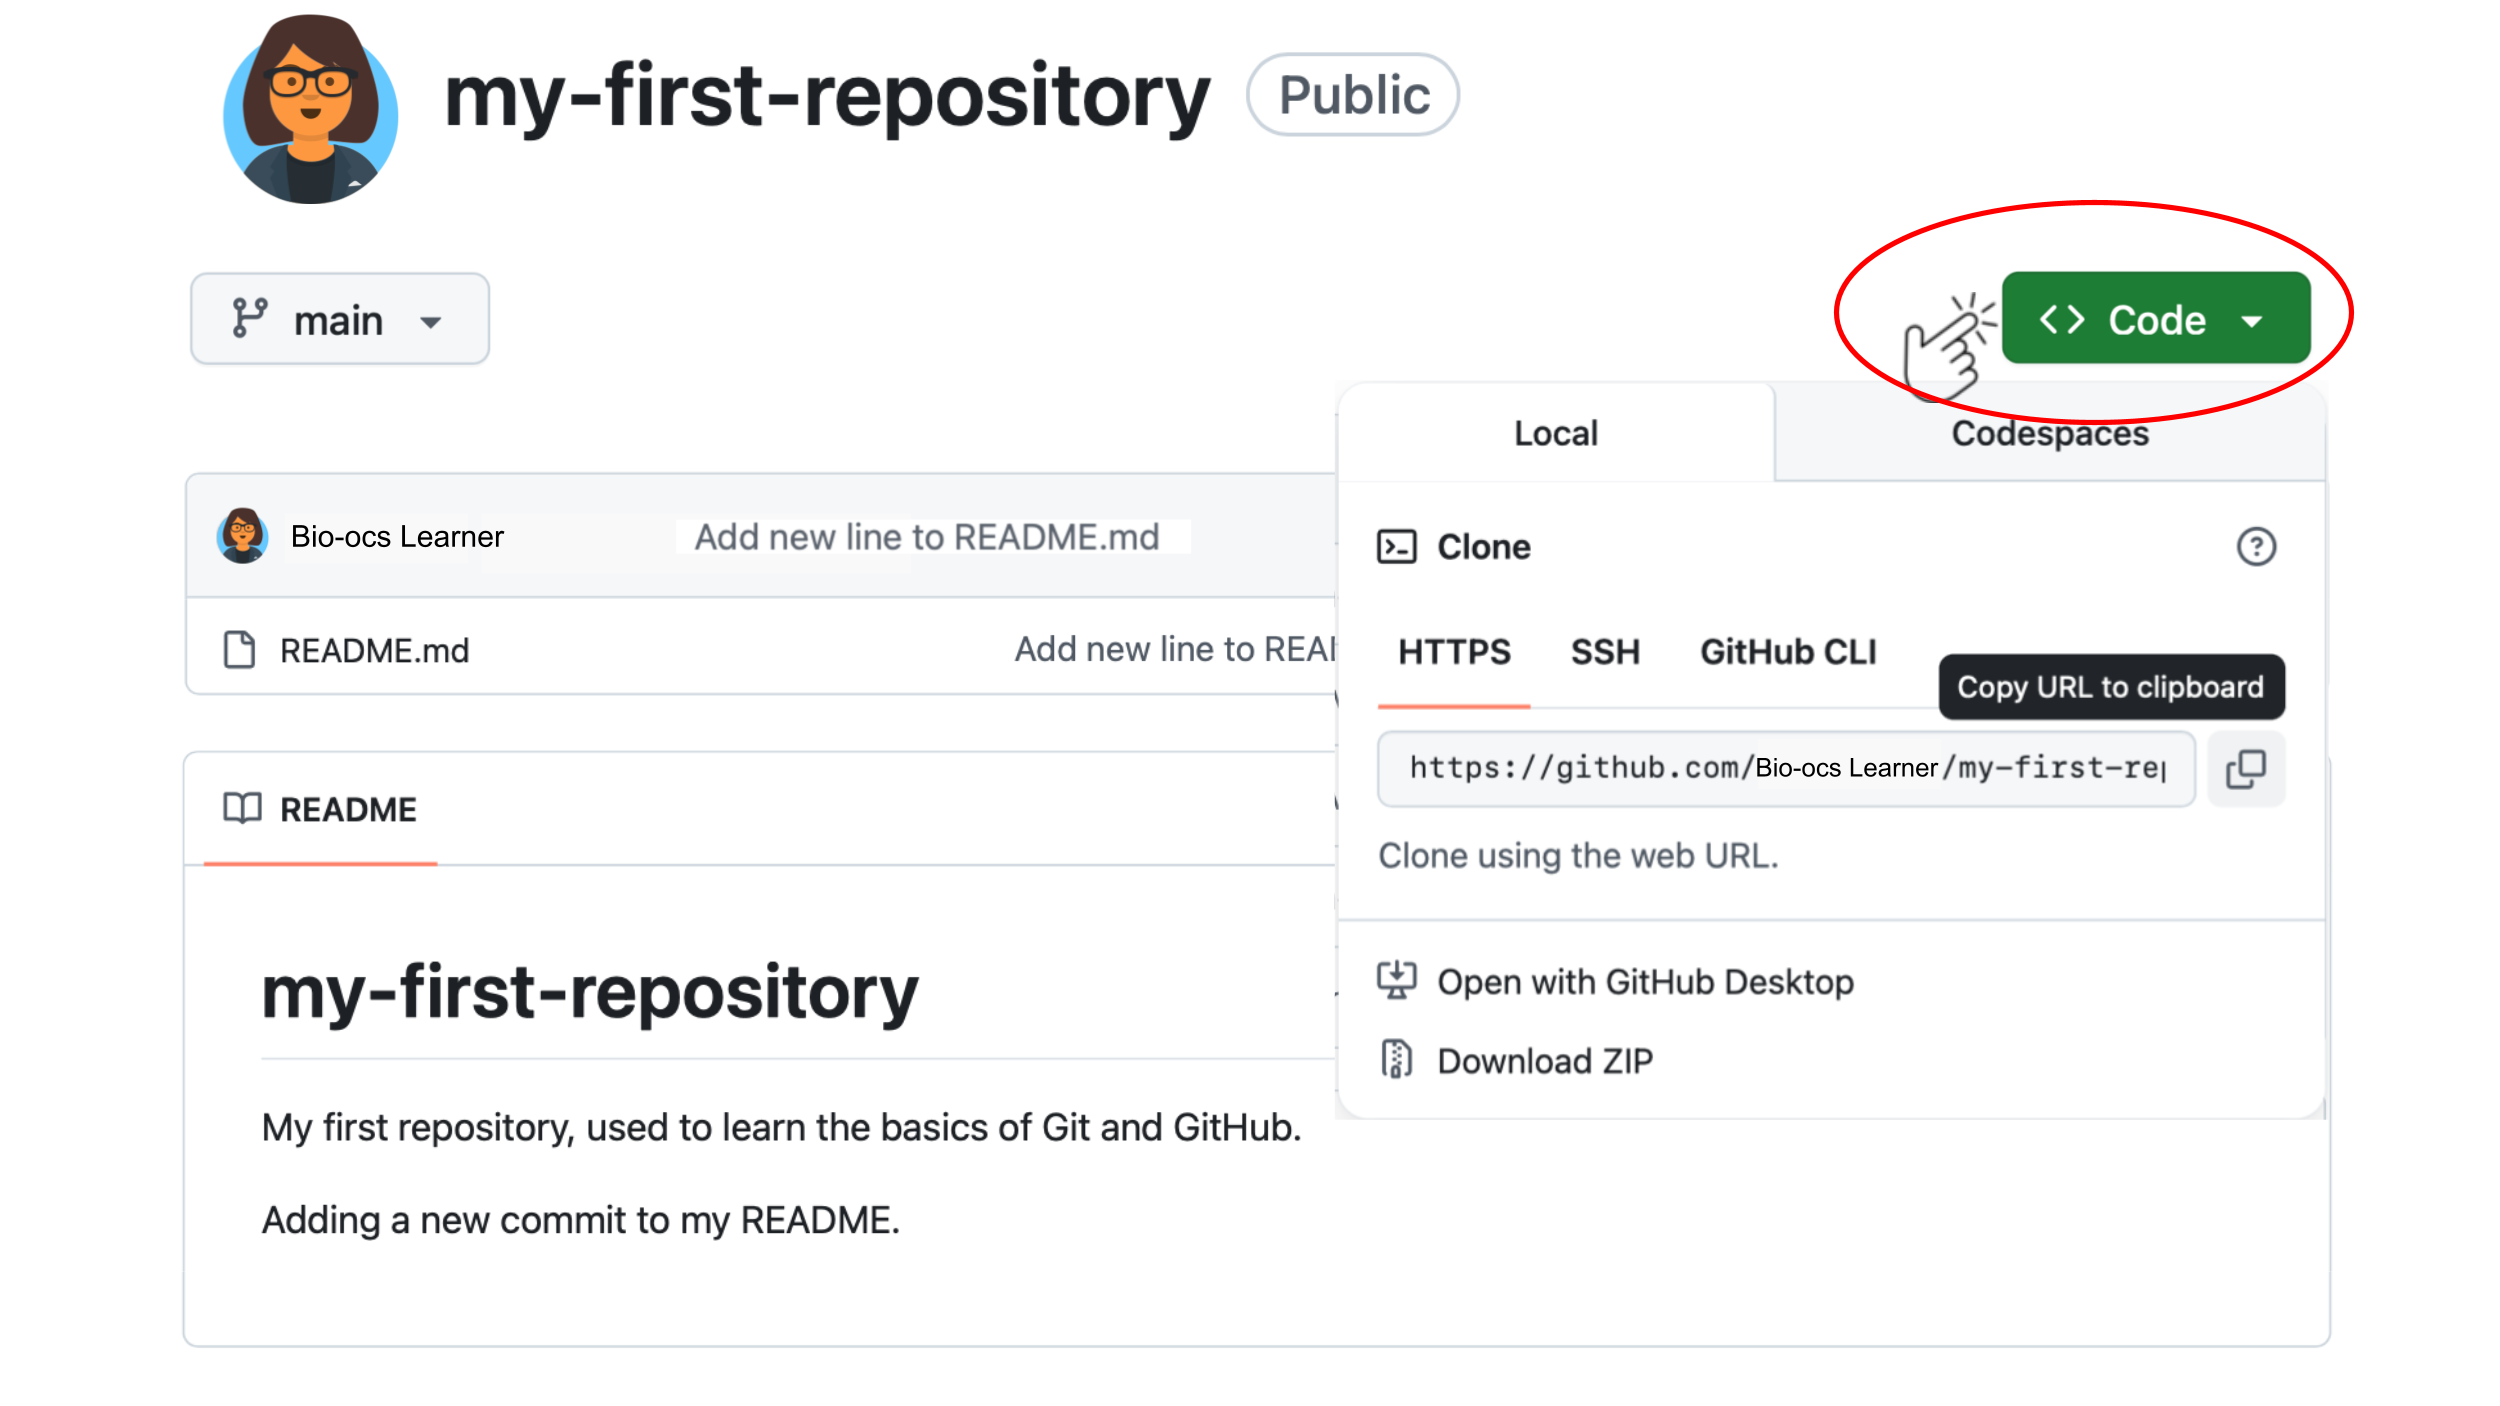
From GitHub Desktop:
Now, you should be able to see a window in GitHub Desktop that corresponds with my-first-repository. If you click on history, you can see a list of commits to this repository.
You were already asked to clone this repository in the last section, in order to trigger Git’s login credentials. If you haven’t done that, open the command line and enter the following, replacing “your_username” with your username:
git clone https://github.com/your_username/my-first-repository.git You will know that this has worked if you see the following output:
Cloning into 'my-first-repository'...Next, you will open the local repository. RStudio and Positron have different approaches to opening folders.
The easiest way to work with a Git-tracked repository in RStudio is to make an RStudio project. A project is a folder that R can open as a self-contained unit. The most useful part of an RStudio project is that you can use relative file paths; the folder that you used to create the project will be the root of any relative file path. Using relative file paths for a project, as opposed to absolute file paths that are specific to your personal computer, make it easier to collaborate with other people.
In order to open your Git-tracked repository as an RStudio project, do the following:
Once you select the correct folder, RStudio will open the project. If you look at the “Files” panel, you’ll see the README that you made for my-first-repository on GitHub. You will additionally see a file called my-first-repository.Rproj. This file is automatically made by RStudio when opening a new project, and saves information about the project.
In Positron, do the following:
Once you select the correct folder, Positron will open it. In the file explorer, you will be able to see the README that you made for my-first-repository on GitHub.
If you are using another R IDE besides RStudio or Positron, you should look up instructions for opening a folder in your environment.
Stage, commit, push
Next, we will create a new file locally.
x <- 103
y <- 5
x * yNow, we will discuss how to track a new file with Git.
Now, navigate back to GitHub Desktop. Where it previously said “no local changes”, it now will show changes to your repository. You should see your new file name 01-calculations.R with a green plus next to it.
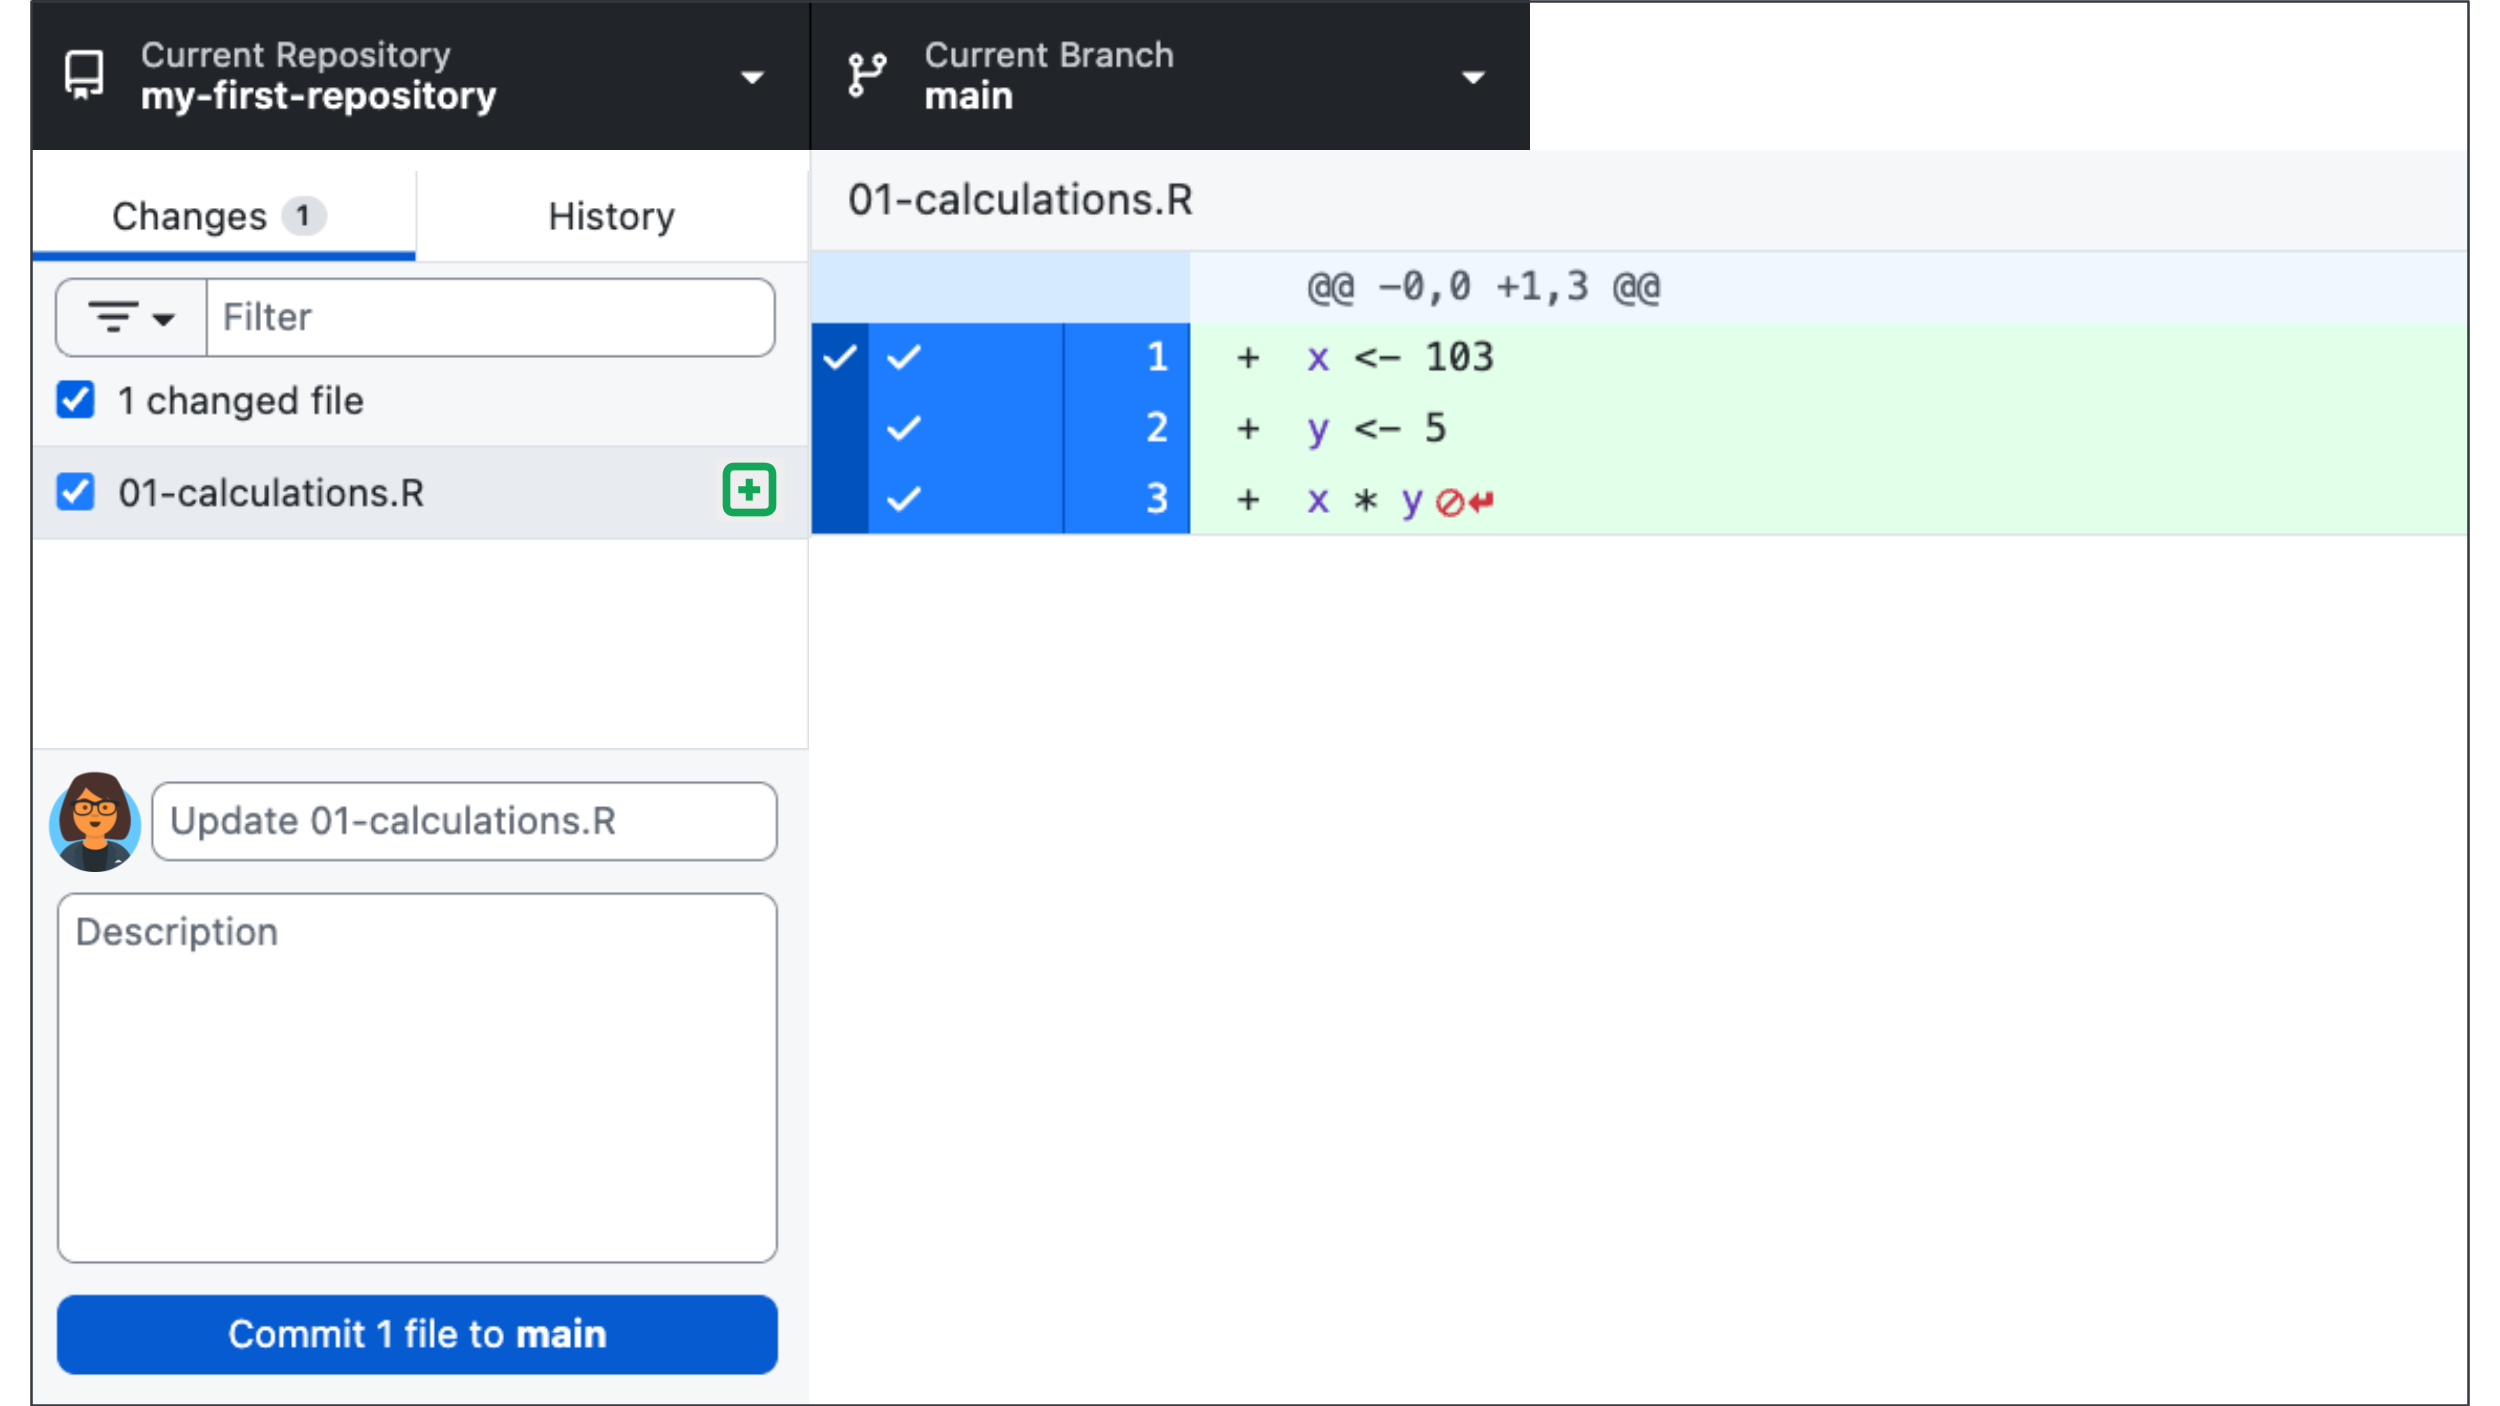
If you are using RStudio, you will likely see additional added files here.
When you created a RStudio project, RStudio automatically created amy-first-repository.Rproj file to manage the project, and a .gitignore file to avoid tracking several hidden files that manage the project. Because these files were added, they are now included in the changed files that you see in GitHub Desktop. It is typically recommended to track your .Rproj and .gitignore files with Git.
By default, the box next to added or updated files is checked. This means that each of these files are , or ready to be included in a commit and added to the repository history. If you uncheck the box, you are telling Git that for now you would not like to track that file with version control. If you would like to tell Git to never track files, you should add them to a .gitignore file.
In the lower left corner you will see a box that says “Summary (required)” and “Description”. This is where you will put your commit message.
Once you’ve added the commit message, you are ready to commit these files.
Now these changes have been entered into the version control history of your repository in Git.
We have one more step to update the GitHub repository, which is to these files to GitHub. This is the step that transfers local changes to the remote repository. Once you commit you will see a box in GitHub Desktop that says “Push commits to the origin remote”.
You should now see the file that you added locally, as well the commit message.
Open the command line, navigate to the folder that contains your repository, and enter the following:
cd my-first-repositoryThis will move you into the repository folder. Next, enter:
git statusThis will list untracked files, which are files that Git is not keeping track of.
If you are using RStudio, you will likely see additional added files here.
When you created a RStudio project, RStudio automatically created amy-first-repository.Rproj file to manage the project, and a .gitignore file to avoid tracking several hidden files that manage the project. Because these files were added, they are now included in the changed files that you see in GitHub Desktop. It is typically recommended to track your .Rproj and .gitignore files with Git.
In order to tell Git to start tracking files, we need to the files for version control. We do this with the git add command:
git add 01-calculations.RIf you are using RStudio, you can also track the additional files that have been created.
git add my-first-repository.Rproj .gitignoreNext, we will commit the staged files (remember, this is similar to creating a snapshot of these files, or to creating a save point in a video game). The command git commit -m "..." commits the staged files and the flag -m adds a commit messages.
For this commit, you might use the summary “Add new file ‘01-calculations.R’ to do calculations.”
git commit -m "Add new file '01-calculations.R' to do calculations."We have one more step to update the GitHub repository, which is to these files to GitHub. This is the final step that updates the GitHub repository to include the changes that we made locally. To push, enter:
git push Now, open your project in GitHub. You should now see the new file that you made locally, as well the commit message.
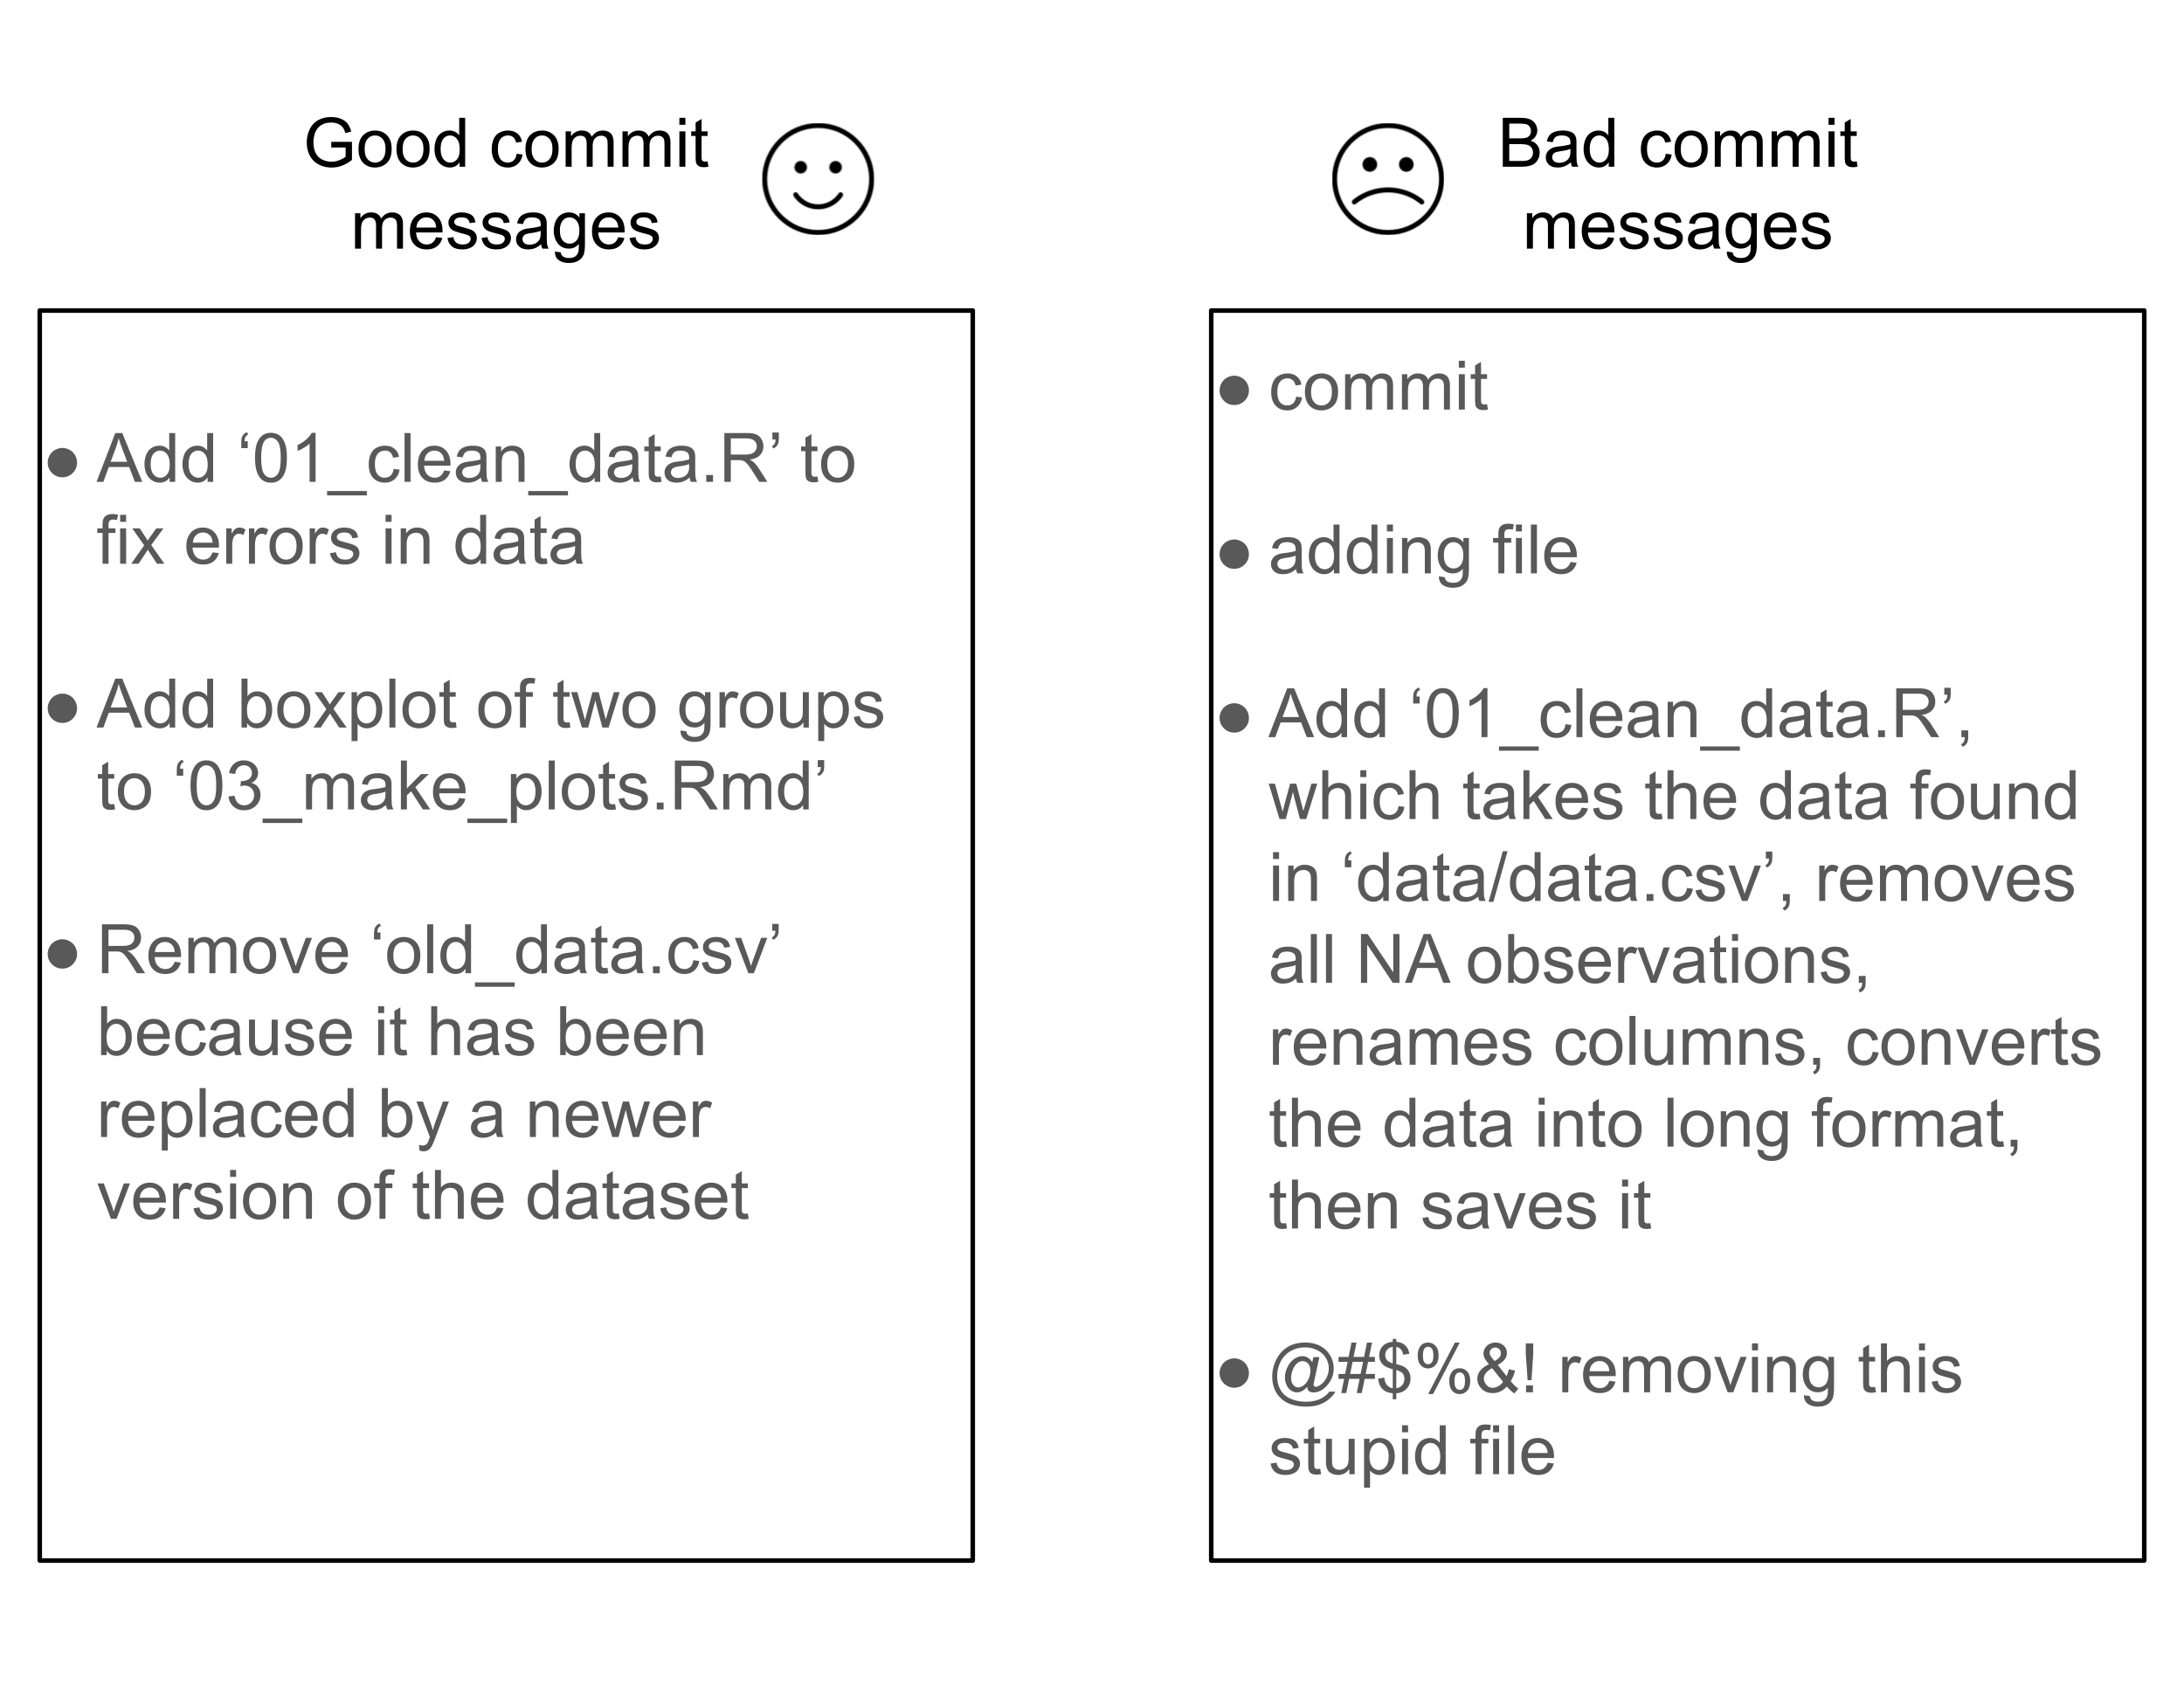
A few pieces of advice to consider for your commit messages:
- A commit message should be informative. Think of a collaborator (or yourself in a few months) reading the commit message. It should tell the reader why you’ve made this commit. Did you add a file? Did you fix a bug in the code? Did you remove an outdated data file? Your commit history, when maintained thoughtfully, can provide a record of why you made changes throughout a project.
- A commit message should be concise. Avoid adding too many unnecessary details here. The reader can always look at the differences in files for the commit to see exactly what you’ve done.
- In a public repository, the commit message will be visible to anyone and exist as long as the repository does. Make sure that your message is appropriate and you’d be comfortable with colleagues seeing it.
Question opportunity
What makes each of these bad commit messages bad, and how might you improve them?
For more tips on writing commit messages, check out this article.
Pulling updates from GitHub
You’ve learned how to make updates locally, and stage, commit, and push these changes so that the GitHub repository includes those updates. Next, we will changes that have been made on GitHub. While pushing sends updates from a local repository to the remote repository on GitHub, pulling sends updates from the remote GitHub repository to your local repository. To practice pulling, we’re going to make another change and commit from GitHub, and then pull that commit into our local repository. We’ll follow the same steps to make a change and commit on GitHub:
Now, return to GitHub Desktop. Do the following:
If you return to RStudio or Positron and open README.md, you will now see the update that you made on GitHub.
Open the command line, navigate to the folder that contains your repository, and enter the following:
git pullIf you return to RStudio or Positron and open README.md, you will now see the update that you made on GitHub.
What you’ve done
In this section you have made a GitHub account, installed Git and GitHub Desktop, configured Git and GitHub to be connected so they can receive updates from each other, and made your first repository. You’ve learned how to make changes to the remote on GitHub and transfer them to the local repository on your computer, as well as do the opposite.
In a typical GitHub workflow, you will rarely be making changes online from the github.com website. Instead, you will often be working with one or multiple collaborators on a repository. Once your collaborator makes changes locally, they can push those changes to GitHub, and then you can pull those changes to your local copy of the repository. This process will continue cyclically while you collaboratively work on a project. Note that this is a simplified system where you take turns to make changes, in practice you can work on the project at the same time (using branches which will be discussed later in the branches section).
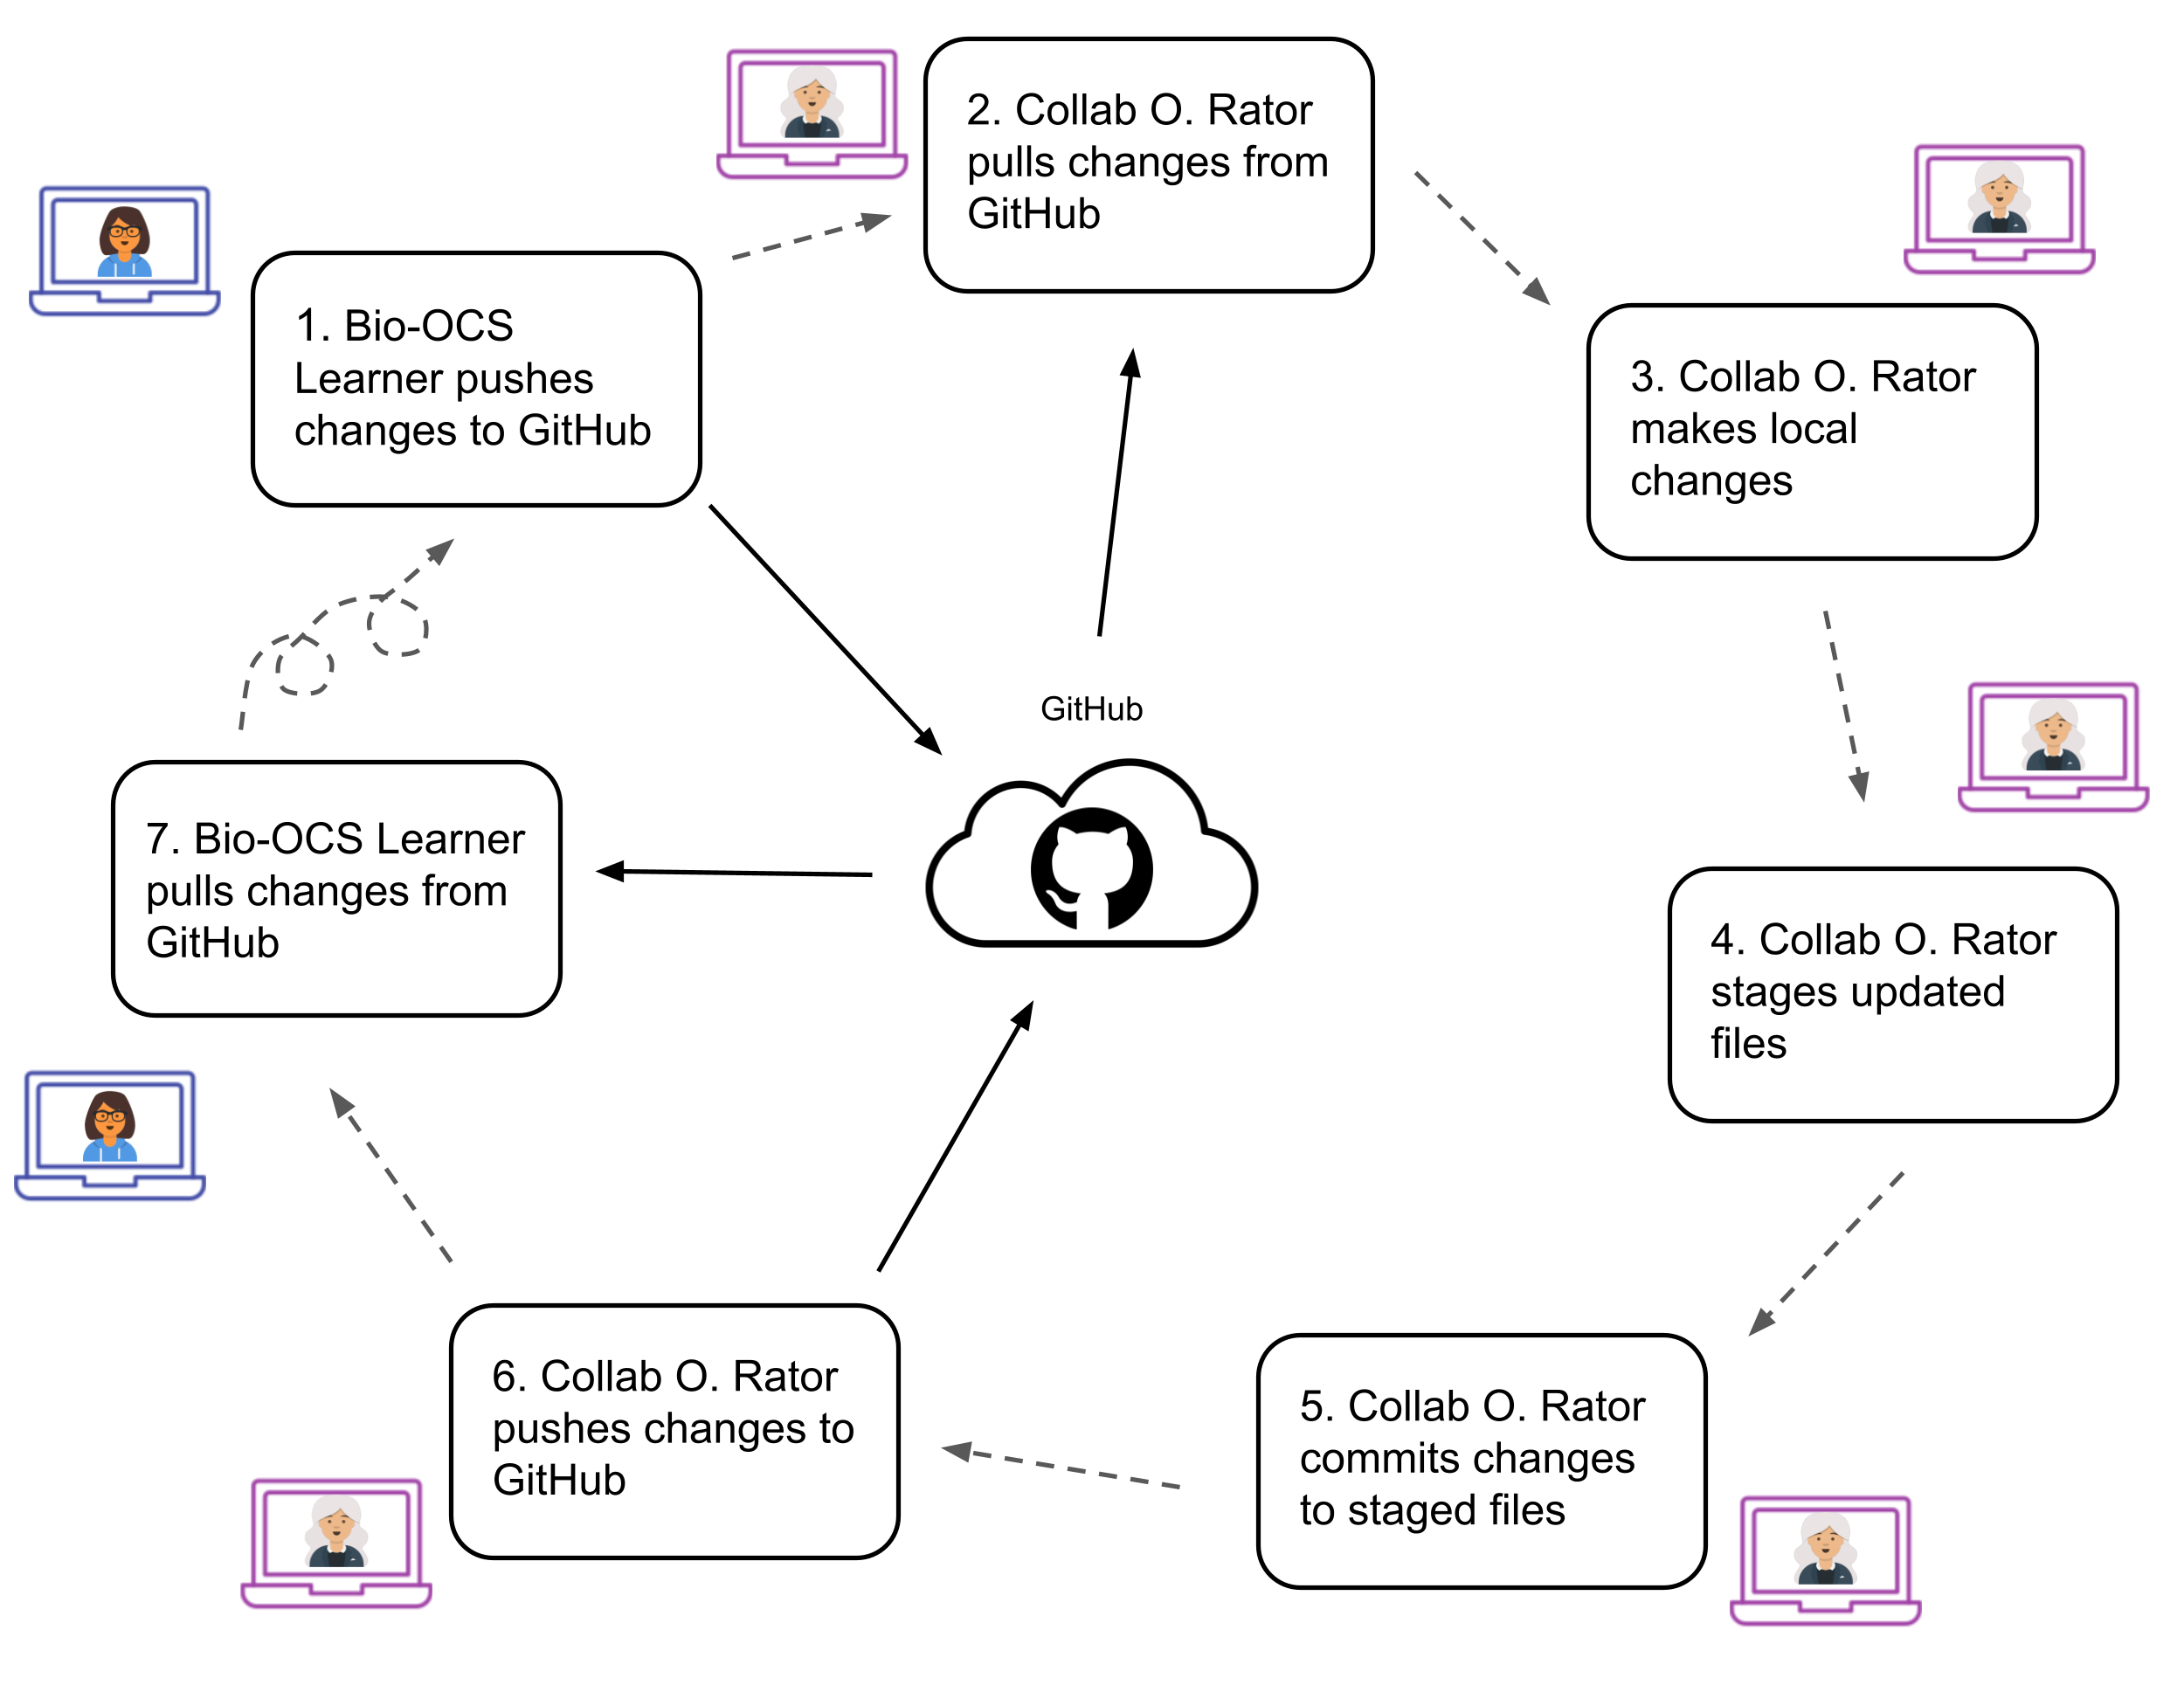
Create a version controlled repository for your project
Now, we will return to the project with Collab. O. Rator. In the previous section, you created a repository on GitHub, and then cloned it to make a local copy. Here, you will practice the other approach for creating a new version-controlled repository. You will start with a local folder, track it with Git, and then create a remote version of the repository on GitHub.
First, we need to download the project files, and set them up in a folder on your computer.
Next, we will make this folder into a Git repository.
Now, go to GitHub Desktop and do the following:
Great work, you have successfully turned your folder into a local Git repository! Next, we will need to make a remote repository on GitHub. GitHub Desktop makes this easy for us.
Clicking this will bring you to the new GitHub repo that you just made for this project!
Open the command line, navigate to the folder infant_gut_analysis (wherever you saved it on your computer), and enter the following:
git init -b mainThis command tells Git to create a Git repository in the current folder. Don’t worry about understanding the -b main part of the command for now, we will discuss it in a later section about branches.
If you look into your folder you will not see any changes. However, this command creates a hidden .git folder within the current folder, which contains the files that are needed to start tracking this folder with Git.
Now we will stage and commit files.
First, check which files are currently untracked or modified with git status.
git statusWhen you run git status, look for files listed under “Untracked files” (new files not yet tracked) or “Changes not staged for commit” (modified files that have not yet been added). You can then choose which files to stage. In this repo, because the data is small and publicly available, we will stage and commit the data folders. If this is not the case for your data, you should avoid tracking the data folders and files with version control. Note that when you stage a folder (like raw_data), you stage all files within it.
git add README.md 01_pull_study_data.R 02_wrangle_data.R \
  processed_data raw_data
git commit -m "track all files for infant gut project"
In the git add command above, we stage all scripts (.R files) and data. We do not stage the figures and results folders for now because Git will not version control empty folders. Once we add figures and results to these folders, we can then stage them (if we want to include these outputs in our version controlled repository).
Note on staging all files in a repository
You may see examples in other Git tutorials usinggit add ., which stages all files in the current directory. While convenient, you should use this with caution, as it can unintentionally include files you do not want to track, such as large data files, sensitive data, or auxiliary files generated by your computer (e.g., .Rproj.user, .DS_Store). While this can be avoided by adding all of these files to your .gitignore file, it is generally safer to add individual files and folders to your git add command when you’d like to stage them.
Next, you will need to create an empty repository on GitHub.
Now, return to the command line and enter (replacing the URL below with the URL that you just copied):
git remote add origin https://github.com/your_username/infant_gut_analysis.gitNow, we’ll push the files that we have locally to the remote repository on GitHub. Use the following command:
git push -u origin mainSince this is the first time pushing to the remote repository, we need the -u flag to tell Git to remember where to send our changes. The argument origin refers to the remote GitHub repository (that we set in the previous command), and main refers to the default version of the repository.
We would like to include a .gitignore file and license for this project. The easiest way to do this will be on GitHub, using existing templates. While the .gitignore template that we will use lists many files that won’t actually be included in your project, there is no harm in including additional files in a .gitignore file that don’t exist in the repository.
Now, you’ve added the .gitignore and license on GitHub, but we do not have them in the local repository. Our final step is them into our local repository. Open the command line again and type:
git pullTo check that we now have these files locally, run ls -a to list all files in the repository (using -a to include files that are typically hidden, such as .gitignore).
ls -a Open this repository in RStudio or Positron
Finally, we will open this repository with RStudio or Positron.
In order to open your Git-tracked repository as an RStudio project:
Once you select the correct folder, RStudio will open the project.
When you use RStudio to open a project, a .Rproj file will automatically be added to your repository. You can version control this file as well.
Return to GitHub Desktop. You should see the new file infant_gut_analysis.Rproj in the list of changed files.
Open the command line and enter the following:
git add infant_gut_analysis.Rproj
git commit -m "Add .Rproj file to repository"
git push
In Positron, do the following:
Once you select the correct folder, Positron will open it.
If you are using another R IDE besides RStudio or Positron, you should look up instructions for opening a folder in your environment, and follow these to open infant_gut_analysis.
Branches
One useful feature of Git is the ability to make branches. A branch is a history of commits, and by default a repository that is tracked by Git starts with the main branch. Multiple branches provide parallel versions of the repository that can be developed separately. For example, you may have a version of your analysis and results in the main branch, but you want to experiment with changing a parameter. You could do this in a separate branch. This would let you work on the experimental version of your analysis while also having a stable version of your analysis elsewhere. You can switch between branches depending on what version of the analysis you want to work with on a given day. If you eventually decide that you want to move forward with the changed parameter, you can merge your experimental branch back into your main branch.
Merge
Integrating changes from one branch into another branch.
Here is an example of a workflow, in which a Git user makes a plotting branch from the main branch, adds commits to both branches, and then eventually merges the plotting branch back into main. Click through the tabs from left to right to follow the branching process.
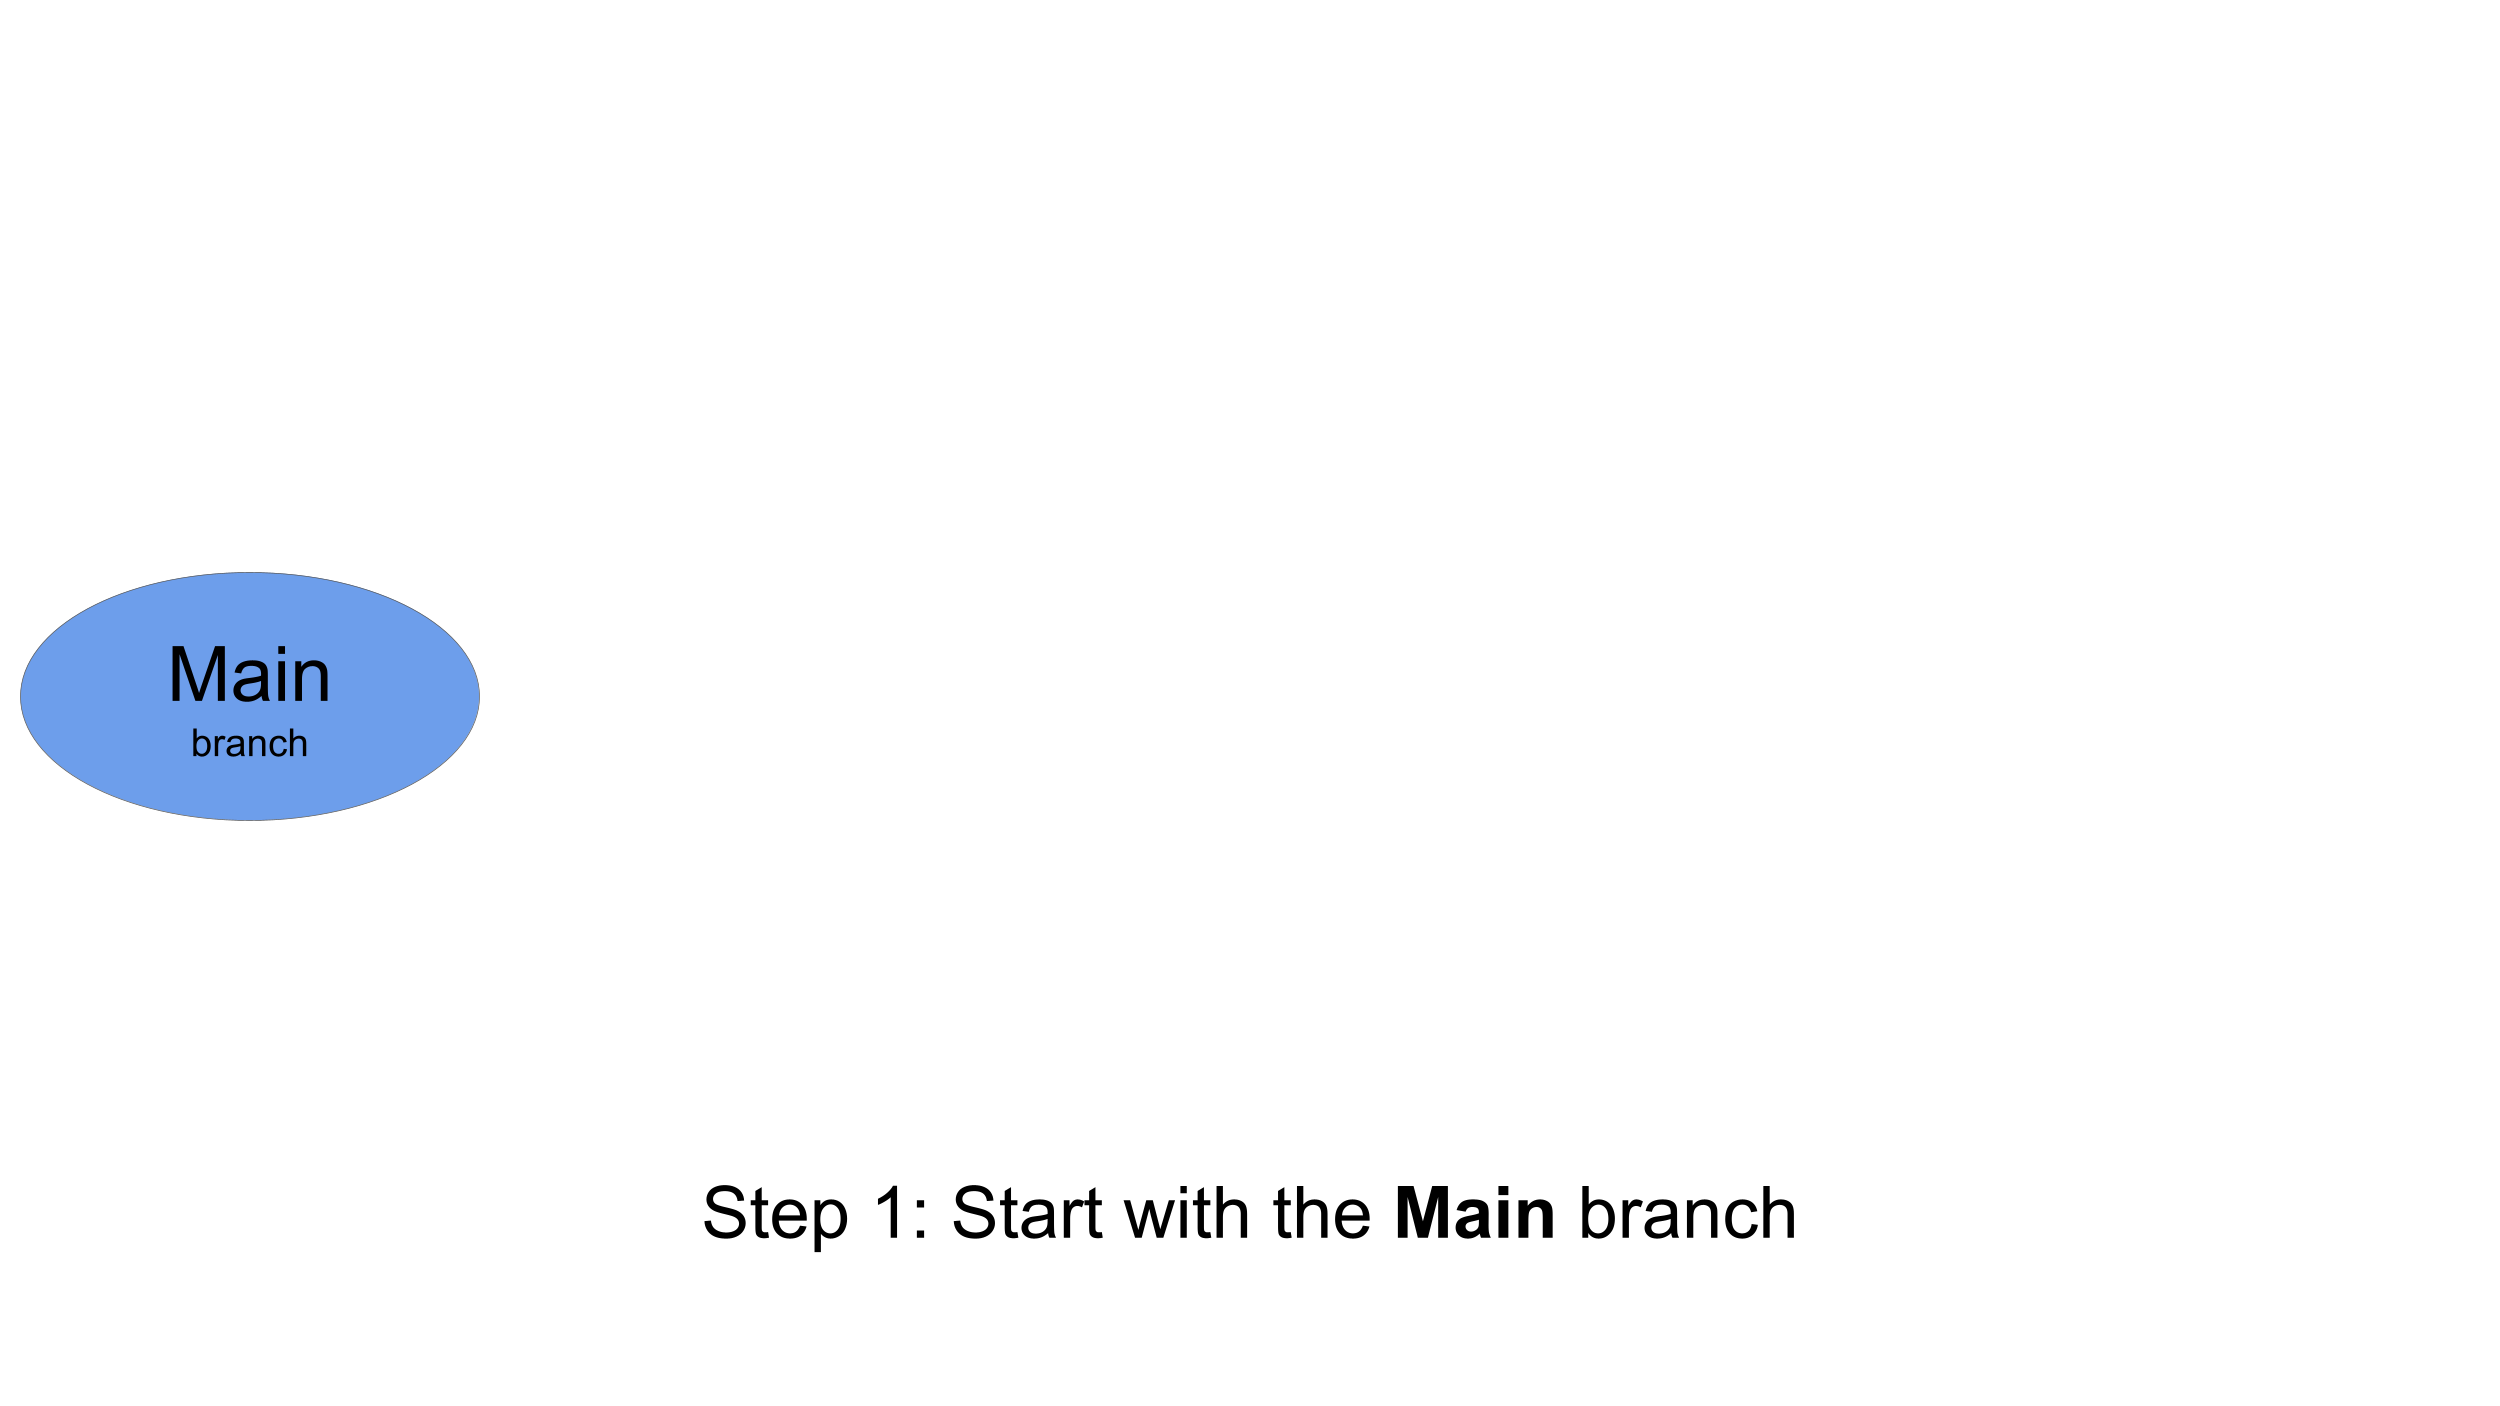
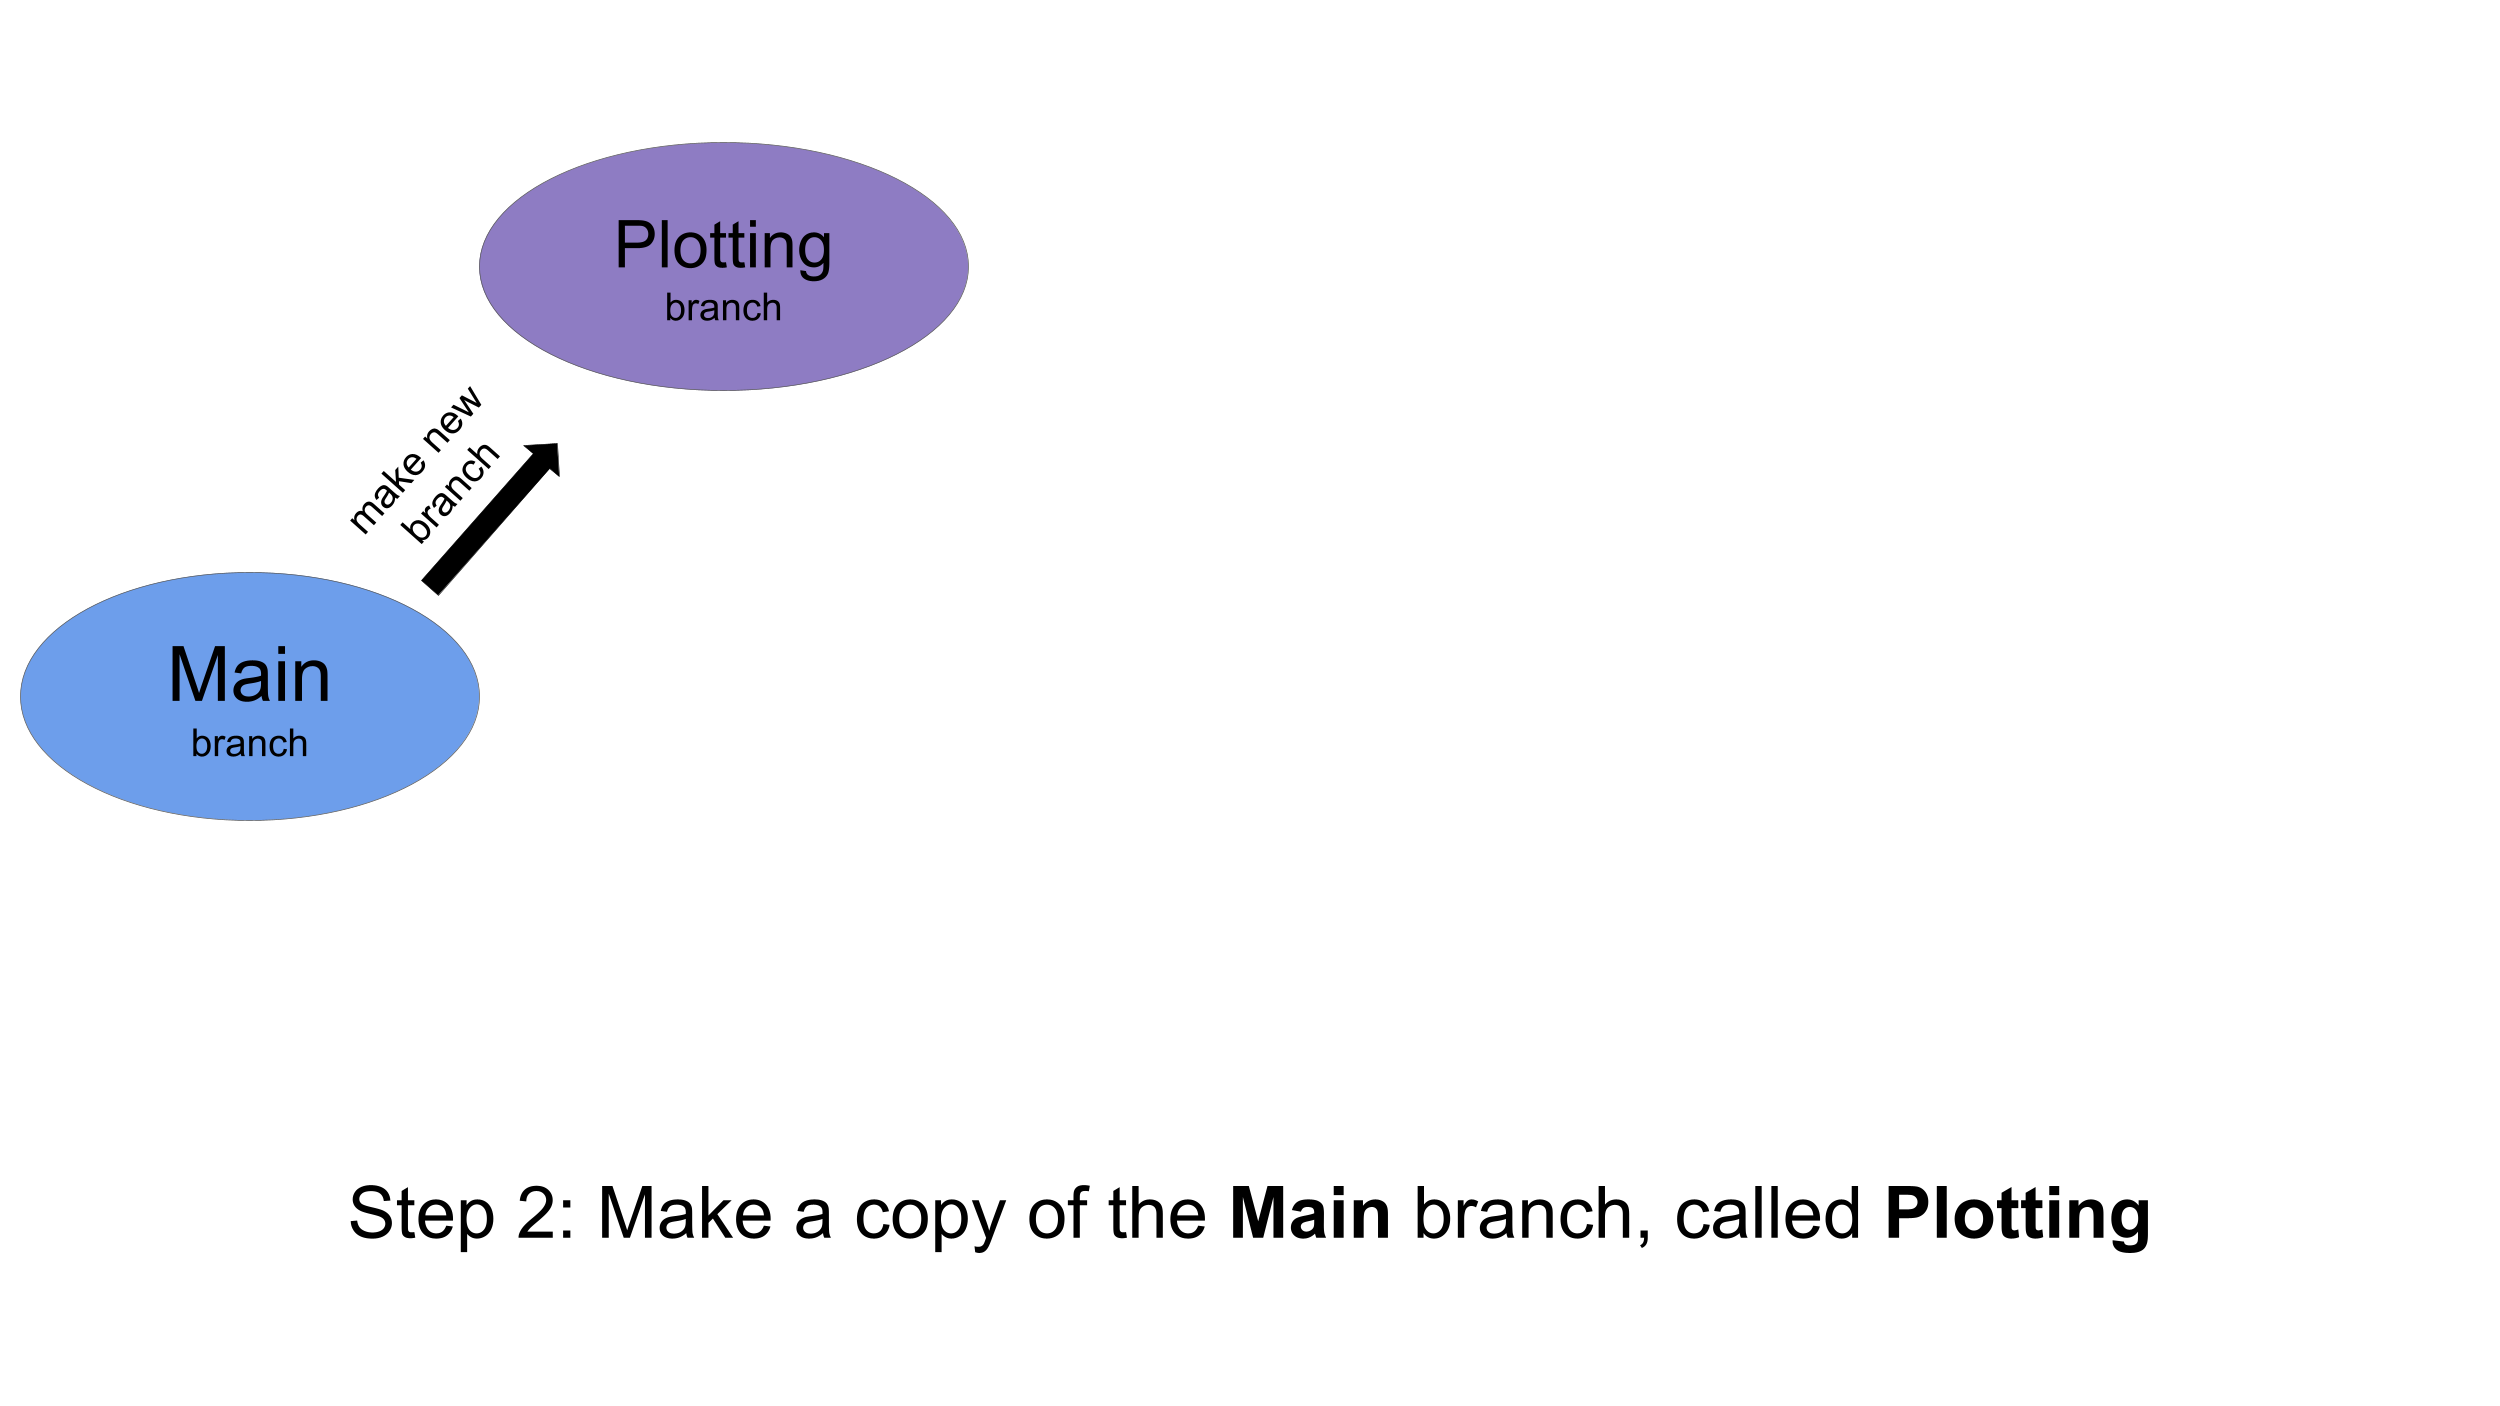
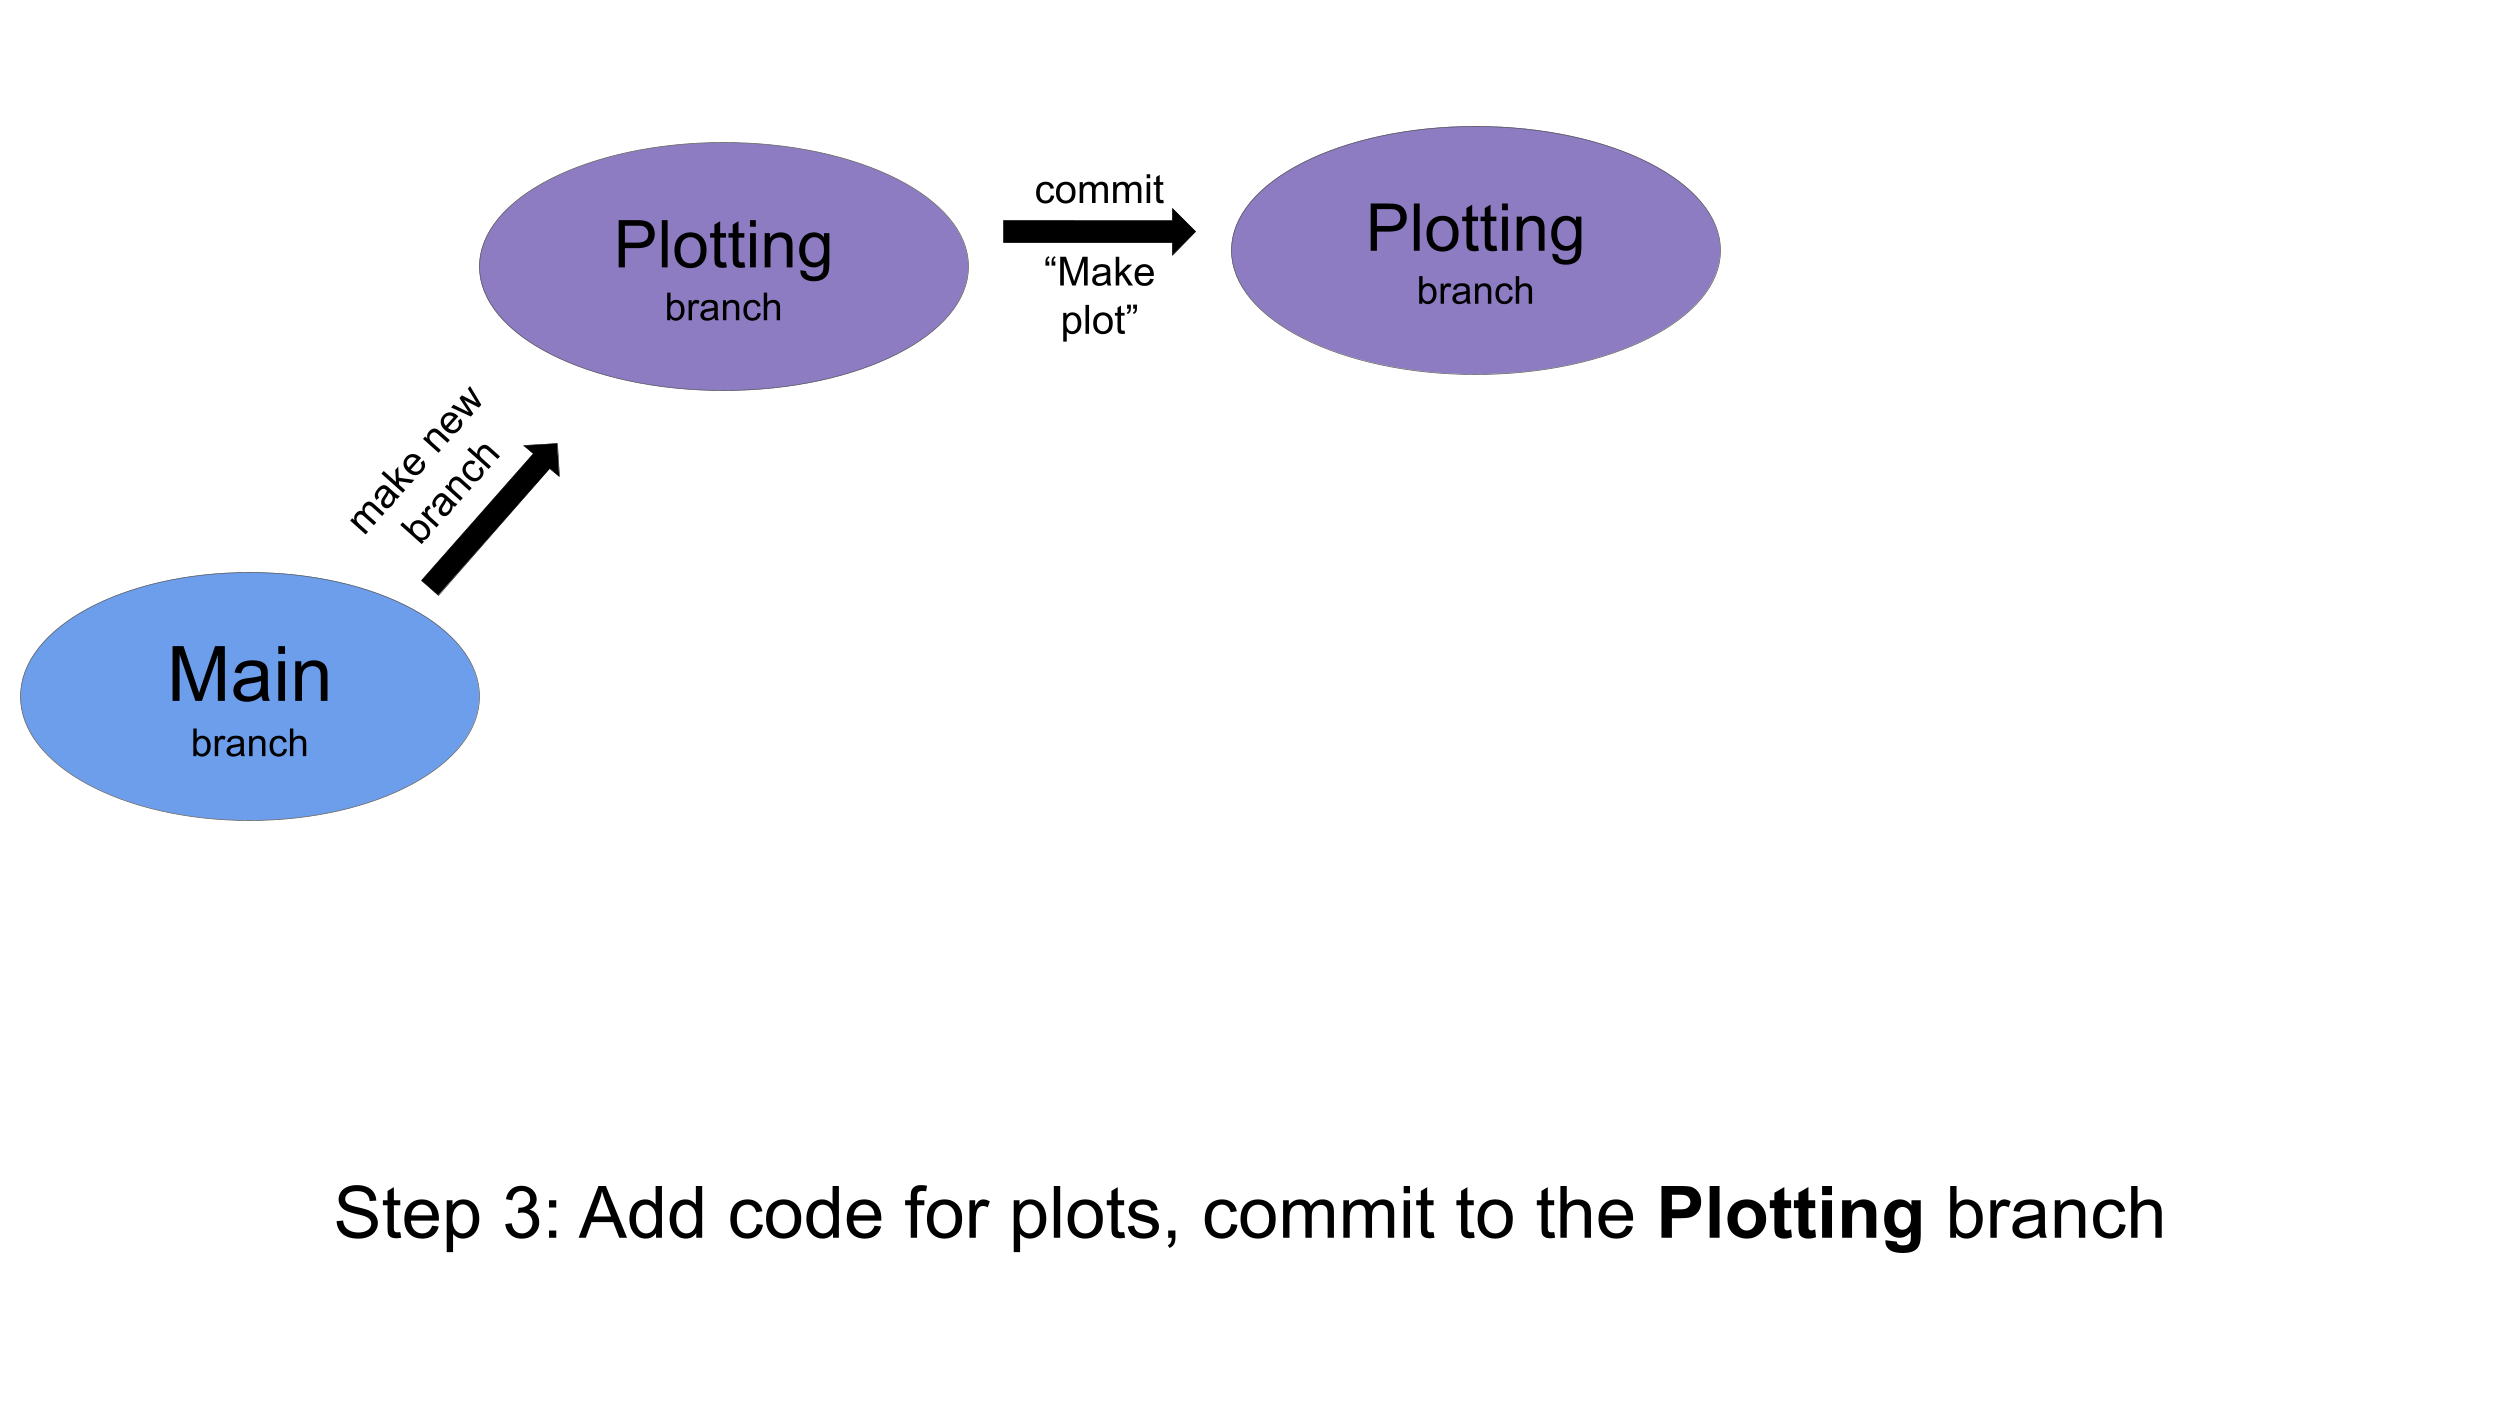
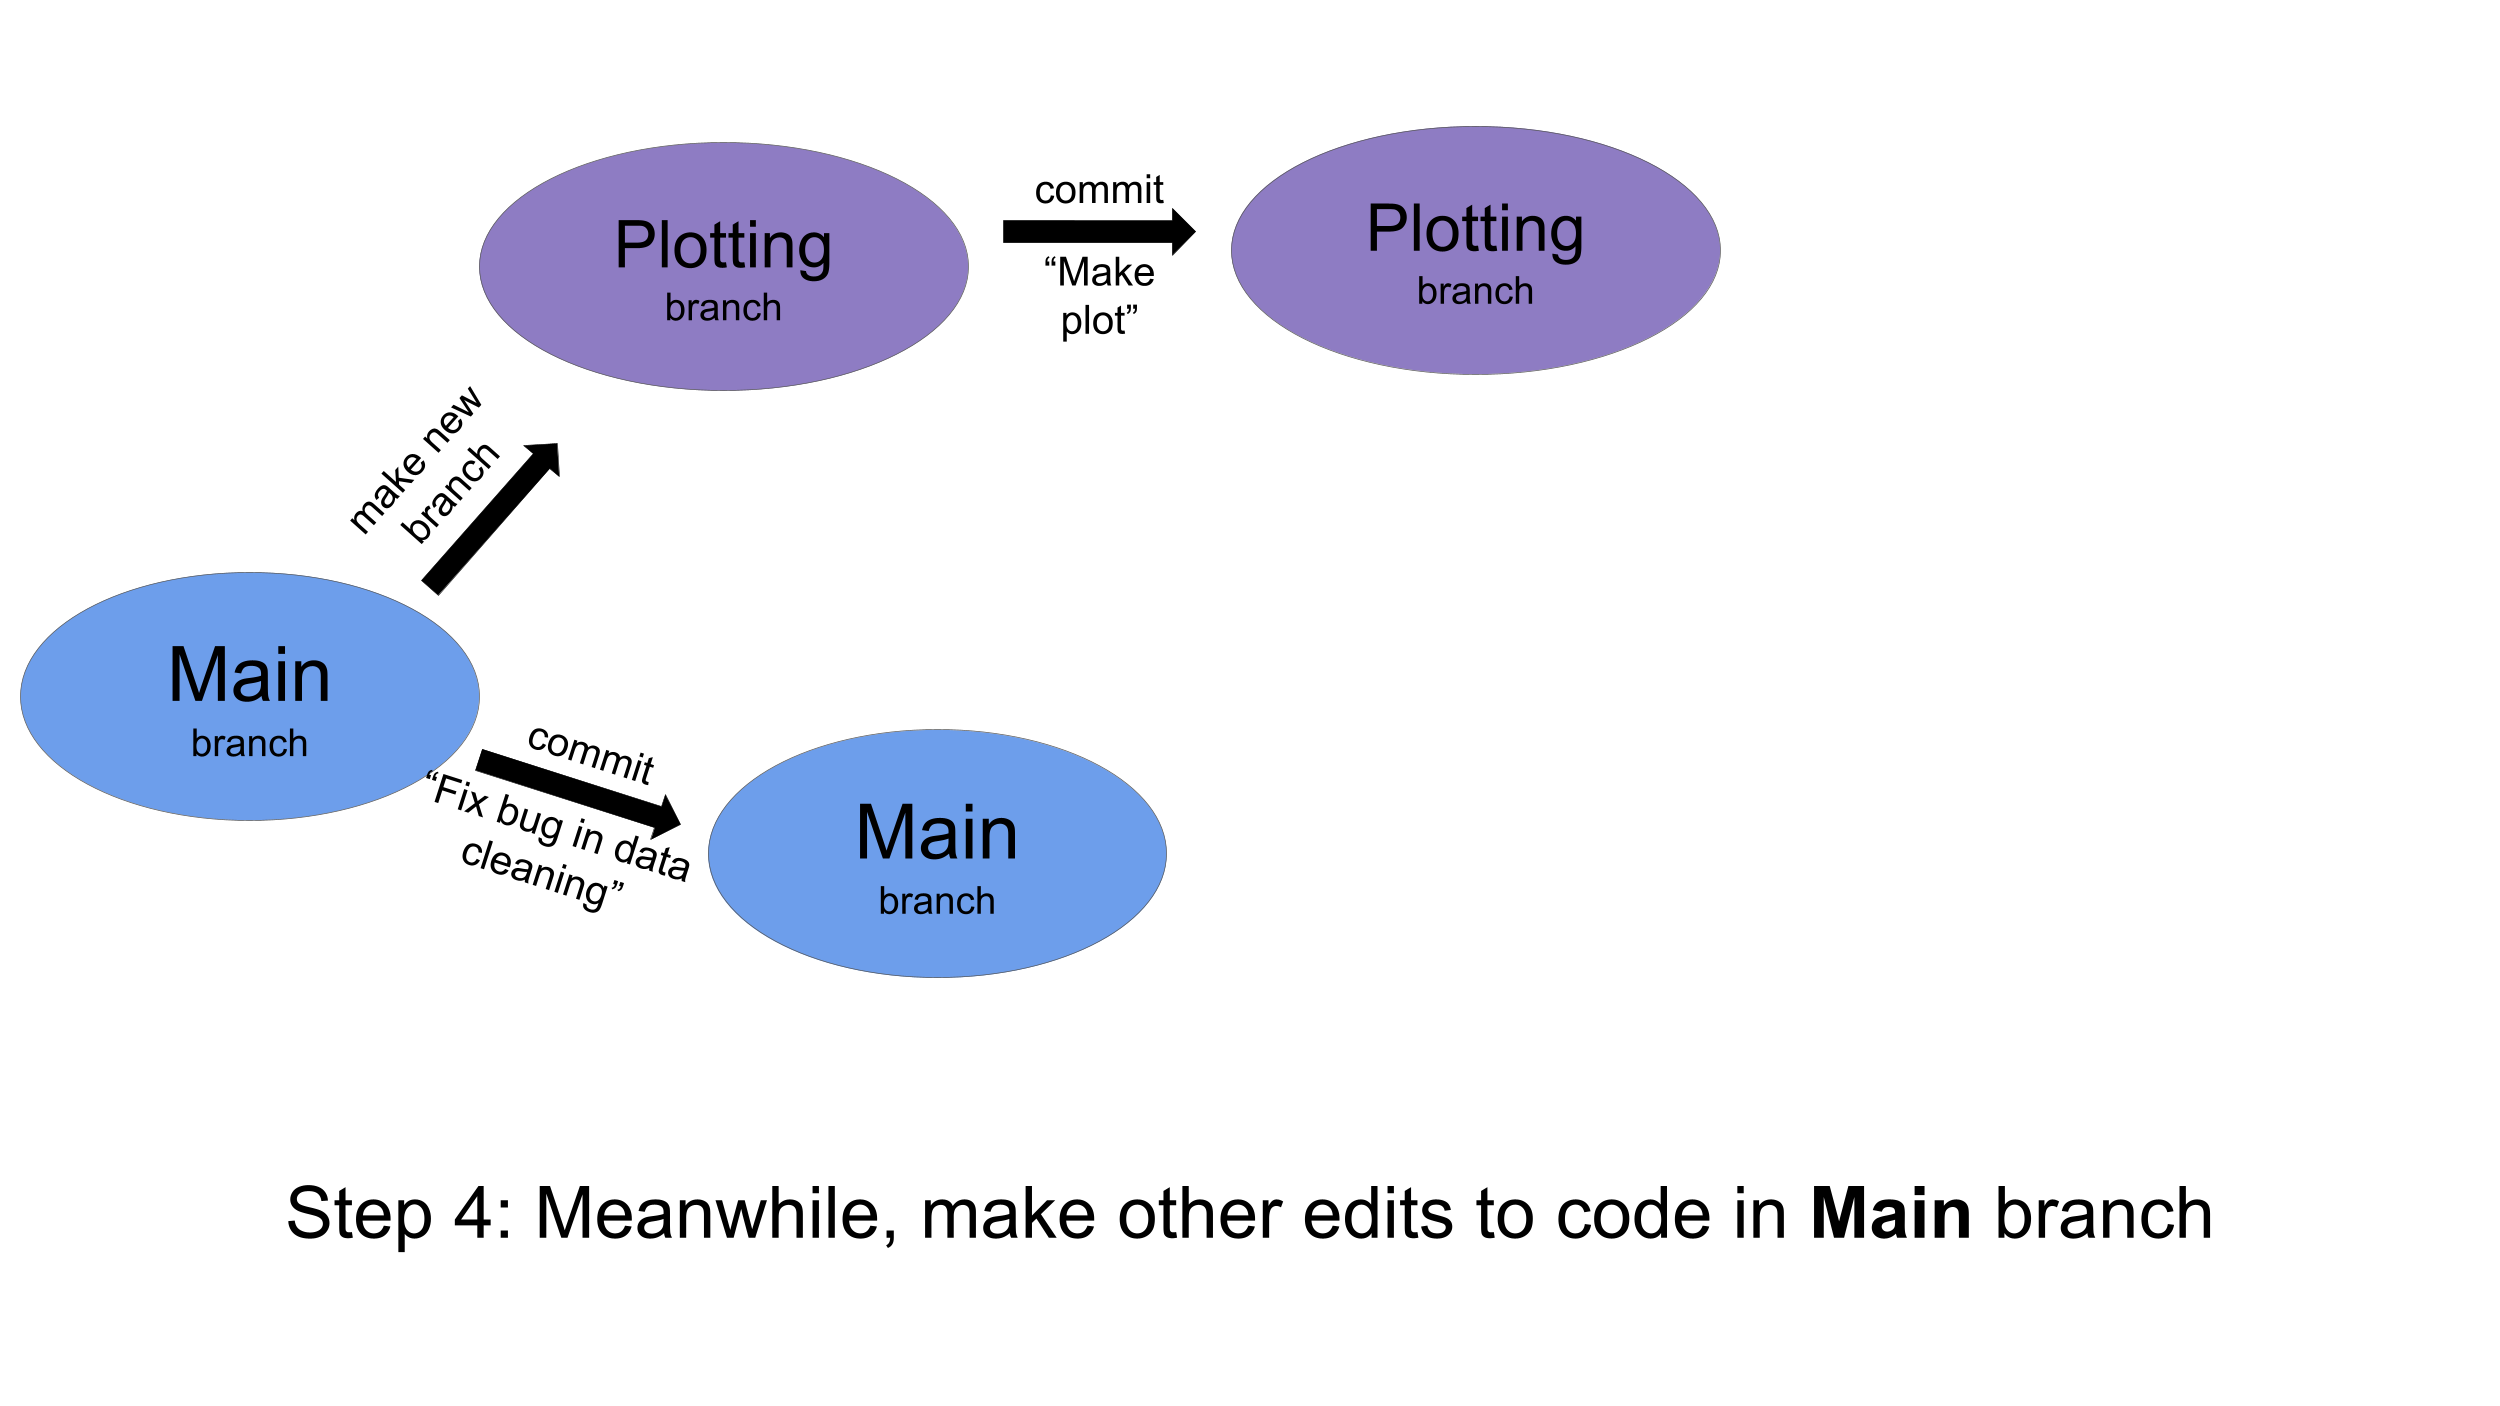
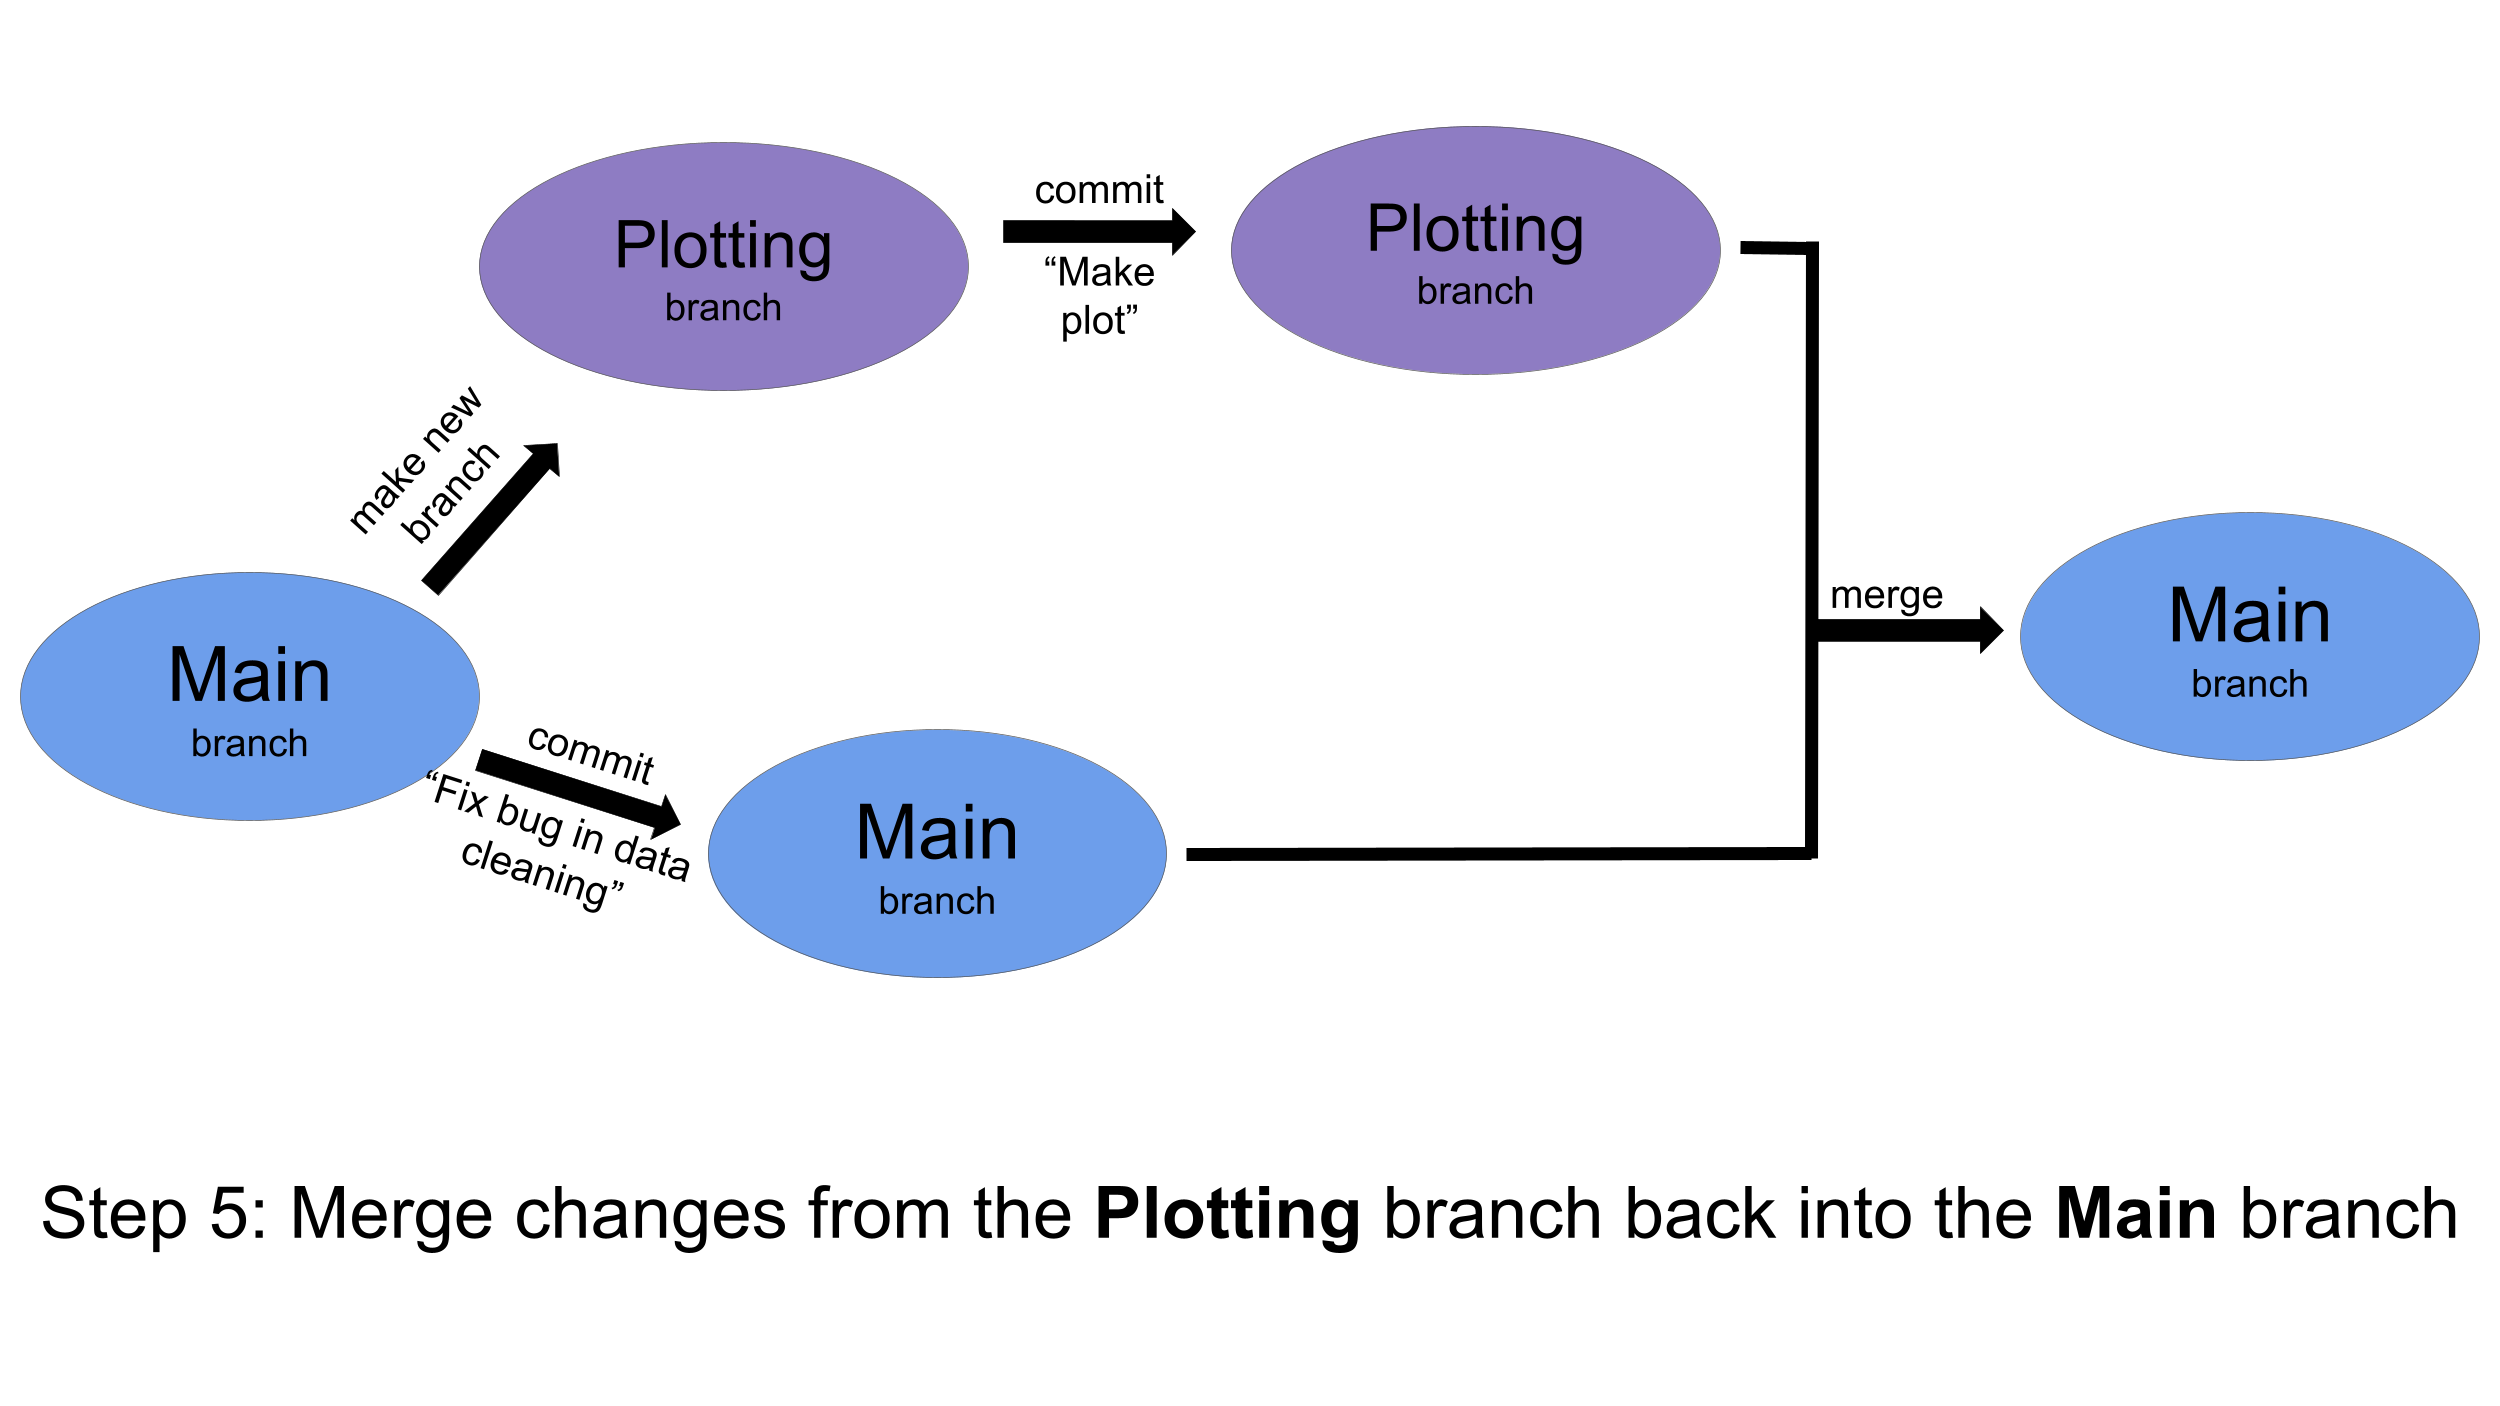
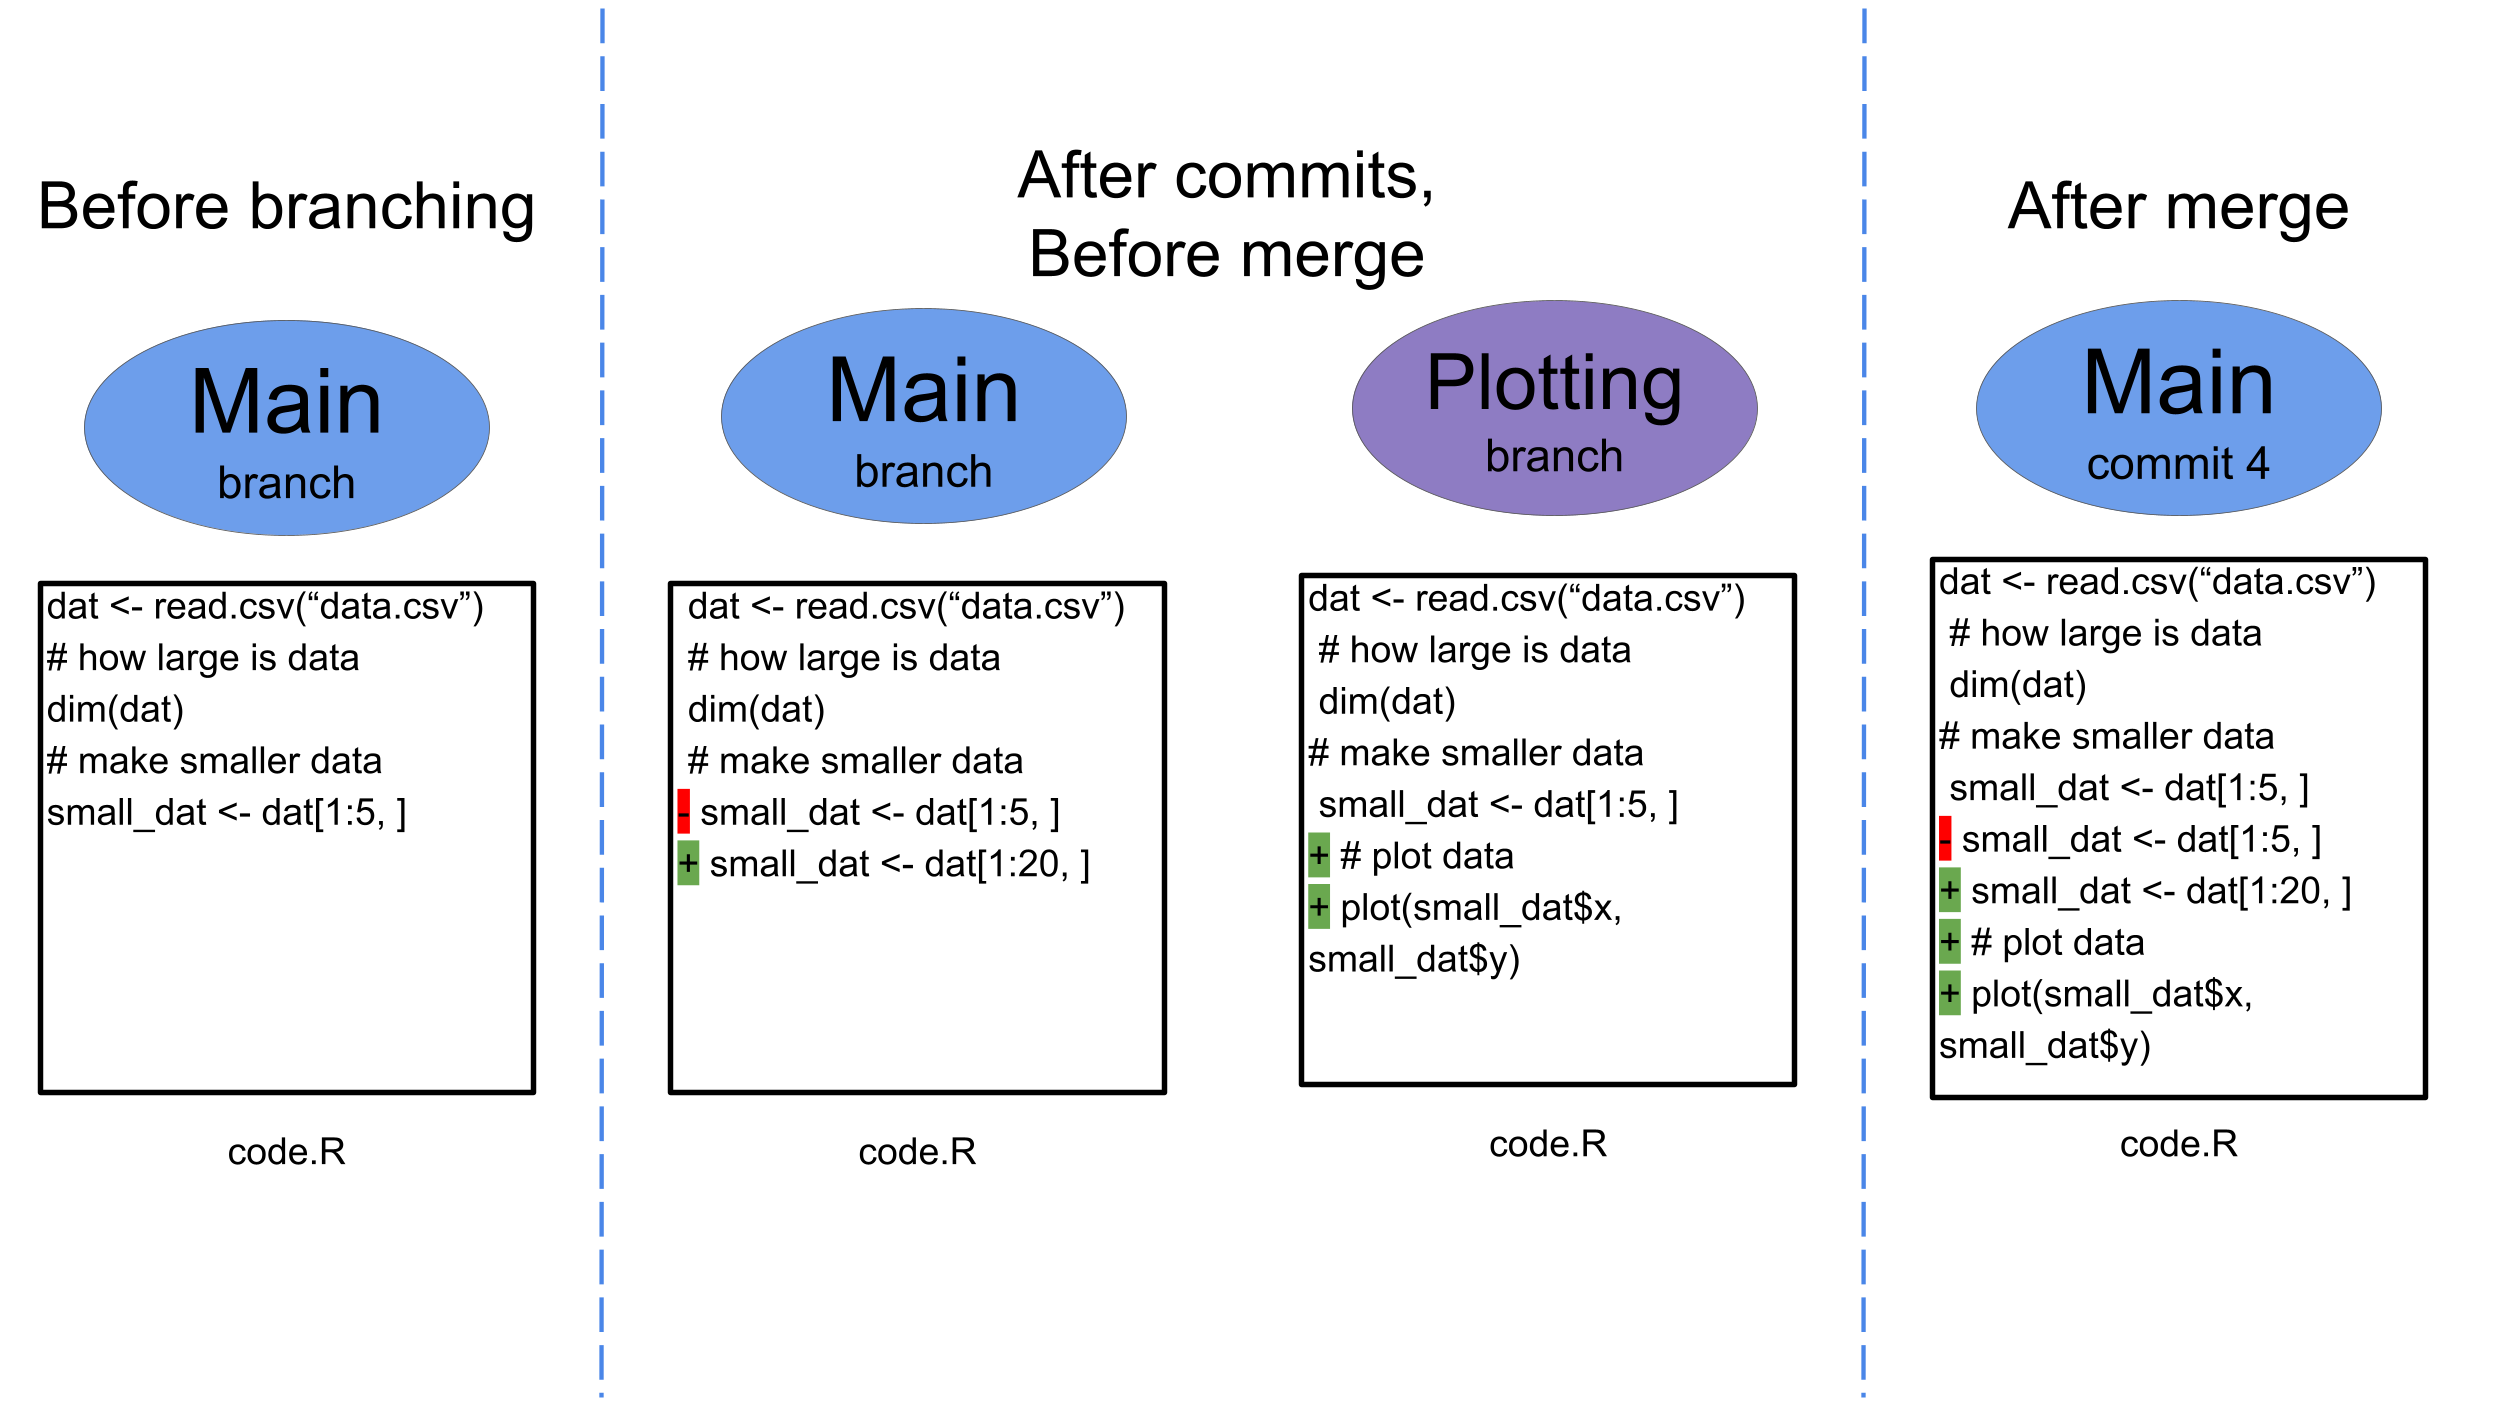
If there are no lines of code in any files that are directly in conflict, then merging will automatically combine the sets of files into a single version to move forward with. If there are lines that are directly in conflict, this will create what is called a merge conflict (merge conflicts are explained further in this section).
Here is an example of a file from the branching workflow above that can be merged automatically. The lines with red minus signs are deleted within the particular commit, and the lines with green plus signs are added within the particular commit.
Branches are also helpful when working with collaborators. If you are developing a new part of an analysis, you can do it in a separate branch. When you are ready for your collaborator to review your work, you can submit a , which is a request to merge your branch with the main branch. Your collaborator can review all of the changes between your main branch and the new branch, and either approve the pull request or request edits before merging. You can read more about pull requests in this section.
Create a new branch for this analysis
You will create a new branch with GitHub Desktop.
In GitHub Desktop:
Open the command line, navigate to the folder that you have unzipped, and enter the following:
git checkout -b study_comparisonWhen you create a new branch, you can name it by providing a new branch name after using the -b flag (we name the new branch study_comparison above) for the checkout command. When you want to move to an existing branch, you can use git checkout without the -b flag. For example, if you want to navigate back to the main branch, you could use the command git checkout main.
A newer Git command to use with branches: git switch
Git is a piece of actively maintained software, and will continuously be updated and improved. In 2019, the git switch command was introduced to work more clearly with branches. The command git switch -c study_comparison is equivalent to the command git checkout -b study_comparison, where the -c flag creates a new branch. Similarly, the command git switch main is equivalent to git checkout main, and will move you to whatever branch you have specified (in this case the main branch). When you look at Git documentation, you may see git checkout used in older material and git switch used in newer material when creating or moving between branches, but either command will work in these situations. You can read this article about why git switch was created if you would like to learn more.
Tips for Git and GitHub
Tips
Commit often. A history will not be helpful if you run an entire analysis locally and then commit everything in a single commit.
If you are working on a repository with multiple contributors, make sure to pull each time you work in order to work on the most up-to-date version of the repository. If you don’t, Git will let you know and help you to do so (check out this resource about more complicated merging when you forgot to pull).
Never use version control to track files with passwords or other sensitive information. If you have there are ways to remove these files and change the Git history, but this should be considered a last resort. Instead, add any files with sensitive information to your
.gitignore.- If passwords, access tokens, API keys, or other credentials are accidentally committed and pushed to a remote repository on GitHub (either public or private), they should be considered compromised and changed as soon as possible, and all collaborators who work with that repository should be alerted.
Use the issues page as a searchable and collaborative to-do list for your repository.
There are a lot of great examples of scientists using Git and GitHub to make their work more reproducible, to provide a convenient platform for collaboration, and to create an accessible website for their projects. For inspiration, check out some of these repositories:
- Bowtie2: This is a tool for aligning sequence reads. You can see that the README gives an overview of the tool, explains how to get started, and lists related publications. The issues page keeps a running to-do list of feature requests and bug fixes, suggested by a variety of users.
- Tybalt: This repository includes code and data to train a variational autoencoded on cancer types from The Cancer Genome Atlas. You can see that the README gives an overview of the project, the data, the results, and includes a citation. The closed issues page shows issues that were opened and then closed after being resolved.
- OpenScPCA-analysis: This is a collaborative project to analyze data from the Single-cell Pediatric Cancer Atlas. You can see a description of the project and the repository contents in the README, and the running to-do list in the issues page.
Scientific Project Organization
Reproducibility considerations
Although this is not directly related to , there are some useful ideas to know about organizing a scientific project, that will improve . While most people have their own approaches to scientific project organization, there are a few principles that most successful organization schemes have in common. More information can be found in this reproducibility course.
- file names are concise but informative
- there is one central folder to contain all files for each project
- there is a central file (often called the ) that explains what files are included and how to use them to run the analysis
- there are folders to keep similar files together
- data folder (this could be split into raw data and processed data)
- figures folder for any figures made for the analysis
- results folder for any results that should be shared or would take moderate or more computation to re-generate
- scripts are numbered in the order that they should be run to generate results
Organization of this project
If we look at the files contained in the infant_gut_analysis repository, they follow the recommendations provided above.
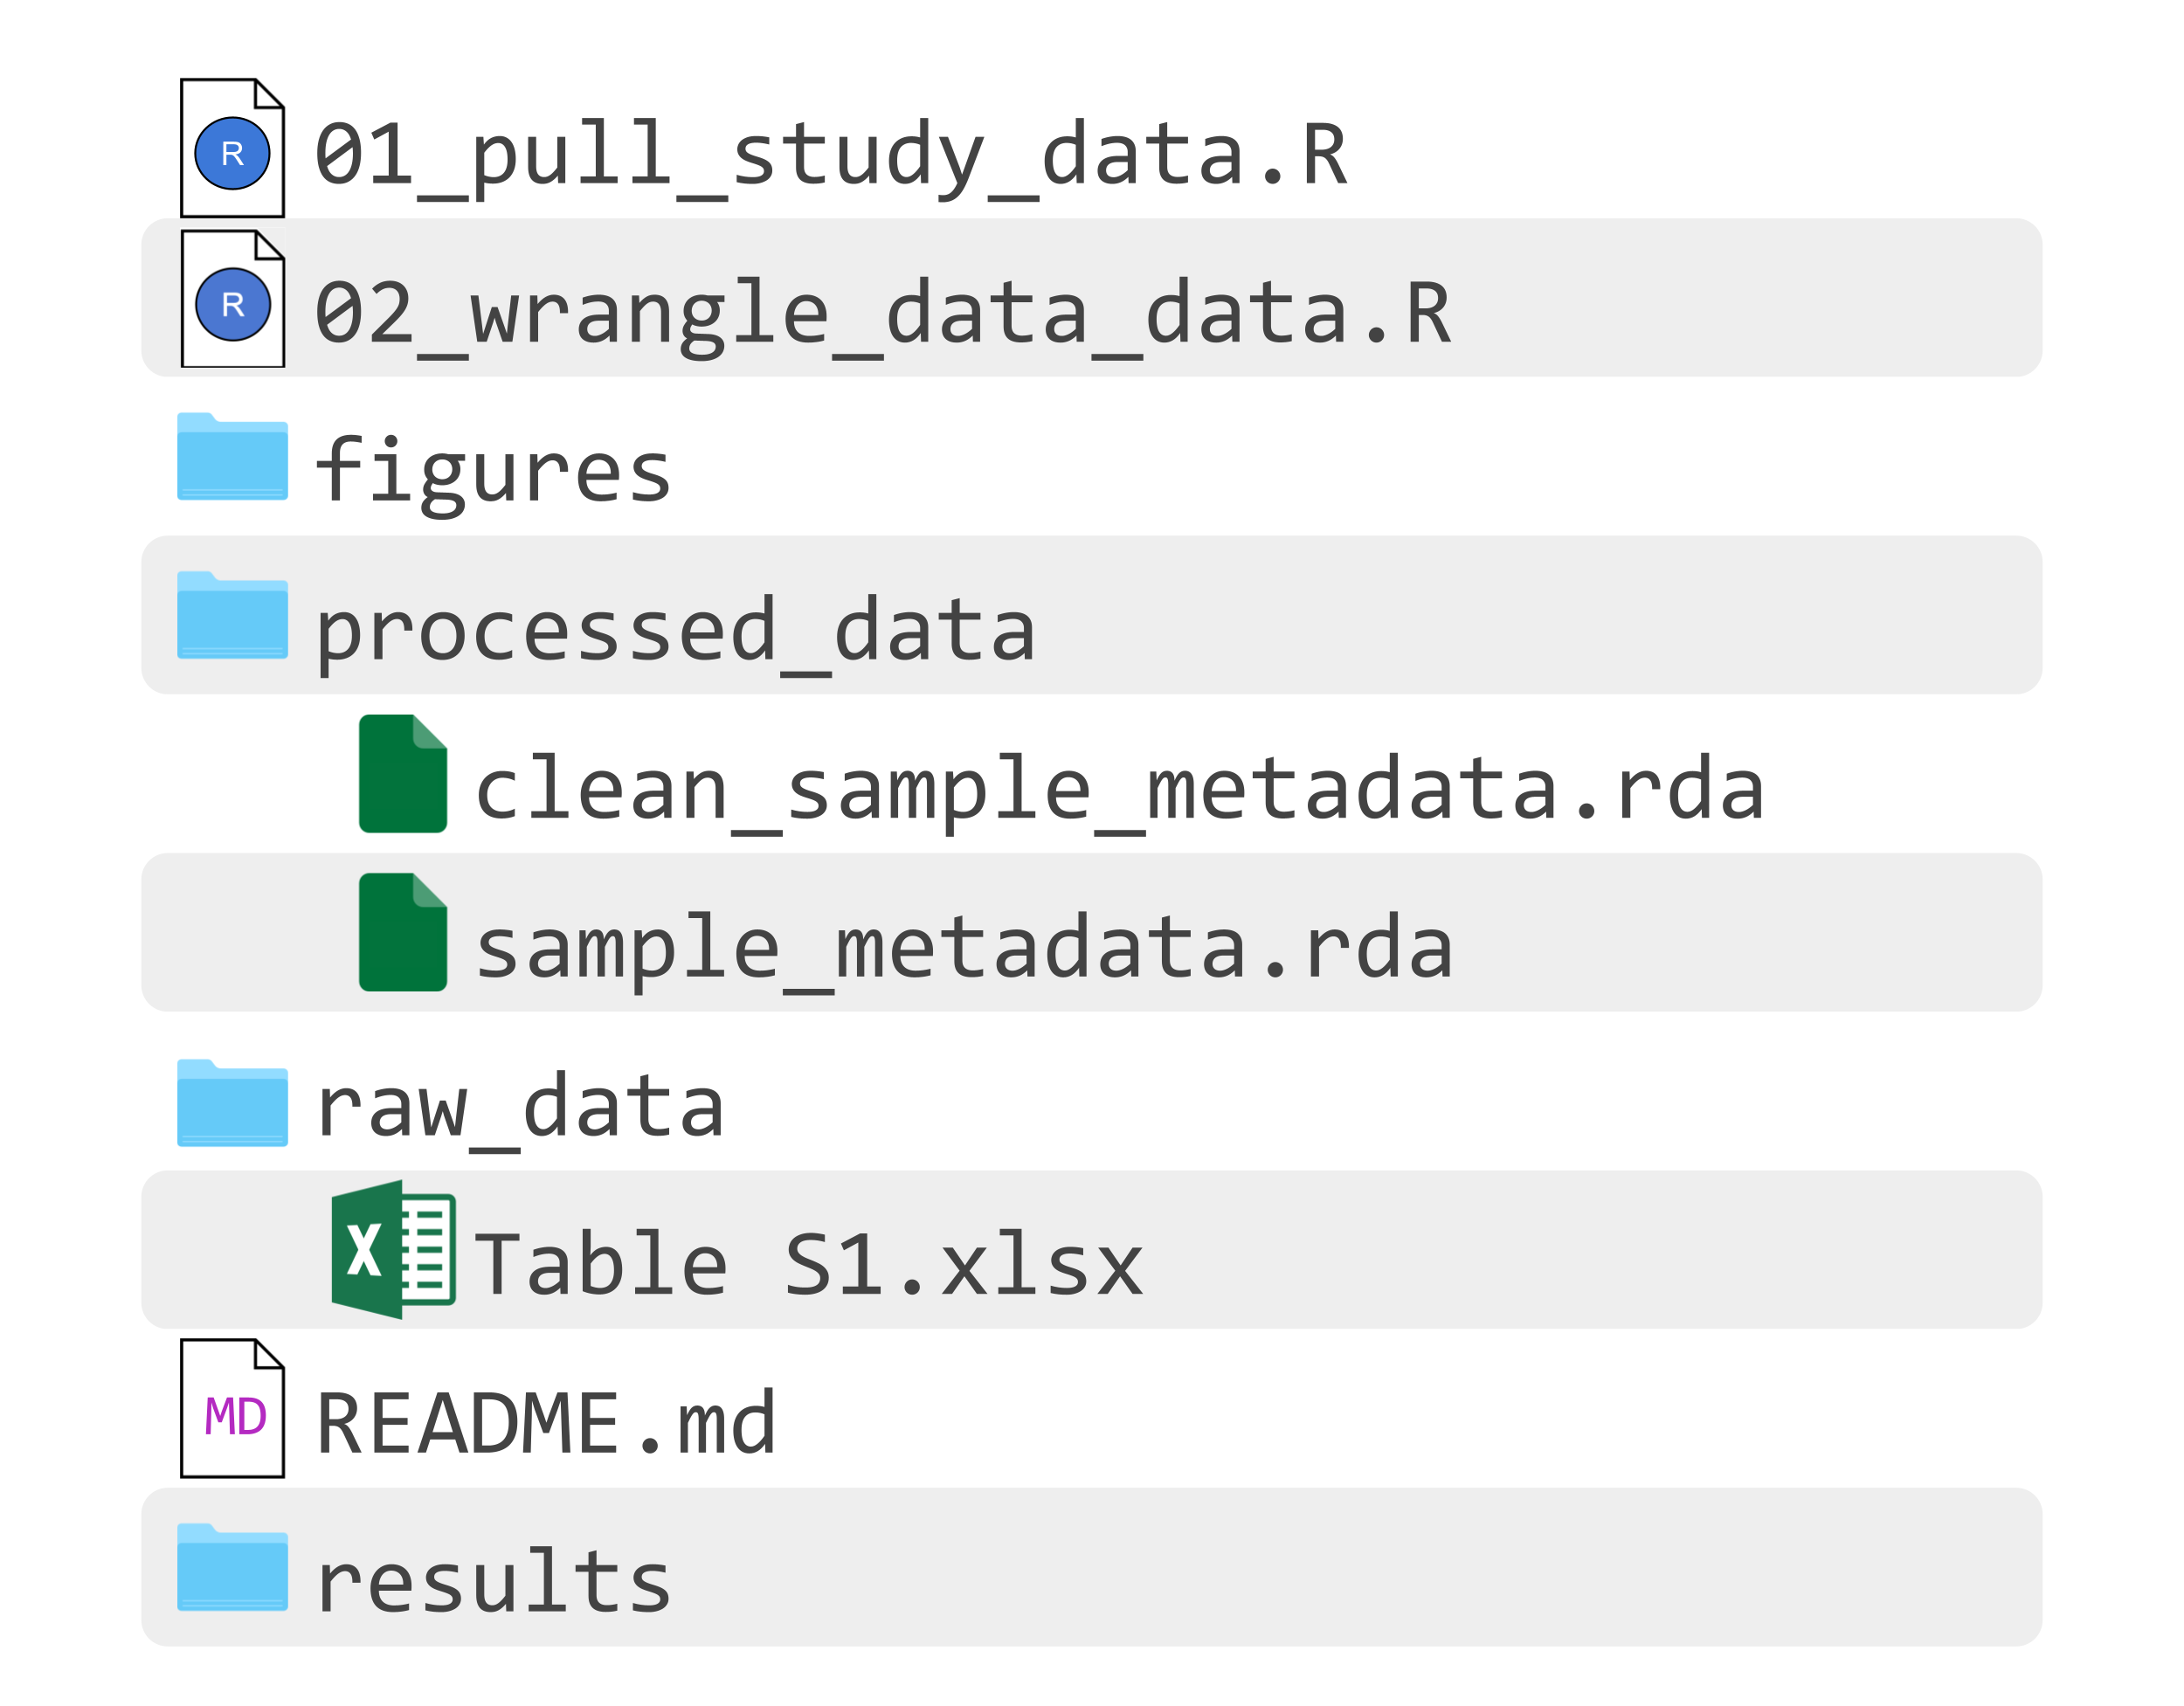
README
A README.md file should describe the files related to your scientific project. It should describe where inputs come from, what each script does, and where outputs are generated. If someone reads through your README, they should know where to find each component of your analysis.
Question opportunity
Read through the
README.md file for this project. Which script generates sample_metadata.rda?
Answer
The script01_pull_study_data.R generates sample_metadata.rda.
Project organization with Git and GitHub
Empty folders
One thing that often surprises new Git users is that any empty folders may exist on your computer but will not be tracked by Git until they have content. So while we see figures and results in the set of files from the folder infant_gut_analysis, they cannot be tracked by Git or hosted on GitHub until they have content. If you want to track an empty folder before it has content, you can add a placeholder file into the folder, and remove it later once the folder has content.
Which files to track with Git
Recall that version control lets you track project files as they change throughout the research process. Therefore, there are some files that should always be tracked with version control, some files that should never be tracked with version control, and some files that depend more on personal preference. Deciding which files to track is another topic that different people take different approaches to, but there are some rules that are typically followed:
- track source files that you’ve written (such as
.Rscripts,shellscripts,LaTeXfiles, etc) - track configuration files (such as
.gitignore) that tell your tools how to interact with this repository - do not track intermediate files (such as log files), these are files that are generated automatically during a certain part of your workflow but are not needed on their own
- sometimes track derived products (such as intermediate data, figures, or reports)
- this depends if you would like a copy of these products to live on GitHub
- this also depends on how you want other people to interact with figures or reports: do you want them to be able to view or download them from GitHub, or do you want them to download your data and scripts from GitHub and generate the outputs for themselves?
- do not track large data files that never change (we’ll explain this more below)
- typically avoid tracking binary files (unless you want them to be available on GitHub)
Binary files
From a Git perspective, files are either text files or binary files. Text files are human-readable. They work nicely with Git because they can be represented in terms of differences between versions. In contrast, binary files are readable by certain programs but are not human-readable. They cannot be represented in terms of diffs, and therefore a new version of the file is saved at each commit. Examples of binary files are images (.png, .jpeg), word and excel files (.doc, .xlsx) and PDFs (.pdf). Tracking many binary files with Git can eventually slow down Git operations. Recommendations vary about when you may or may not want to track binary files with Git, we suggest tracking them only if you want viewers of your GitHub repository to be able to view and download specific figures or documents without regenerating them from the source code, and otherwise do not track them.
How to use the .gitignore file
The best way to avoid tracking a file is to add it to your file. If a file or folder is included in your .gitignore file, it will only be included in a commit if you explicitly decide to stage it. This means that if you use GitHub Desktop, it will not stage these files by default, and if you use the command line and the command git add ., this will ignore any files listed in the .gitignore.
If you open an RStudio project for a Git repository, you’ll have a .gitignore file that looks similar to the following:
# History files
.Rhistory
.Rapp.history

# Session Data files
.Rdata
.RDataTmp

# User-specific files
.Ruserdata

# RStudio files
.Rproj.user/
If you would like Git to avoid tracking a PDF called analysis_report.pdf, which lives in a folder called reports, you would add the following line to the end of your .gitignore file:
reports/analysis_report.pdfYou could also tell Git to avoid tracking an entire folder. If you didn’t want to track any files in the reports folder, you would add the following line to your .gitignore file:
reports/In some cases, you may not want to include data in your repository because it is too large to host online or because it contains sensitive information that should not be publicly available. Although these files could be listed in the .gitignore file, keeping them outside the repository entirely in a separate folder provides an additional safeguard against accidentally committing them or losing them if they are inadvertently deleted (since Git cannot restore ignored files). For example, you could have a folder called analysis_files that contains both a data folder and an analysis_repo folder, where only analysis_repo is version-controlled with Git.
Git and large files
An important consideration for which files to track is file size. Tracking large files can slow down common Git operations and may eventually exceed GitHub’s repository limits. GitHub recommends that the maximum size of a single object being pushed to GitHub be 1MB, and enforces this size limit at 100 MB. For binary files or moderately large files that still need version control, Git Large File Storage (often referred to as Git LFS) is an option. Git LFS stores large files outside the main repository while preserving version tracking. You can read more about Git LFS here.
However, large data files or results that are not expected to change over time should generally not be tracked with Git at all. Instead, they are better stored in dedicated research data repositories such as figshare or Zenodo, which are designed for long-term storage, sharing, and citation. If data files are not tracked by Git or Git LFS, and are therefore not included in the GitHub repository, it is important for the repository to contain download instructions for these data files for other users who may want to run the code and reproduce results. The README file is a good place to include these download instructions.
What are the data?
In this case study, we will investigate data about samples from this meta-analysis of mother and infant gut studies. Wang et al. identified a set of eight studies that collected mother and infant gut microbiome samples and performed metagenomic sequencing. These eight studies collectively include 1,496 samples, representing 368 individuals. The variables that we will use to answer our questions include:
| Variable | Details |
|---|---|
| Study | Original study the sample comes from |
| SampleID | ID for sample (unique ID for each combination of person and time point) |
| PersonID | ID for participant the sample came from (unique ID for each person in the study, shared across time points) |
| Category | Either mother or infant |
| Sampling from papers | Sampling time frame described in paper |
| Sampling, day | Day after birth that the sample was collected on |
Limitations
There are some important considerations regarding this data analysis to keep in mind:
- In the original studies included in this , some studies describe sampling date in terms of days, and some in terms of weeks or months. Although this is converted into days in the variable
Sampling, day, time has been measured in finer resolution for some studies compared to others. - In this analysis we are only comparing the original studies based on the number of samples they have and when they collected their samples. There are several other ways we may want to compare these cohorts to understand how comparable they are, including based on measured information (like maternal age, mode of delivery, birth weight, maternal antibiotic use, etc.) as well as unmeasured information.
There are also limitations of version control:
- Git does not automatically make commits for you. Any work that you have locally that you have not staged and committed is not under version control. As a version control user, you need to make commits in order to create a record of changes over time.
- Additionally, the quality of the commit messages matters. Poor commit messages will limit your ability to understand why you made certain changes when looking back at the commit history of your analysis.
- As described in the scientific project organization section, version control is not ideal for large binary files.
- Git and GitHub are currently the most widely used tools for version control, with extensive documentation and active development. However, like any software tool, their long-term availability is not guaranteed. While the principles of version control will remain integral to reproducible research, the specific technologies used to implement these principles may evolve over time.
- While version control makes a scientific project more reproducible, this does not mean that the analysis is valid or the results are correct. It is useful to have another person review code to confirm the validity and accuracy of an analysis (this can be done with pull requests on GitHub!).
Ethical Considerations
There are some important ethical considerations when working with version control, as well as with health-related data in general and when collaborating on scientific projects.
When hosting data, code, and results on , make sure to never include personally identifiable information (PII) or protected health information (PHI) in a repository. This includes names, dates of birth, medical records and diagnosis, lab results, identifiable genomic sequencing data, as well as other types of data. You can read more about PII and PHI in this course about ethical data handling. For more general information about data management, you can explore this course.
Private repositories prevent other GitHub users from viewing your repository and are therefore useful when you are not yet ready to share your work publicly. However, private repositories are not an appropriate place to store PII or PHI. While versions of GitHub Enterprise may offer additional security and administrative controls, the ability to store sensitive data depends on institutional policies, compliance requirements, and contractual agreements. Unless you have explicit guidance from your institution approving such use, you should assume that PII and PHI should not be stored in GitHub repositories.
If you do commit sensitive information (PHI or PII) to a version controlled repository on GitHub, it is not sufficient to simply remove the file, commit the changes, and push again. If you do this, any files with sensitive information will be part of a commit, and will therefore be a part of the history of the repository. While there are ways to remove sensitive information from a local commit, and from a GitHub repository, these procedures are more complicated and may disrupt workflows for other collaborators working on the repository. It is important to inform collaborators of the sensitive information that has been committed.
It is important to carefully review files before staging and committing changes to ensure you aren’t pushing anything sensitive to GitHub, such as credentials, keys, access tokens, passwords, etc. Some tools automatically create environmental files containing credentials (these files have names like
.env). Make sure that these files are included in your.gitignoreand are never staged, committed, or pushed to GitHub.Make sure to keep comprehensive documentation for scientific projects to avoid losing track of which data generated a set of results or figure, or which version of a software you used in an analysis. Version control can help you do this. Reproducible science is ethical science: without a transparent and well-documented process, others in the scientific community cannot easily verify or trust your results.
For projects with large teams, it can be challenging to track individual contributions. histories can be helpful to see who worked on each component on an analysis, in order to fairly acknowledge each contributor’s work. You can read this paper for more ethical considerations related to large team science.
When performing a such as the one described in this case study, it is important to be transparent about inclusion and exclusion criteria for studies and for individual observations within studies. Criteria should be determined before analysis, to avoid choosing studies that will support a desired conclusion. It is also important to properly cite the original studies and recognize the groups that collected the data.
Packages and Setup
Before we get into the coding, we want to describe the R packages that we’ll use in this case study, or that are used in other scripts contained in our repository:
| Package | Use | Where this packages is used |
|---|---|---|
| here | To construct file paths within folders | Data visualization |
| readxl | To read Excel files into R | Data import |
| dplyr | To combine and manipulate data tables | Data import, Data exploration, Data wrangling, Data visualization, Data analysis |
| ggplot2 | To visualize data | Data visualization |
| stringr | To manipulate strings | Data wrangling |
The first time we use a function, we will use :: to indicate which package we are using. Unless we have overlapping function names, this is not necessary, but we will include it here to remind you which packages the functions come from.
Three of these packages, dplyr, ggplot2, and stringr are part of the tidyverse suite of packages. The tidyverse includes nine packages that can easily be used together and share data structures and syntax. While each of the packages can be installed or loaded separately (as we do above), they can be installed or loaded all at once using install.packages("tidyverse") and library(tidyverse), respectively.
Data Import
Now that you have set up this project with and , you can start working on the study comparison in R.
We will start by taking a look at the data.
Click here to see the code included in this file.
library(readxl) # for reading data from supplementary table
library(dplyr) # for combining data across studies

# read tabs for each study from Table S1 from Wang et al. supplementary
# information, saved as "meta_analysis_metadata.xlsx"
study_data <- lapply(3:10, function(i) {
  readxl::read_xlsx("raw_data/Table S1.xlsx", sheet = i)
})

# set all variables as characters in order to combine data across studies
# original data had some variables in different data types across studies
study_data_clean <- lapply(study_data, function(df) {
  df %>% dplyr::mutate(dplyr::across(dplyr::everything(), as.character))
})

# combine lists for each study into a single data frame
sample_metadata <- dplyr::bind_rows(study_data_clean)

# save data frame as a .rda file
save(sample_metadata, file = "processed_data/sample_metadata.rda")
Question opportunity
How many observations are included after importing our data? How many variables are included in our data set?
There are 1,499 observations and 20 variables in the data frame.
Hint
Data is imported in the file 01_pull_study_data.R. You can find out how many rows are in a data frame with the function nrow(name_of_data_frame). You can find out how many columns are in a data frame with the function ncol(name_of_data_frame). If you are working in either RStudio or Positron, you can also see the object dimensions in the Environment pane (in RStudio) or the Session pane (in Positron).
Answer
nrow(sample_metadata)[1] 1499ncol(sample_metadata)[1] 20Data Exploration
Now that you’ve imported the data, let’s take a look at it. We’ll use the function glimpse(), from the dplyr package that we’ve already been working with. This function shows the first several observations from each column of our dataset.
glimpse(sample_metadata)Rows: 1,499
Columns: 20
$ Study <chr> "AsnicarF_2017", "Asnic…
$ Run <chr> "SRR4052021", "SRR40520…
$ SampleID <chr> "MV_FEI1_t1Q14", "MV_FE…
$ PersonID <chr> "1", "1", "2", "2", "3"…
$ Type <chr> "stool", "stool", "stoo…
$ Category <chr> "infant", "mother", "in…
$ `Maternal age` <chr> "NA", "NA", "NA", "NA",…
$ `Maternal body mass index before pregnancy` <chr> "NA", "NA", "NA", "NA",…
$ `Maternal antibiotics before delivery` <chr> "NA", "NA", "NA", "NA",…
$ `Maternal intrapartum antibiotics` <chr> "NA", "NA", "NA", "NA",…
$ `Sampling from papers` <chr> "3mo", "3mo", "3mo", "3…
$ `Sampling, day` <chr> "90", "90", "90", "90",…
$ `Feeding regimen` <chr> "combined", "NA", "brea…
$ `Postnatal antibiotic intervention in infants` <chr> "NA", "NA", "NA", "NA",…
$ Gender <chr> "female", "female", "ma…
$ `Mode of delivery` <chr> "vaginal", "vaginal", "…
$ `Caesarean-section type` <chr> "NA", "NA", "NA", "NA",…
$ `Gestational age` <chr> "NA", "NA", "NA", "NA",…
$ `Birth weight` <chr> "NA", "NA", "NA", "NA",…
$ Country <chr> "ITA_1", "ITA_1", "ITA_…Question opportunity
As we described in the “What are the data?” section, the variables that we will use in our analysis are
Study, SampleID, PersonID, Category, Sampling from papers, and Sampling, day. Based on the output of the glimpse() function, which if any of these variables will we want to work with as a numeric data type as opposed to a character data type?
Hint
Numeric data types are used for data that we’d like to do math with (such as 4 or 3.14). Character data types are used for data in which we record a word or a series of words, and don’t need to do any mathematical equations (such as "apple" or "treatment group"). Character data are enclosed in quotes.
Answer
The variable Sampling, day is encoded with character values, however seems to contain numerical data. In the Data Wrangling section we will recode Sampling, day as a numeric variable.
Data Wrangling
Data wrangling includes cleaning data to fix mistakes and reorganizing data to make it easier to use in visualizations and analyses.
Click here to see the code included in this file.
library(dplyr) # for data manipulation
library(stringr) # for working with strings

# load data that we saved in data_import
load("processed_data/sample_metadata.rda")

# clean data
clean_metadata <- sample_metadata %>%
  # remove all rows in data that are missing sample ID
  dplyr::filter(!is.na(SampleID)) %>%
  # clean study name to only include last name of first author
  mutate(Study =
           # remove _year from study name
           stringr::str_remove(Study, "\\_.*") %>%
           # remove first name initial from study name
           stringr::str_remove_all("(?<=.)[A-Z]")) %>%
  # remove spaces from names of variables
  dplyr::rename(sampling_paper = `Sampling from papers`,
         sampling_day = `Sampling, day`) %>%
  # recode "NA" as NA and make sampling_day a numeric variable
  mutate(sampling_day = na_if(sampling_day, "NA") %>%
           as.numeric())

# in Yassour study, sample IDs are not unique to samples
# first inspect this to confirm
clean_metadata %>%
  filter(Study == "Yassour") %>%
  dplyr::select(Study, Category, SampleID, sampling_day) %>%
  head()

# create new unique sample IDs for Yassour study
clean_metadata <- clean_metadata %>%
  # check if study is Yassour
  mutate(SampleID = ifelse(Study == "Yassour",
                           # if so, combine sample ID and sampling day
                           paste0(SampleID, sampling_day),
                           # if not, leave sample ID as is
                           SampleID))

# confirm that we've fixed this problem
clean_metadata %>%
  filter(Study == "Yassour") %>%
  select(Study, Category, SampleID, sampling_day) %>%
  head()

# two studies (Parnanen and Yassour) took samples
# from mothers during pregnancy
# remove these samples, because they don't fit into
# the time range that we want to consider
clean_metadata <- clean_metadata %>%
  filter(!(sampling_paper %in% c("32WK", "Gest")))

# save cleaned data
save(clean_metadata, file = "processed_data/clean_sample_metadata.rda")
Question opportunity
Now that the data have been wrangled, how many observations remain? And why did we remove data?
Hint
Data are wrangled in the file 02_wrangle_data.R. You can find out how many rows are in a data frame with the function nrow(name_of_data_frame). You can find out how many columns are in a data frame with the function ncol(name_of_data_frame). If you are working in either RStudio or Positron, you can also see the object dimensions in the Environment pane (in RStudio) or the Session pane (in Positron).
Answer
nrow(clean_metadata)[1] 1443There are 1,443 observations after data wrangling. We removed observations that had NA values for the variable SampleID (in line 10) and we removed observations that were taken before birth (in line 51).
Question opportunity
What are the earliest and latest time points that samples were taken, relative to an infant’s birth date, in the data set?
Hint
Data are wrangled in the file 02_wrangle_data.R. You can use the functions max() and min() to get the maximum and minimum values in a vector. The variable in the cleaned data set that gives the sampling day relative to the infant’s birth date is called sampling_day.
Answer
min(clean_metadata$sampling_day, na.rm = TRUE)[1] 0max(clean_metadata$sampling_day, na.rm = TRUE)[1] 480The earliest day that a participant was sampled after birth was 0, and the latest day was 480.
Data Visualization
We will now generate visualizations to compare the study cohorts.
Setup
First, we will make sure that we are on the correct branch. We want to use a development branch for this analysis, which we will request to merge back into the main branch once the analysis is ready. We already created the branch study_comparison in the introduction to Git and GitHub section, so we just need to make sure that we are working on that branch.
-
- If it says
study_comparison, then you are already working on the correct branch. - If it says
main, then you can click the drop-down button next to “Current Branch” and selectstudy_comparison.- If
study_comparisondoes not appear, you can click the “New Branch” button to create it.
- If
- If it says
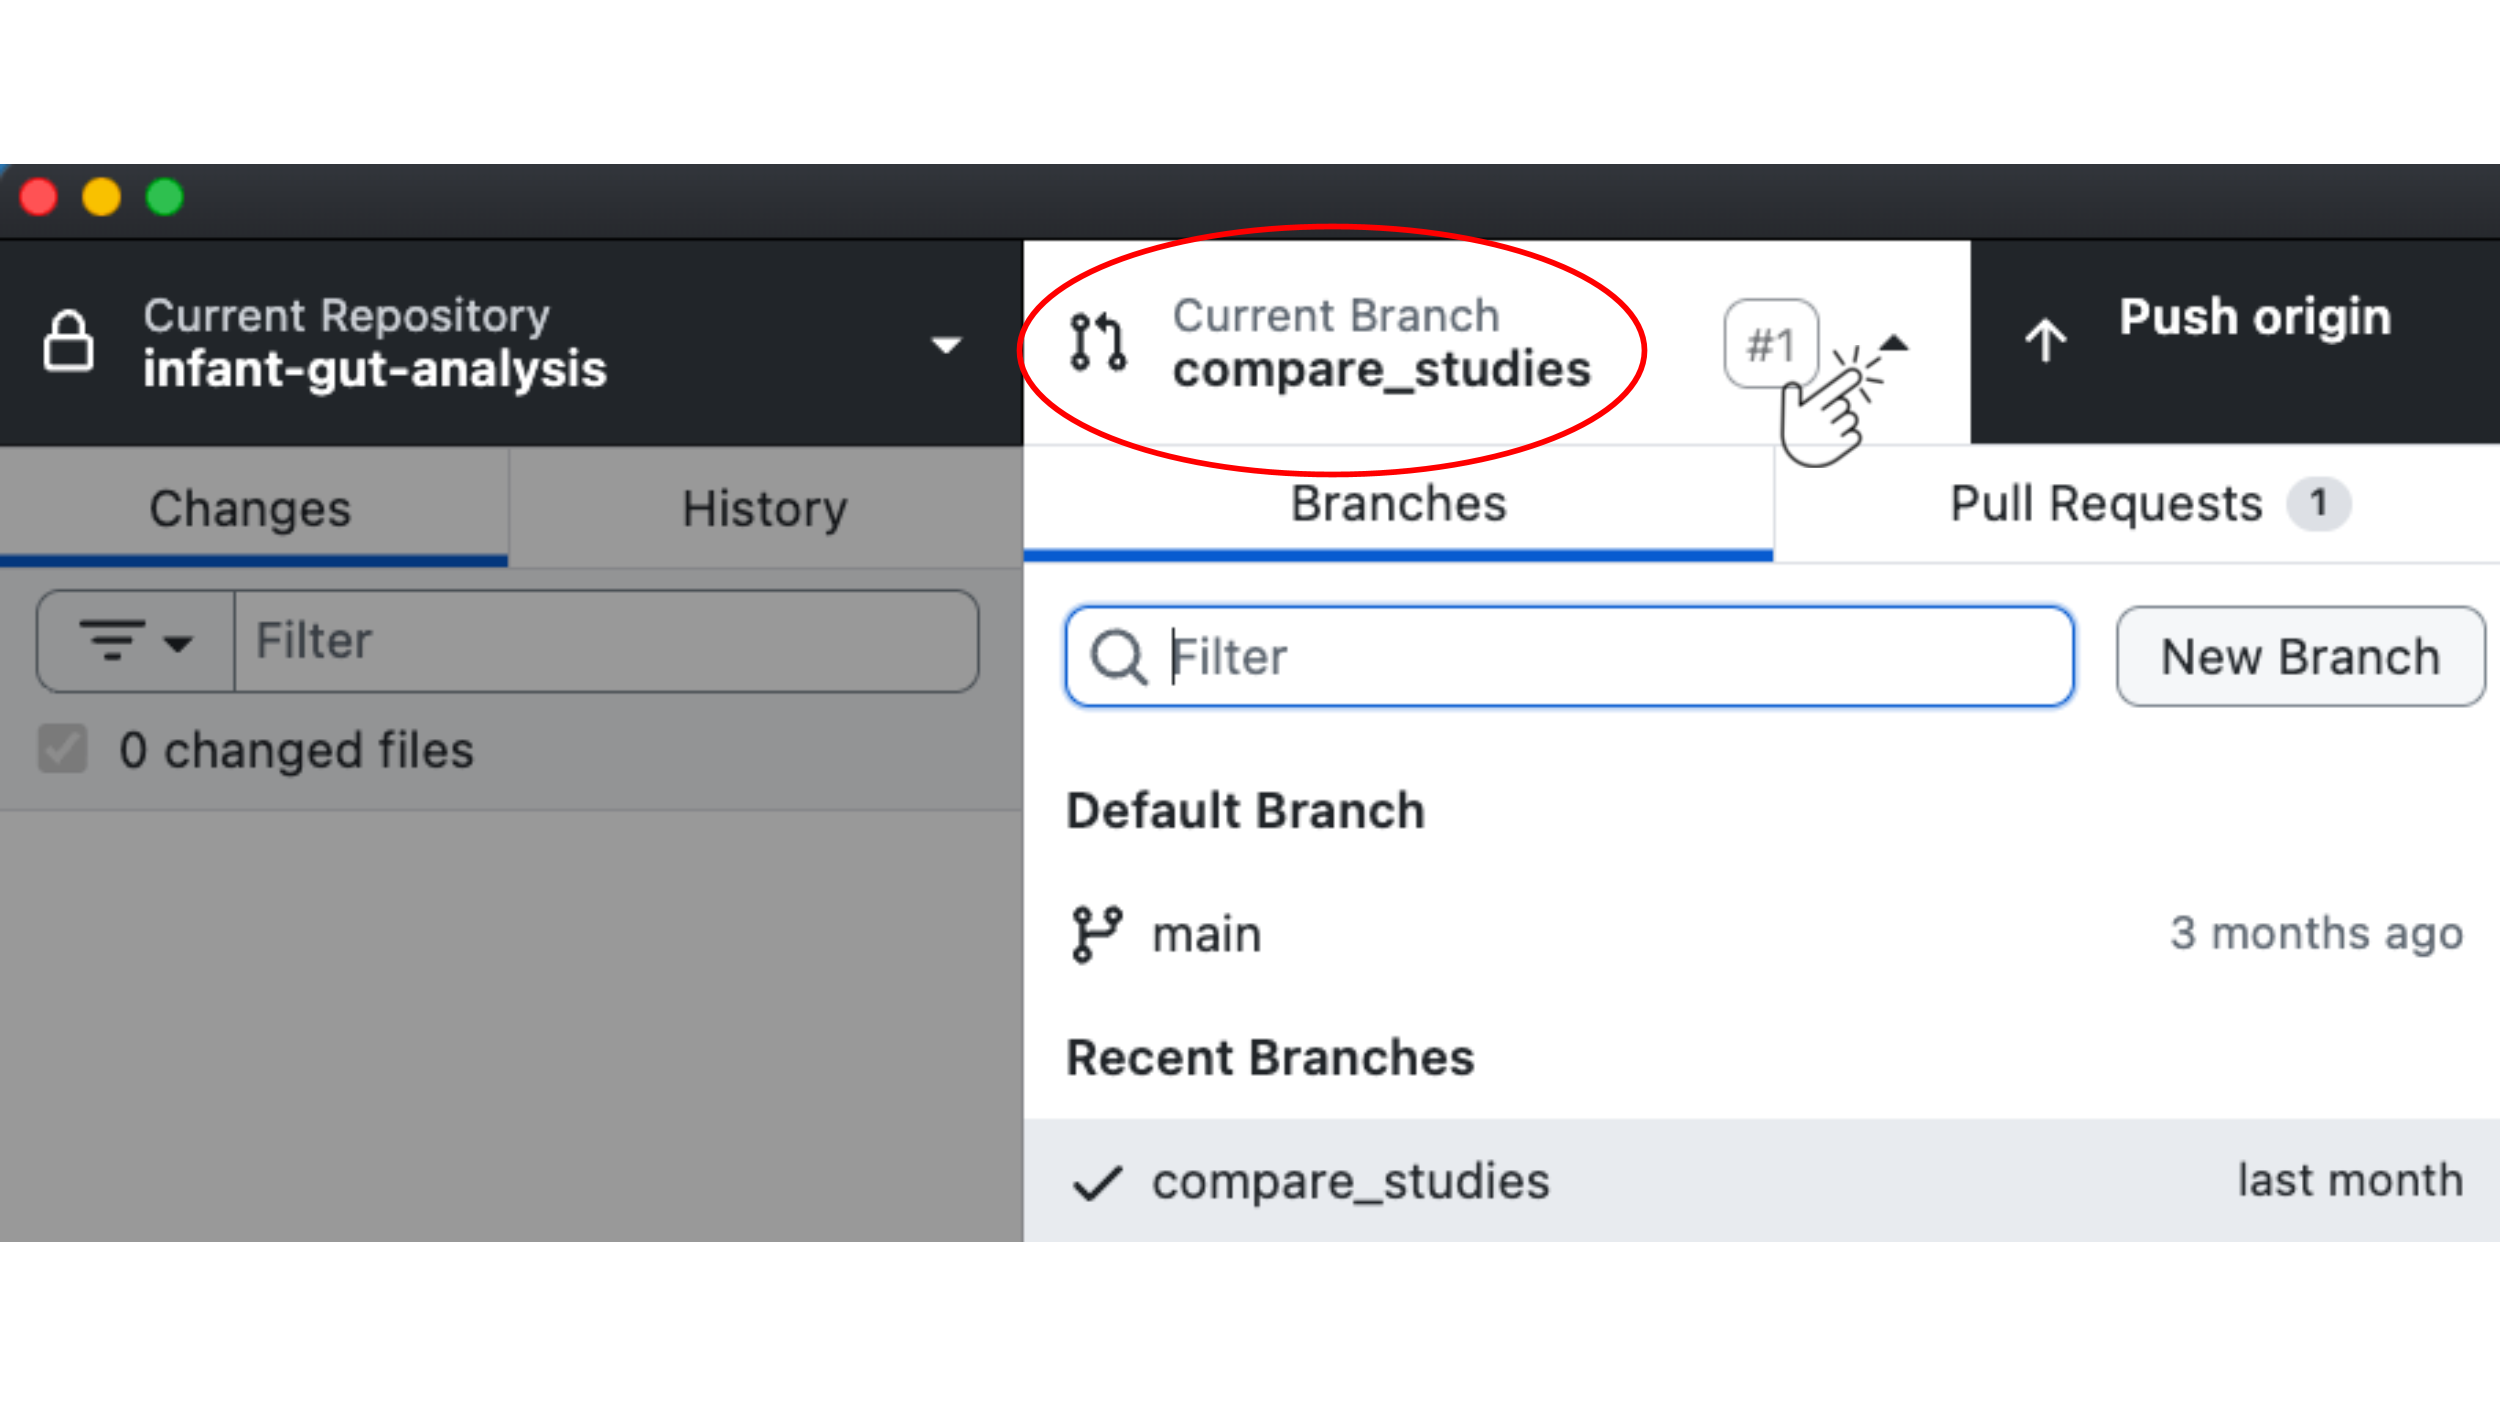
Open the command line and navigate to your repository. Use the git branch command.
git branchThis should list the branches for your repository, with the current branch highlighted and marked with an asterisk (*). If the highlighted branch is study_comparison, then you are already working on the correct branch. If the highlighted branch is main or something else, you can switch over to study_comparison using the git checkout command.
If study_comparison appears in your list of branches, you can move to it with the following command:
git checkout study_comparisonHowever, if study_comparison doesn’t appear in your list of branches, you can create it with git checkout -b.
git checkout -b study_comparisonBecause this is a new component of the analysis, we will create a new file in the infant_gut_analysis folder for this code.
Reproducibility considerations
There are different types of files that you can create to run R code. The most basic file is an .R script (the code files that we ran in the data import and data wrangling sections are .R scripts). In an .R script, everything is interpreted as R code except for comments, which are preceded by #.
Another file type is a notebook-style document, which combines text components with code components. The code is broken into pieces, which are referred to as “code chunks”. Two common types of these files are R Markdown files (.Rmd) and quarto files (.qmd). These files can be rendered, which means that all code chunks are run in order (typically in a fresh R session), and any outputs (calculations, tables, plots) are included in the resulting document. These notebook-style documents also make it easier to explain what each step of an analysis is doing, improving both readability and reproducibility by clearly linking code, output, and interpretation in a single document.
We will use a quarto document for this analysis. To start:
In this section, we will go through the steps to make two visualizations to compare the study cohorts. As you go, include the relevant code (as well as explanations of what the code is doing) into your quarto document. When you are done, you or someone else with access to the data and your document, should be able to run the code and create the visualizations.
In your quarto document, you should start by making a code chunk to load the required packages. A code chunk looks like the following:
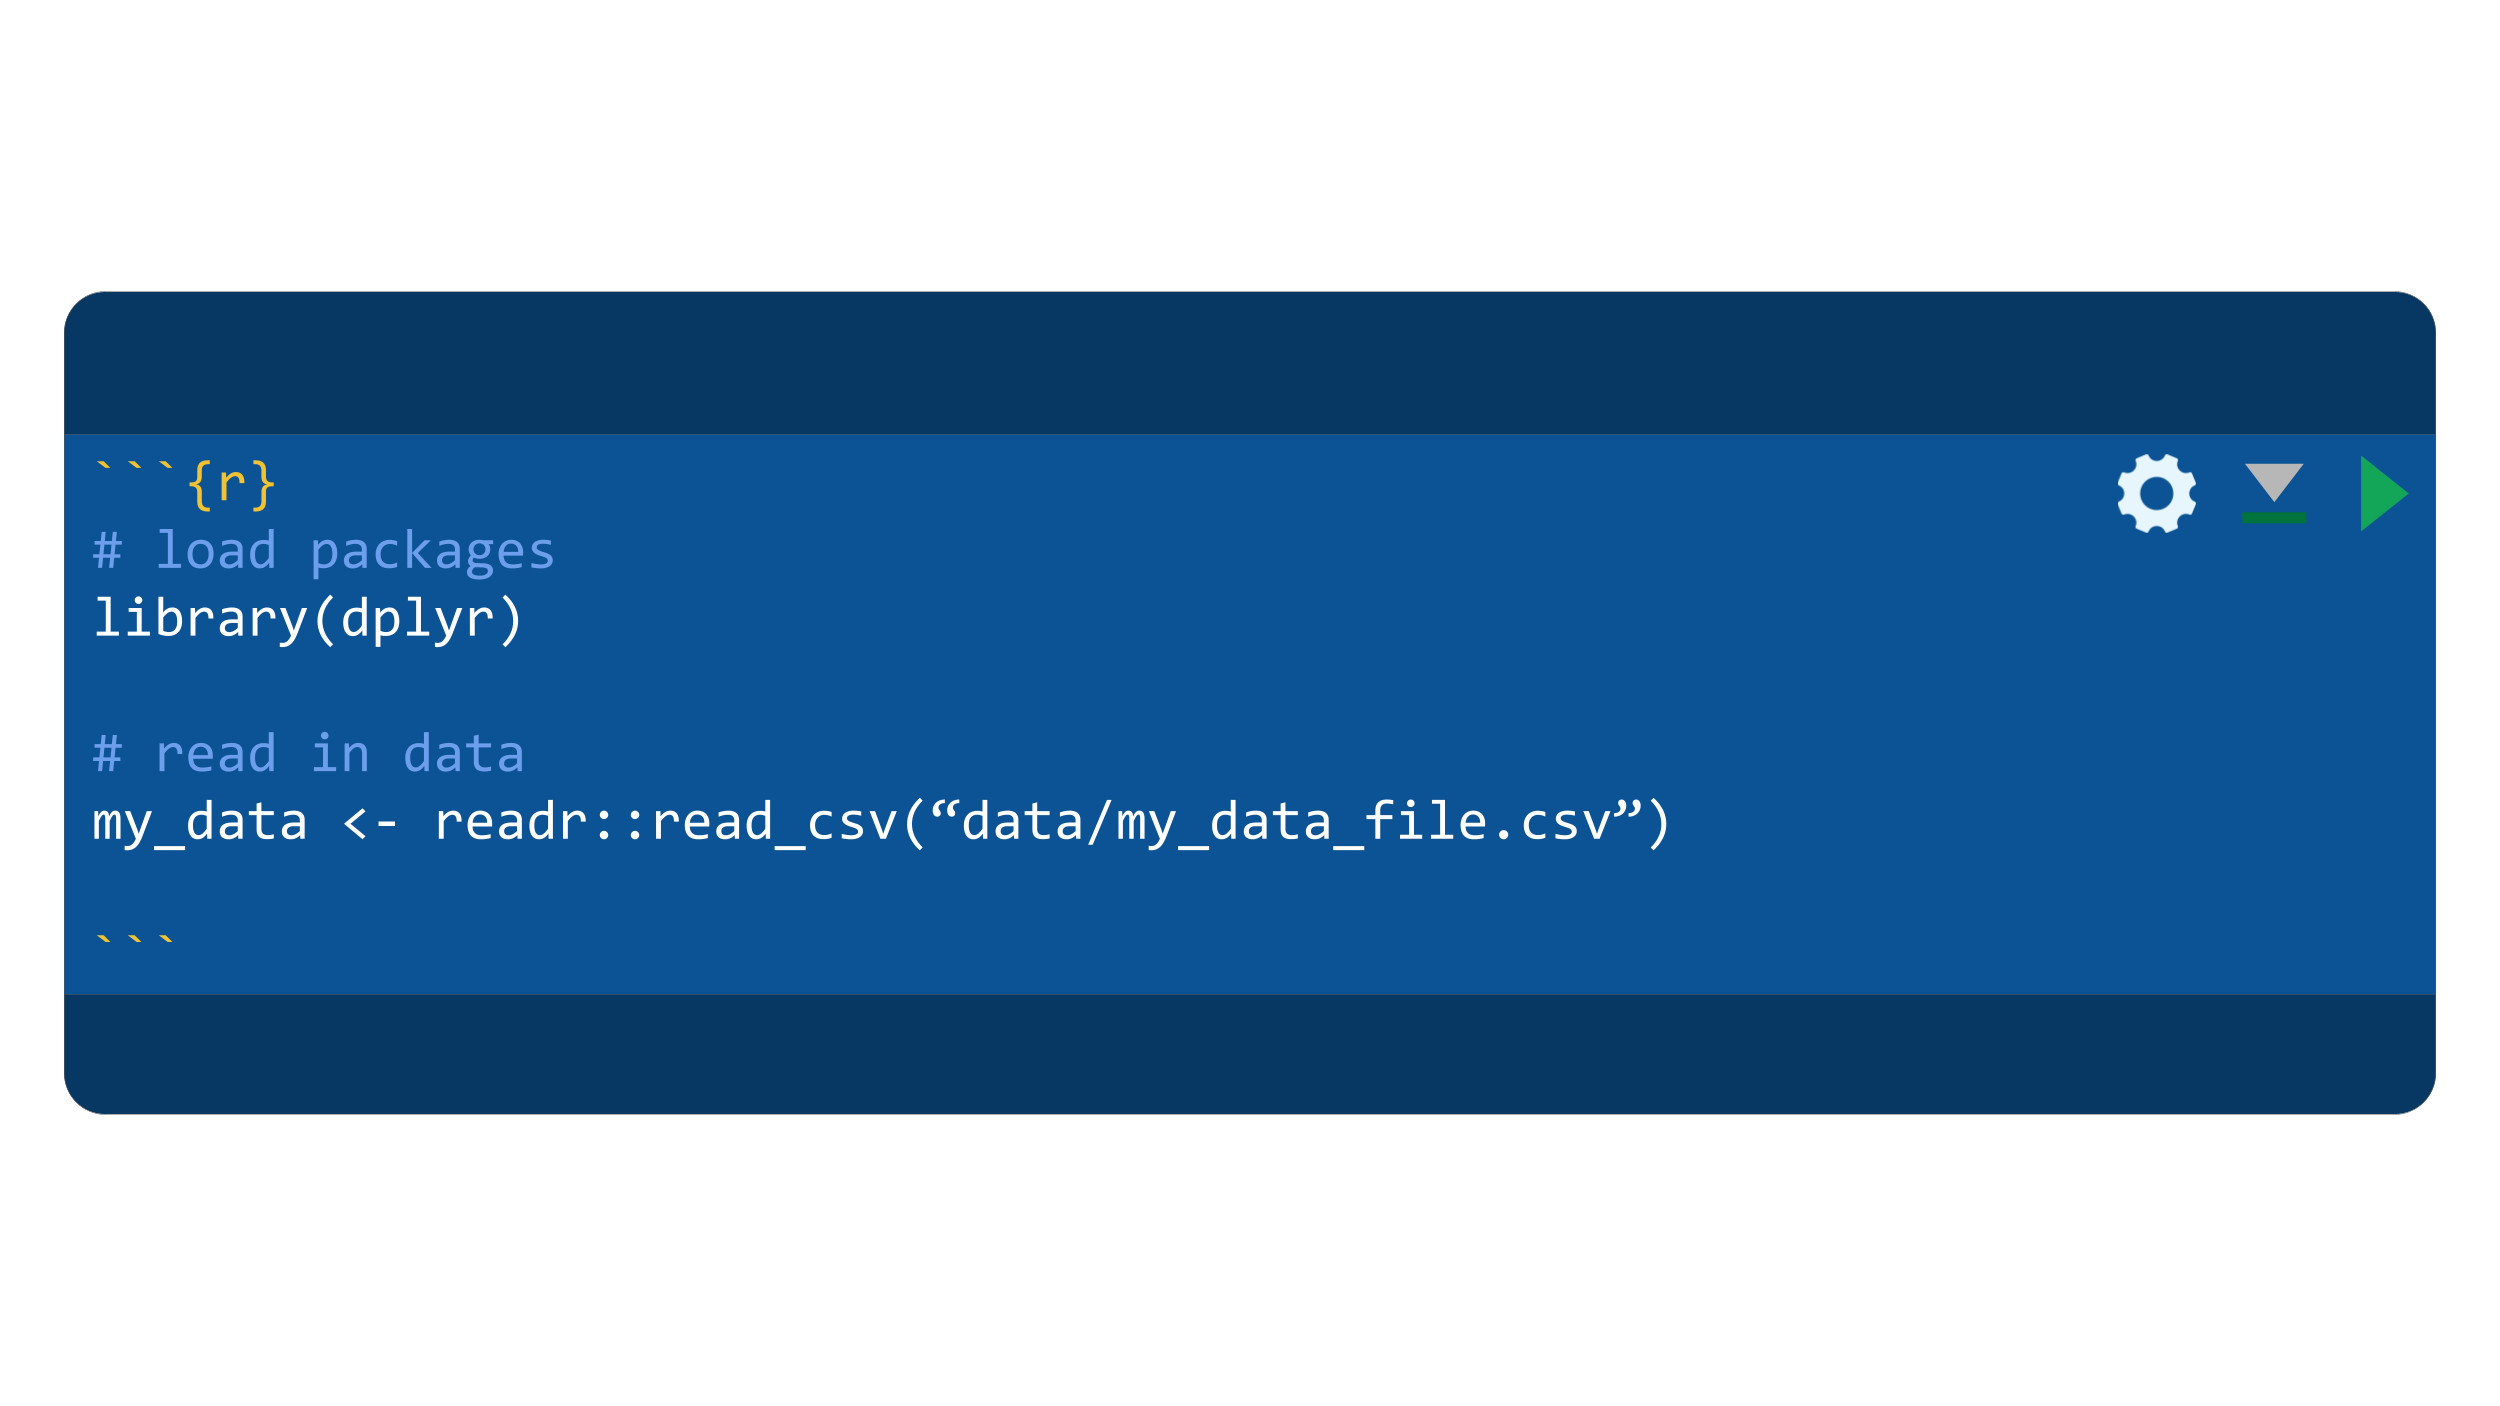
Adding a code chunk to a quarto file
To add a new R code chunk, go to a new line and enter: ```{r}
Then, type your code, starting on the following line. To end a code chunk, go to another new line and enter: ```
You can also add a code chunk in RStudio by clicking the button green button with a plus sign and a “c”, below the open file names. Other options include navigating to “Code” → “Insert Chunk” or using a keyboard shortcut: Ctrl + Alt + I in Windows and Linux, and Cmd + Option + I on Mac.
You can also add a code chunk in Positron by clicking the icon that shows an arrow pointing towards to two vertical boxes. There is a keyboard shortcut to add a code chunk: Ctrl + Shift + I in Windows and Linux, and Cmd + Shift + I on Mac.
library(here)
library(dplyr)
library(ggplot2)
Next, we will load the wrangled data. We will use the function here(), which creates relative file paths.
More information about the here() function:
The here() function creates file paths that always start from the main project folder (the top-level folder that contains all of your project files). In a Git repository, this is the folder that contains the .git directory, which was created when you initialized the repository. However, there are other ways here can determine where to start the path, including the directory with an .Rproj file (if you are using one), see this list of conditions for the starting directory for more information. Using relative file paths (i.e., paths that only reference folders within your project) makes your code more portable and easier for collaborators to run. Importantly, the here() function creates these relative paths in a way that is compatible with different kinds of operating systems which have different path requirements. In contrast, absolute file paths depend on the specific file structure of your personal computer and will not necessarily work on other machines.
We want to load data from the file clean_sample_metadata.rda contained within the processed_data folder.
load(here::here("processed_data", "clean_sample_metadata.rda"))Now that you have created a new file and loaded packages and data, this is a good time to stage this new file and your work.
Navigate back to .
Open the and navigate to your repository. Recall that you can stage the new file with git add:
git add 03_visualize_study_cohorts.qmdNext, add a commit with an appropriate commit message.
git commit -m "Add new file '03_visualize_study_cohorts'"Comparing Sample Sizes
Now that we’ve started tracking our work with Git, let’s start by considering the first question: how do these studies compare in terms of the number of observations?
Use the dplyr functions group_by() and count() to view the number of observations per study.
clean_metadata %>%
  dplyr::group_by(Study) %>%
  dplyr::count(name = "total")
# A tibble: 8 × 2
# Groups: Study [8]
Study total
<chr> <int>
1 Asnicar 16
2 Backhed 392
3 Chu 27
4 Ferretti 102
5 Parnanen 48
6 Shao 588
7 Wampach 49
8 Yassour 221
A note on the pipe operators %>% and |>.
The pipe operator %>% chains R commands together. It takes the preceding object and inputs it as the first argument to the function that follows it. It often is used to make code more readable and to avoid using intermediate objects or nested functions. The code above is equivalent to both of these expressions:
grouped_data <- group_by(clean_metadata, Study)
count(grouped_data, name = "total")
# A tibble: 8 × 2
# Groups: Study [8]
Study total
<chr> <int>
1 Asnicar 16
2 Backhed 392
3 Chu 27
4 Ferretti 102
5 Parnanen 48
6 Shao 588
7 Wampach 49
8 Yassour 221count(group_by(clean_metadata, Study))# A tibble: 8 × 2
# Groups: Study [8]
Study n
<chr> <int>
1 Asnicar 16
2 Backhed 392
3 Chu 27
4 Ferretti 102
5 Parnanen 48
6 Shao 588
7 Wampach 49
8 Yassour 221The pipe operator that we use, %>%, is part of the magrittr and dplyr R packages. There is also a pipe operator in base R, |>. In most cases, these two pipe operators will work equivalently.
clean_metadata |>
  group_by(Study) |>
  count(name = "total")
# A tibble: 8 × 2
# Groups: Study [8]
Study total
<chr> <int>
1 Asnicar 16
2 Backhed 392
3 Chu 27
4 Ferretti 102
5 Parnanen 48
6 Shao 588
7 Wampach 49
8 Yassour 221We can see that there is quite the spread of study sizes. Let’s also break this down by whether observations are from infants vs mothers. Whether the observation comes from an infant or a mother is contained in the variable Category.
Coding opportunity
Your turn: Modify the code above to count the number of observations by Study and by Category, and save the results as a data frame named sample_counts.
The output data frame should look like this:
# A tibble: 16 × 3
# Groups:   Study, Category [16]
   Study    Category total
   <chr>    <chr>    <int>
 1 Asnicar  infant       8
 2 Asnicar  mother       8
 3 Backhed  infant     294
 4 Backhed  mother      98
 5 Chu      infant      12
 6 Chu      mother      15
 7 Ferretti infant      81
 8 Ferretti mother      21
 9 Parnanen infant      32
10 Parnanen mother      16
11 Shao     infant     410
12 Shao     mother     178
13 Wampach  infant      35
14 Wampach  mother      14
15 Yassour  infant     152
16 Yassour  mother      69
View code:
# create the sample_counts data frame
sample_counts <- clean_metadata %>%
  group_by(Study, Category) %>%
  count(name = "total")
# calling the variable name here will print the output
sample_counts
Now that we’ve looked at this data in a table format, let’s make a plot so that we can compare this data visually. We’ll make a bar plot, with separate bars for each study and for observation category (infant vs mother).
sample_counts %>%
  ggplot2::ggplot(ggplot2::aes(x = Study, y = total, fill = Category)) +
  ggplot2::geom_col(position = ggplot2::position_dodge())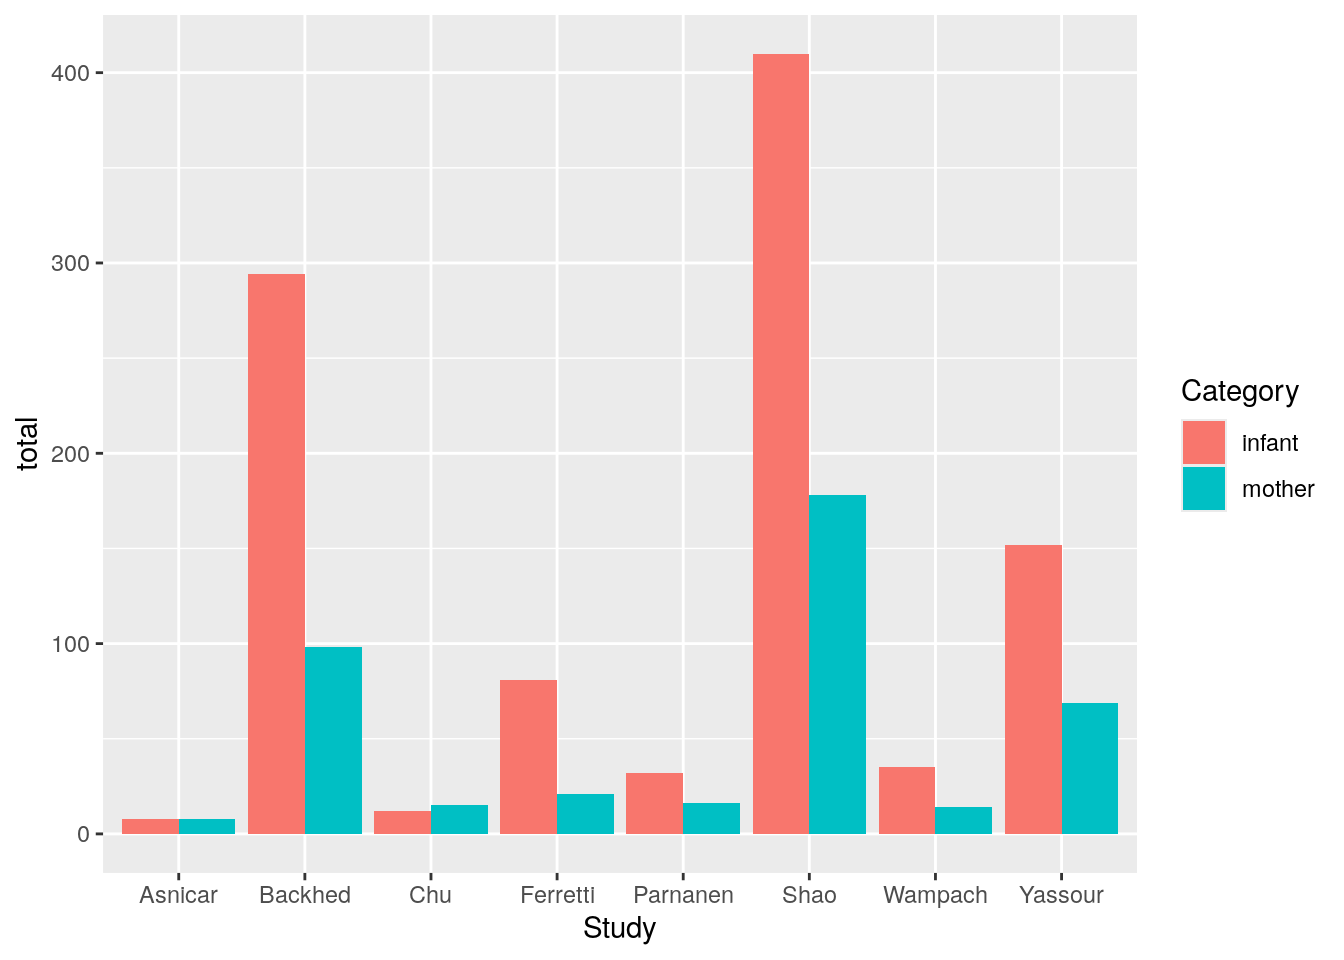
While this plot looks good, it would be visually easier to compare if the studies were ordered by the number of observations (read more details about this recommendation as well as other recommendations for making better data visualizations in this data visualization course). We can make a vector that orders the studies from the least observations to the most observations by using the dplyr functions group_by(), summarise(), arrange(), and pull().
More information about these dplyr functions:
dplyr function |
operation |
|---|---|
group_by() |
groups rows by a variable |
summarise() |
computes table of summaries |
arrange() |
sorts rows by one or more variables |
pull() |
pulls a variable from the data frame as a vector |
study_order <- sample_counts %>%
  group_by(Study) %>%
  dplyr::summarise(total_both = sum(total)) %>%
  dplyr::arrange(total_both) %>%
  pull(Study)
study_order
[1] "Asnicar" "Chu" "Parnanen" "Wampach" "Ferretti" "Yassour" "Backhed"
[8] "Shao" We can now order the bar plot by increasing sample size.
sample_counts %>%
  mutate(Study = factor(Study, levels = study_order)) %>%
  ggplot(aes(x = Study, y = total, fill = Category)) +
geom_col(position = position_dodge()) 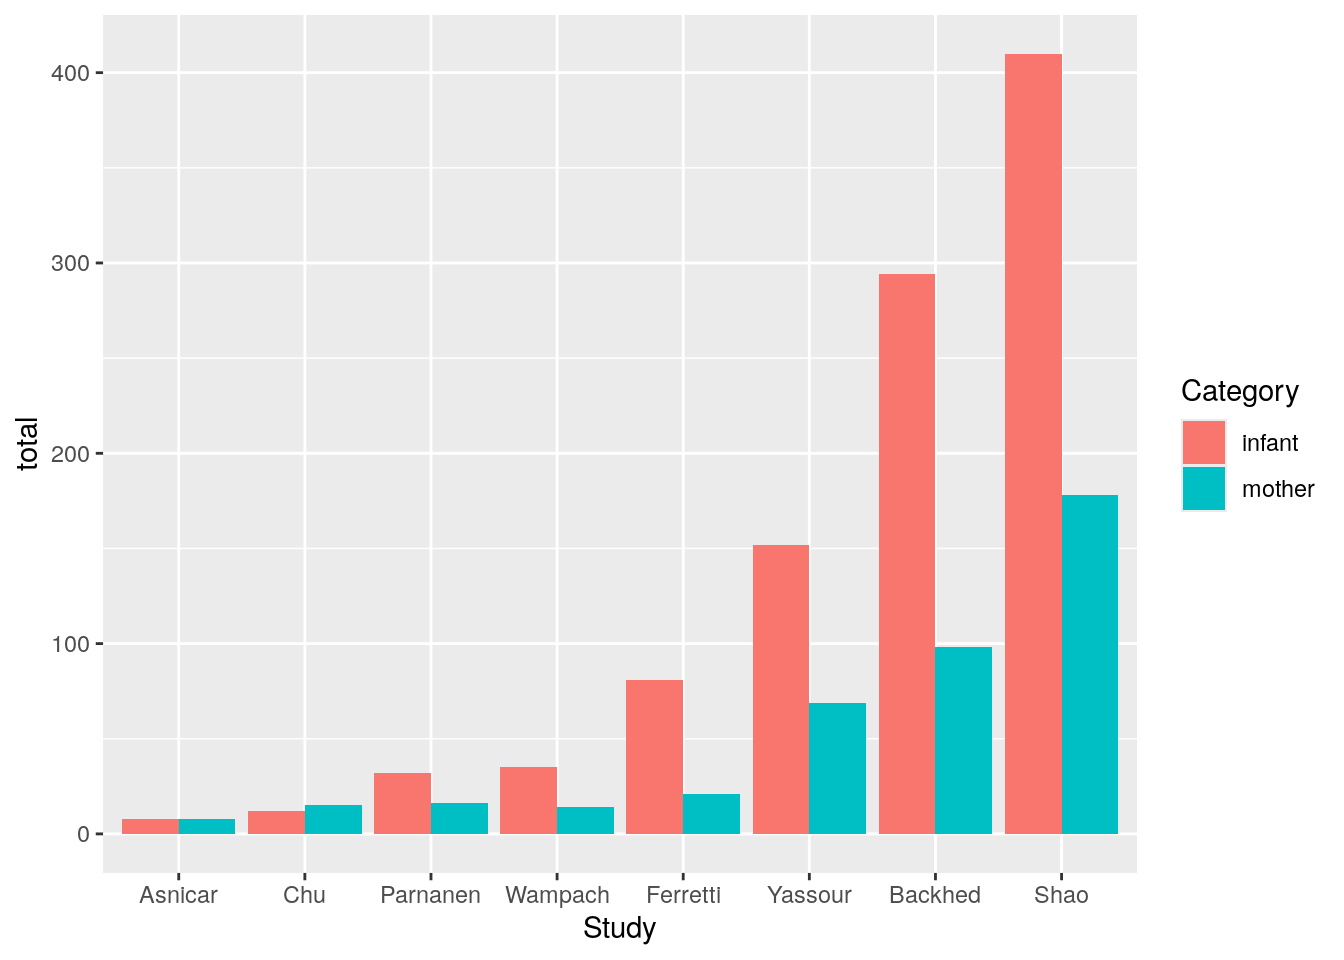
Finally, we can update the colors of the plot and add labels. We will use the function scale_fill_viridis_d() to use colors that are more color-deficiency friendly (more information can be found in this documentation about color scales and in this description of accessible color palettes. While we could use the function gglot2::scale_fill_viridis_d() with no arguments to use default colors from this color map, here we include the arguments begin and end to choose specific colors (see the help file by typing ?ggplot2::scale_fill_viridis_d() for more information on these arguments).
sample_counts %>%
  mutate(Study = factor(Study, levels = study_order)) %>%
  ggplot(aes(x = Study, y = total, fill = Category)) +
  geom_col(position = position_dodge()) +
  ggplot2::scale_fill_viridis_d(begin = 0.1, end = 0.8) +
  ggplot2::theme_minimal() +
  ggplot2::labs(y = "Number of samples",
       x = "Study",
       title = "Number of Samples by Study and Category") +
  ggplot2::theme(plot.title = element_text(hjust = 0.5))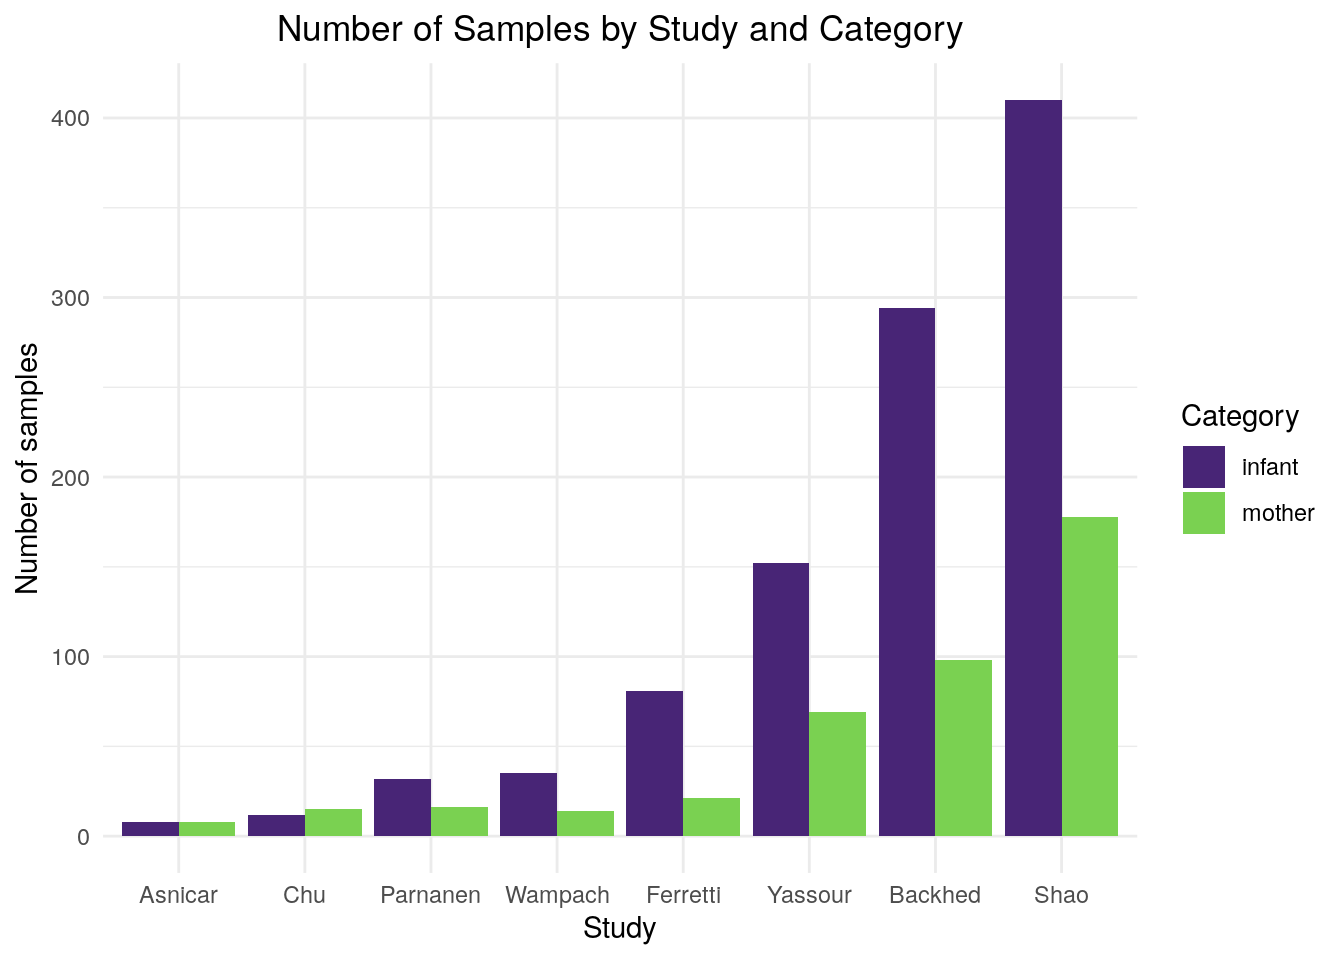
We will now use ggsave() to save this plot in the figures folder.
ggplot2::ggsave("figures/study_sizes_by_category.png", height = 6, width = 9)This is another great time to commit your current work.
Navigate back to GitHub Desktop. You should see that 03_visualize_study_cohorts.qmd now has an orange box next to it (signaling that this file has been modified) and that figures/study_sizes_by_category.png has been added (which is signaled by the green plus sign next to it).
Even though Git is already tracking 03_visualize_study_cohorts.qmd, we still need to use git add to tell Git to stage this file for this commit. We will also need to start tracking figures/study_sizes_by_category.png. We can stage multiple files at once by listing them with spaces between.
git add 03_visualize_study_cohorts.qmd figures/study_sizes_by_category.png Next, add a commit with an appropriate commit message.
git commit -m "Add plot of study sizes to '03_visualize_study_cohorts' and save plot in figures folder."Comparing Longitudinal Sampling
Next we will consider the second question: how do these studies compare in terms of when they took samples after the birth of the infants?
First, we will check if any of our observations have missing sampling day information.
clean_metadata %>%
  # only keep rows that have NA values for sampling_day
  filter(is.na(sampling_day)) %>%
  # view a smaller subset of variables
  select(Study, SampleID, sampling_day, Category)
# A tibble: 7 × 4
Study SampleID sampling_day Category
<chr> <chr> <dbl> <chr>
1 Backhed 201_4M NA infant
2 Backhed 229_M NA mother
3 Backhed 229_B NA infant
4 Backhed 544_B NA infant
5 Backhed 624_B NA infant
6 Backhed 633_B NA infant
7 Shao C01831_NA NA infant Here we can see that there are six observations from the Backhed study and one observation from the Shao study for which sampling_day is missing. Let’s create a new data frame that removes these observations.
sampling_day_df <- clean_metadata %>%
  # remove rows that have NA values for sampling_day
  filter(!is.na(sampling_day))
Now, we will make a histogram of sampling day, where we separate the data by Category and Study. There are multiple ways to do this, but we will color the bars by Category and then use facet_wrap() to make separate panels for each study. Below we show two versions of this histogram that show the patterns in the data in different ways.
In this histogram, we will order the studies in the same order that we used in the bar plot earlier (from smallest to largest sample size) and set scale = "free_y" in facet_wrap() so that each of the y-axes of the panels is different. The different y-axes in this plot make it easy for us to compare sampling day across studies, because we can easily see when samples were taken in each study.
sampling_day_df %>%
  mutate(Study = factor(Study, levels = study_order)) %>%
  ggplot(aes(x = sampling_day, fill = Category, group = Category)) +
  geom_histogram(position = position_dodge(), bins = 20) +
  facet_wrap(~Study, scale = "free_y", ncol = 1) +
  labs(x = "Days since birth at sampling",
       y = "Count",
       title = "Distribution of sampling day across studies") +
  scale_fill_viridis_d(begin = 0.1, end = 0.8) +
  theme_minimal() +
  theme(plot.title = element_text(hjust = 0.5))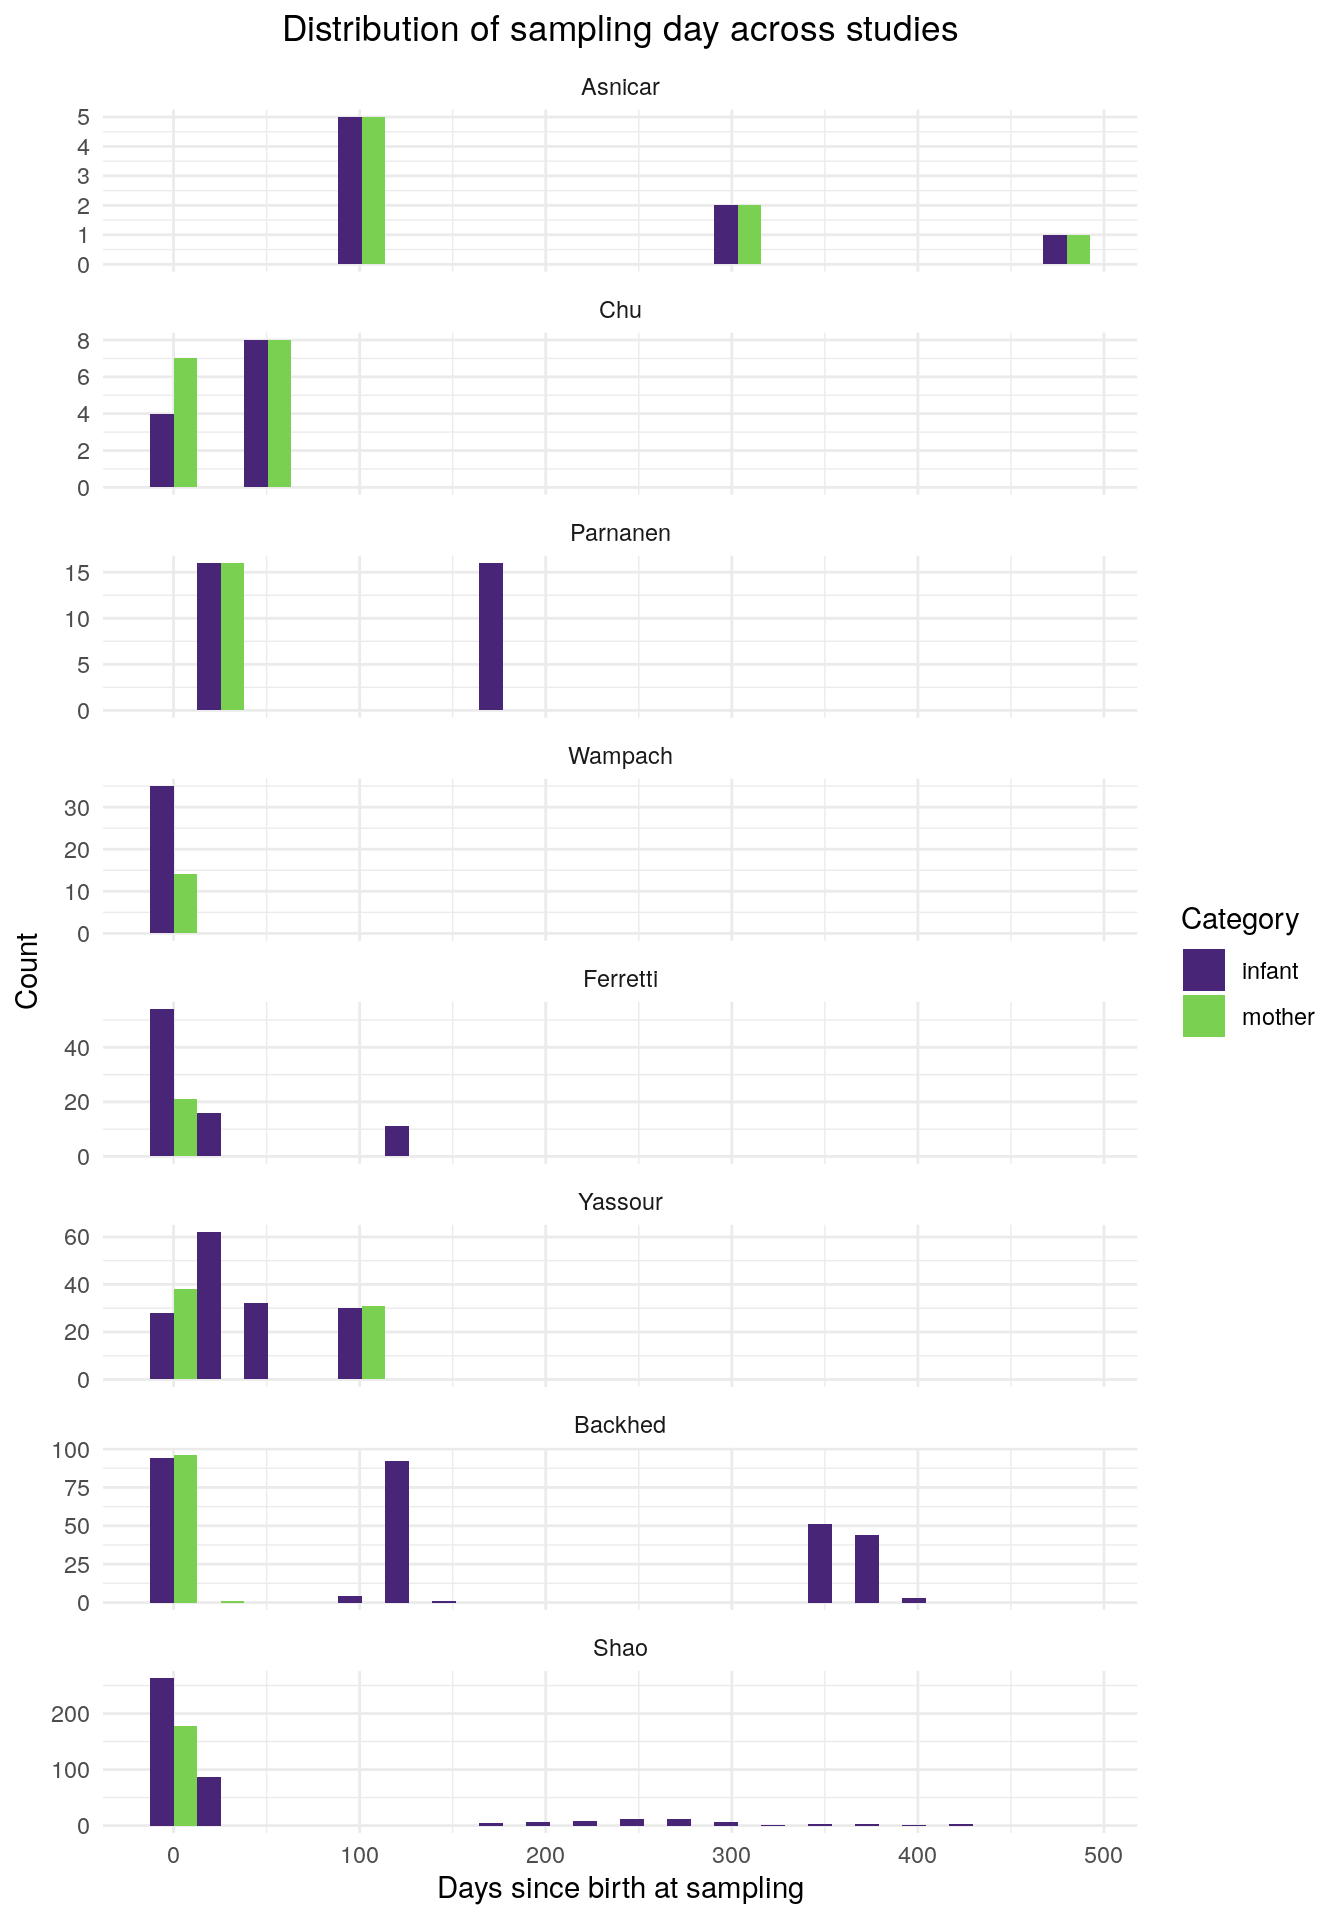
We will save this plot in the figures folder.
ggsave("figures/sampling_timepoints_option1.png", height = 6, width = 9)In this histogram, we will set scale = "fixed" in facet_wrap() so that the y-axes of the panels all share the same scale. We will order the study panels by the last sampling day. The shared y-axis in this plot lets us visually compare the studies both by sample size and by sampling day. However, for studies with smaller sample sizes it is harder to see the bars and determine when samples were taken. The ordering of the study facets helps us compare the range of sampling time points between studies.
sampling_day_df %>%
  mutate(Study = reorder(Study, sampling_day)) %>%
  ggplot(aes(x = sampling_day, fill = Category, group = Category)) +
  geom_histogram(position = position_dodge(), bins = 20) +
  facet_wrap(~Study, scale = "fixed", ncol = 1) +
  labs(x = "Days since birth at sampling",
       y = "Count",
       title = "Distribution of sampling day across studies") +
  scale_fill_viridis_d(begin = 0.1, end = 0.8) +
  theme_minimal() +
  theme(plot.title = element_text(hjust = 0.5))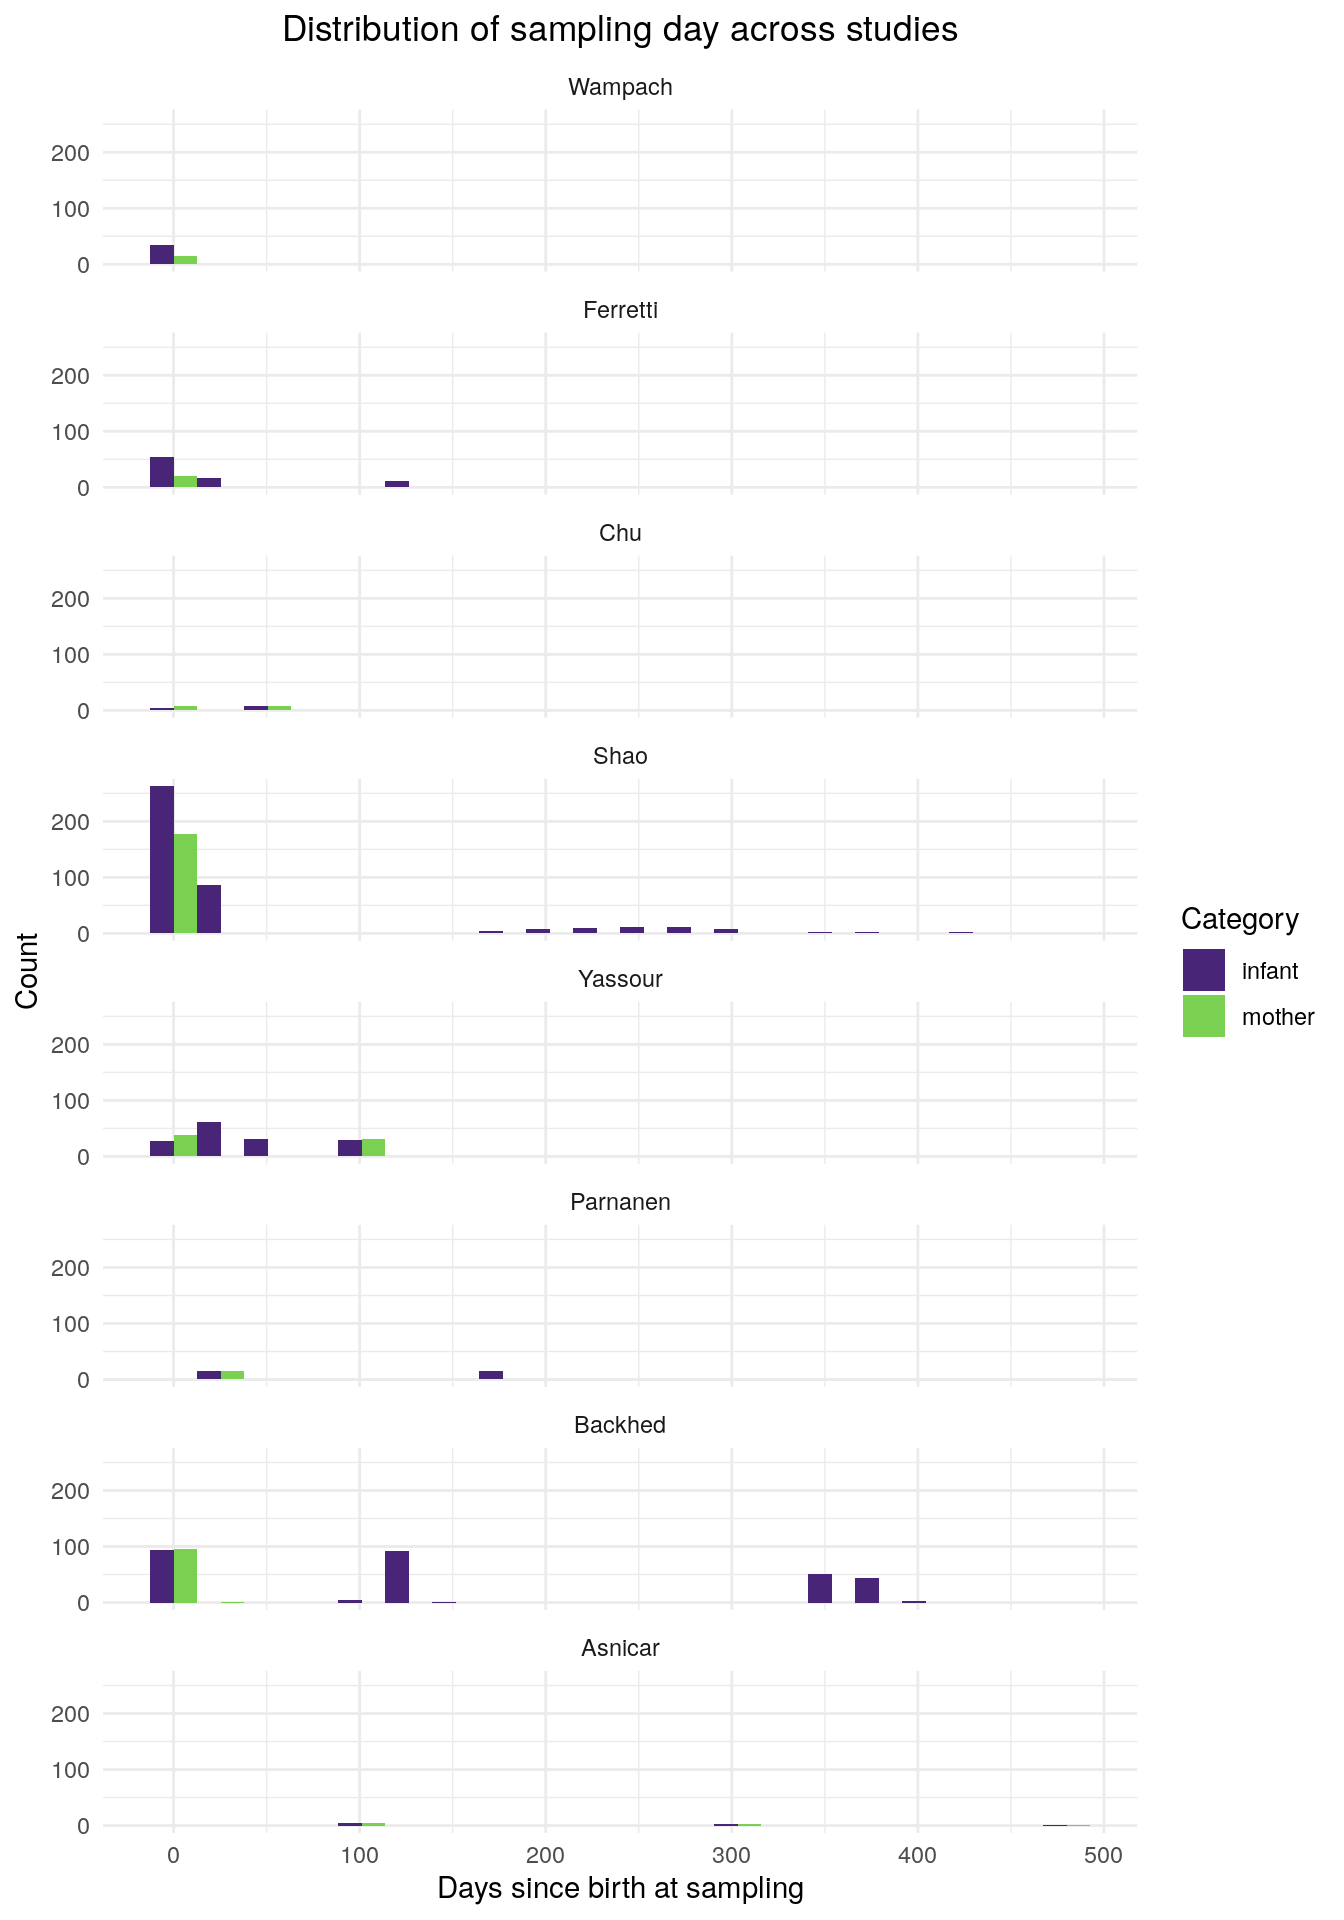
We will save this plot in the figures folder.
ggsave("figures/sampling_timepoints_option2.png", height = 6, width = 9)While we use histograms to compare the sampling time points, you could also try other types of plots.
We could also compare sampling time points between studies using boxplots. These boxplots let us visualize the distribution of sampling time points for each study, emphasizing the range and middle 50% of each sampling times for each study. Note the differences in y-axis scales. The number of points in each facet represent the number of samples in that study. Read more about boxplots with jittered points in this data visualization course.
sampling_day_df %>%
    mutate(Study = factor(Study, levels = study_order)) %>%
    ggplot(aes(x = Category, y = sampling_day, fill = Category)) +
    geom_boxplot(outliers = FALSE, alpha = 0.6, width = 0.5) +
    geom_jitter(aes(fill = Category), width = 0.2, alpha = 0.5,
                size = 1.5, shape = 21, color = 'black') +
    facet_wrap(~Study, scales = "free_y") +
    labs(x = "Category", y = "Days since birth at sampling",
        title = "Distribution of sampling day across studies") +
    scale_fill_viridis_d(begin = 0.1, end = 0.8) +
    scale_color_viridis_d(begin = 0.1, end = 0.8) +
    theme_minimal() +
    theme(plot.title = element_text(hjust = 0.5), legend.position = "none")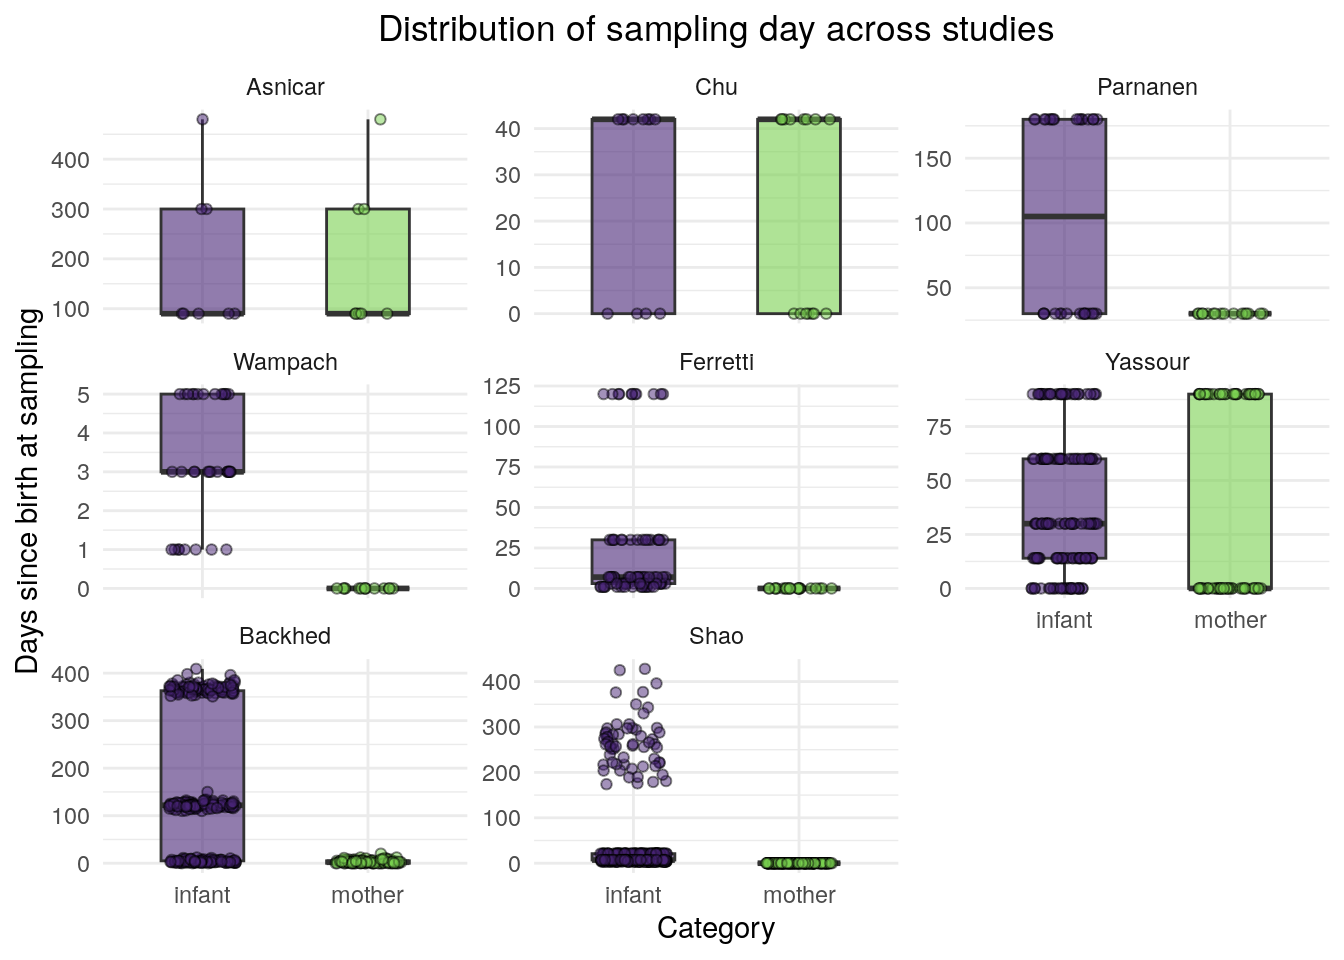
If you like these boxplots, you can include the code above into your .qmd file and save the plot to your figures folder.
ggsave("figures/sampling_timepoints_boxplots.png", height = 6, width = 9)Question opportunity
Are there patterns in the sampling time points can be more easily identified from the histograms? Are there patterns that can be more easily identified from the boxplots? How could these plots complement each other in an analysis?
Now that we have plotted patterns in sample size and sampling time points:
Once you’ve done this, make another commit for these edits.
Navigate back to GitHub Desktop.
First, stage 03_visualize_study_cohorts.qmd and whichever of the figures you have saved (figures/sampling_timepoints_option1.png, figures/sampling_timepoints_option2.png, and/or figures/sampling_timepoints_boxplots.png).
git add 03_visualize_study_cohorts.qmd figures/sampling_timepoints_option1.png Next, add a commit with an appropriate commit message.
git commit -m "Add plot of sampling time points and save plot in figures folder."Great job! You have now made plots to compare the study designs of the studies within the meta-analysis, and made several commits with informative messages that track the history of this analysis.
Data Analysis
Now, we’re going to put our evidence together to draw some conclusions about the study designs of studies included in this meta-analysis.
First, recall the plots that we made.
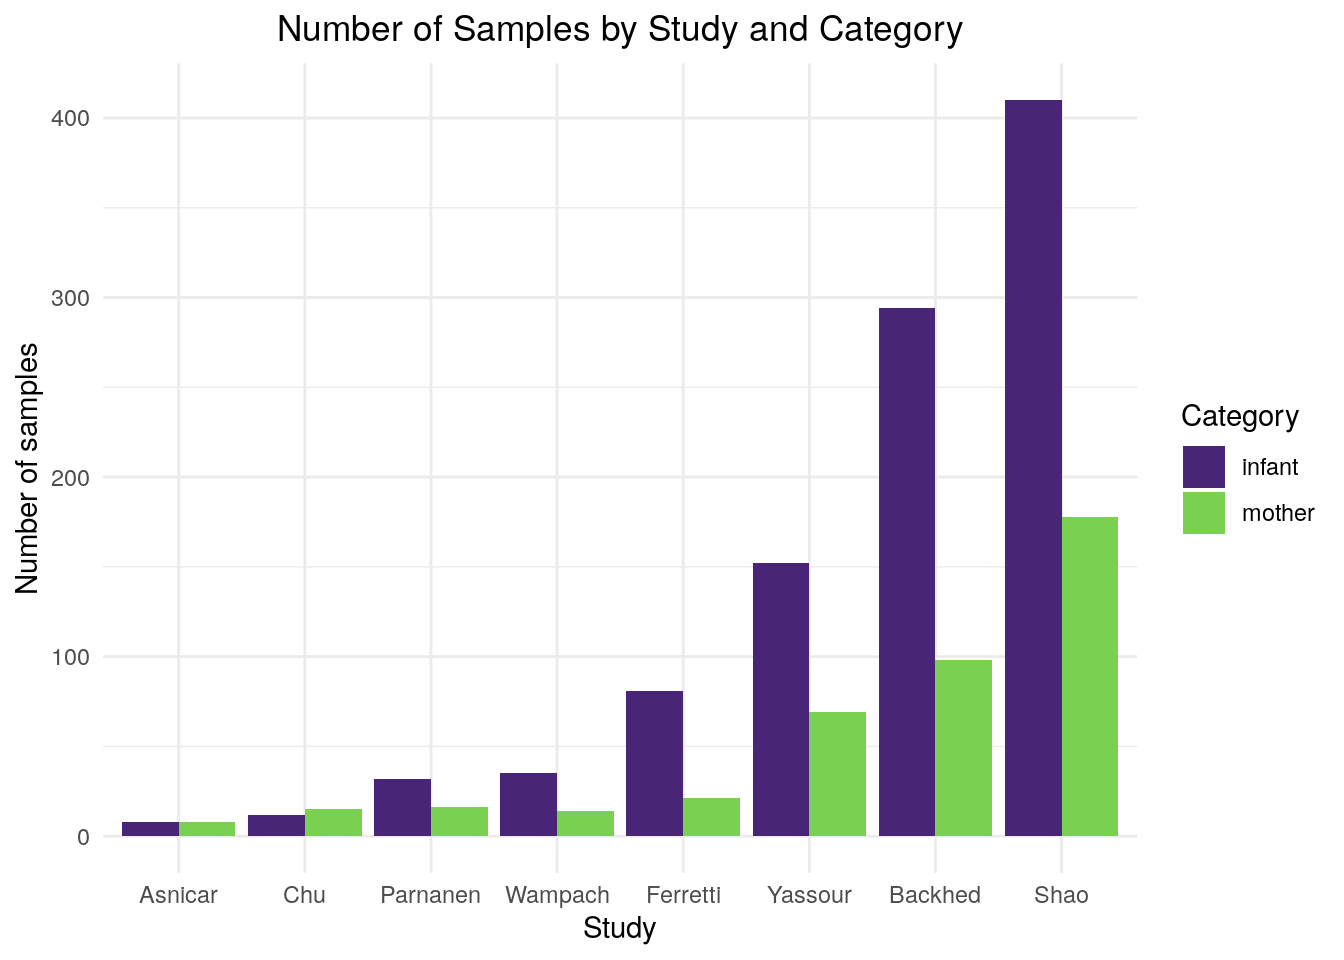
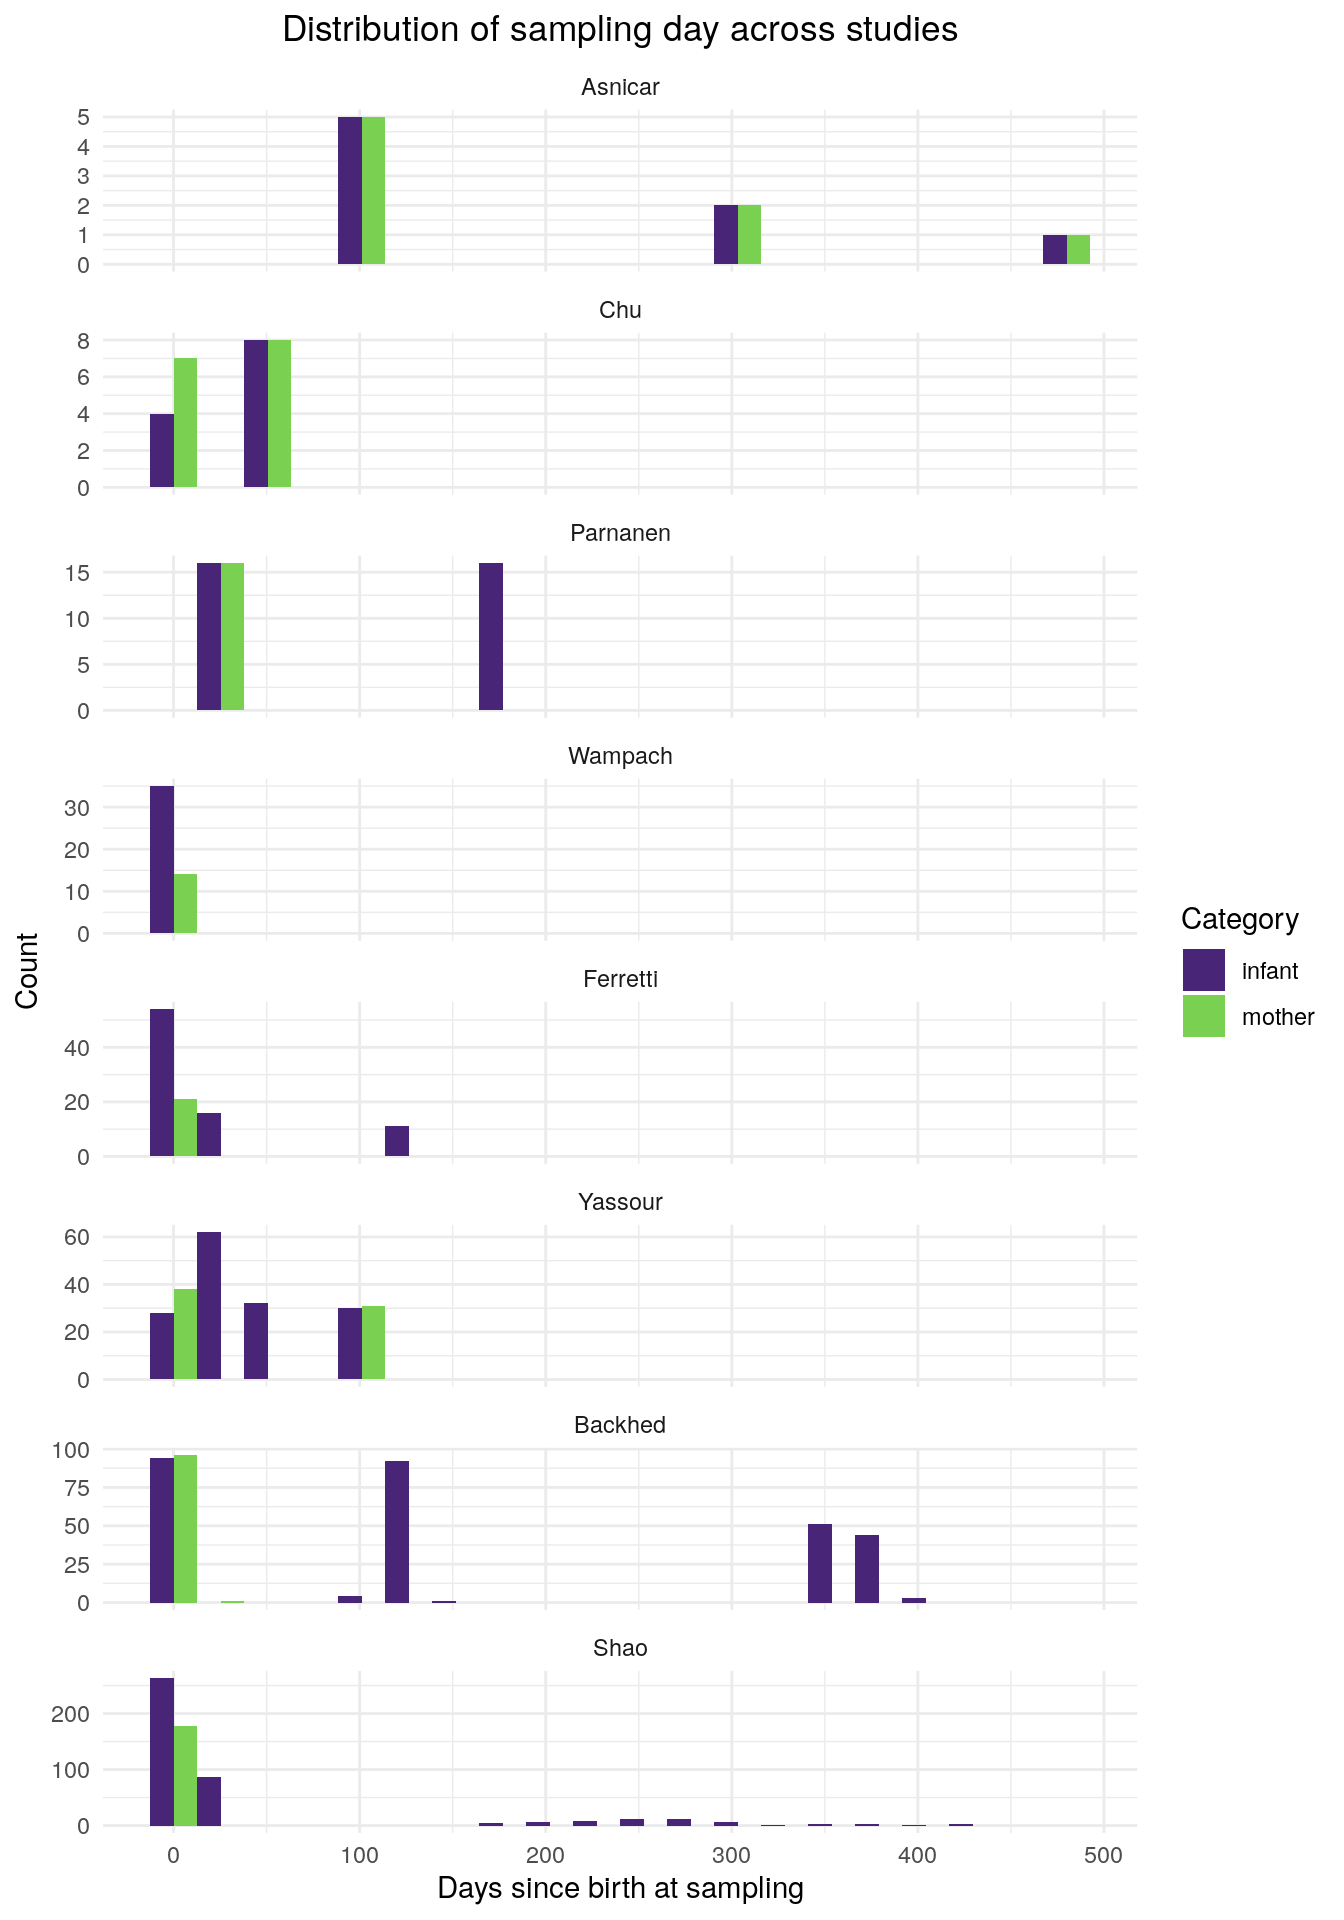
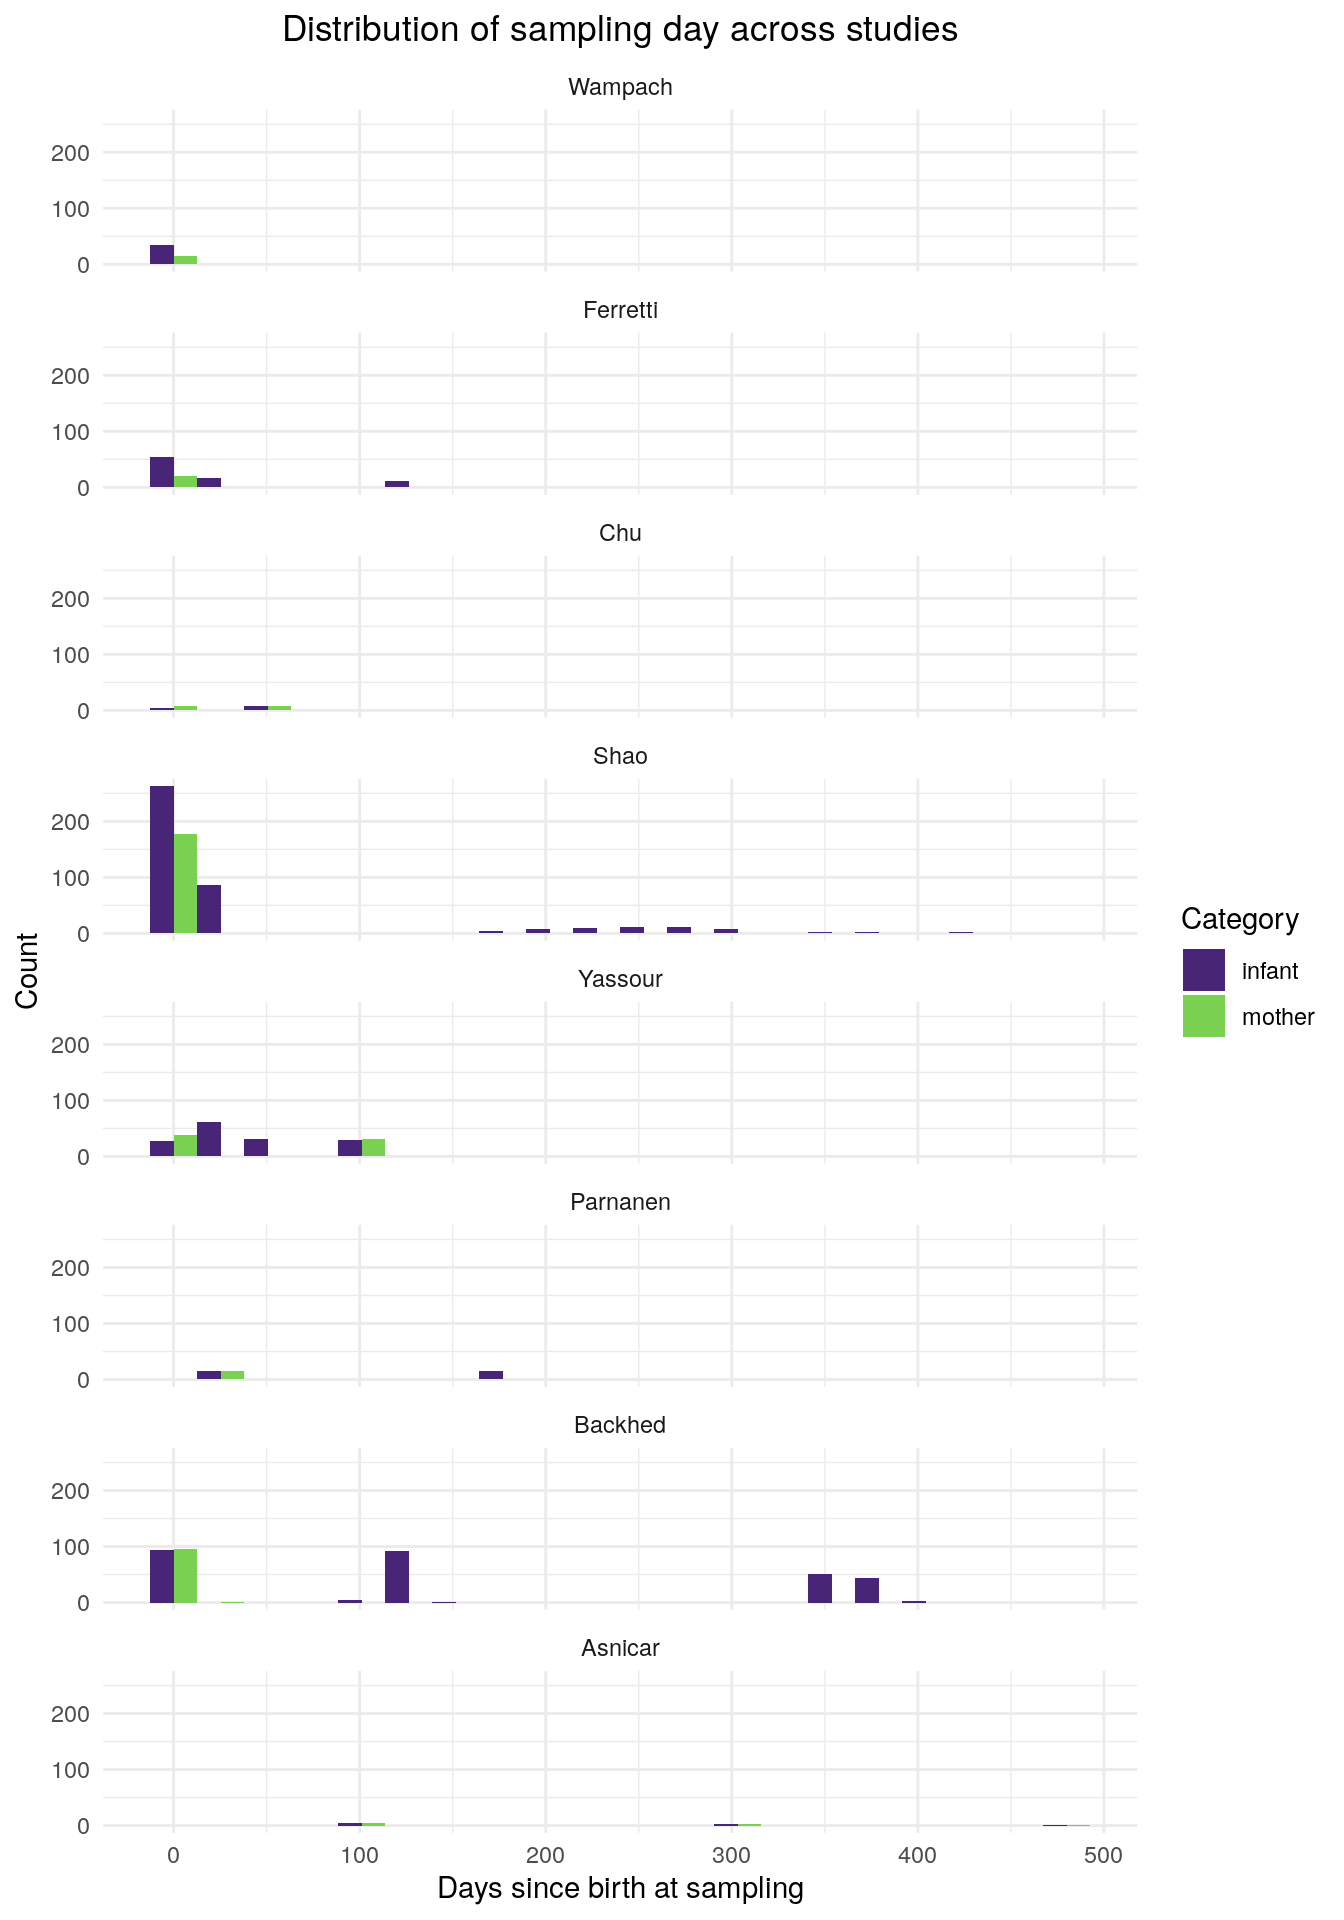
Additionally, we can make a summary table for a concise view of some study design features of these studies.
clean_metadata %>%
  # group data by study and category
  group_by(Study, Category) %>%
  # calculate the number of unique people in each study and category
  summarise(n_person = dplyr::n_distinct(PersonID),
            # calculate the number of unique samples in each study and category
            n_sample = n_distinct(SampleID),
            # calculate the number of unique days at which samples were taken in
            # each study and category
            n_time = n_distinct(sampling_paper),
            # calculate first sampling day for each study and category
            min_time = min(sampling_day, na.rm = TRUE),
            # calculate last sampling day for each study and category
            max_time = max(sampling_day, na.rm = TRUE),
            .groups = "drop")
# A tibble: 16 × 7
Study Category n_person n_sample n_time min_time max_time
<chr> <chr> <int> <int> <int> <dbl> <dbl>
1 Asnicar infant 5 8 3 90 480
2 Asnicar mother 5 8 3 90 480
3 Backhed infant 98 294 72 0 409
4 Backhed mother 98 98 15 0 20
5 Chu infant 10 12 2 0 42
6 Chu mother 10 15 2 0 42
7 Ferretti infant 21 81 5 1 120
8 Ferretti mother 21 21 1 0 0
9 Parnanen infant 16 32 2 30 180
10 Parnanen mother 16 16 1 30 30
11 Shao infant 178 410 58 4 428.
12 Shao mother 178 178 1 0 0
13 Wampach infant 14 35 4 1 5
14 Wampach mother 14 14 1 0 0
15 Yassour infant 38 152 5 0 90
16 Yassour mother 38 69 2 0 90 Question opportunity
Recall one of the main questions of this case study: In this meta-analysis of infant gut microbiome samples, how do the original studies compare in their sampling designs? Specifically, how do they compare in terms of the number of samples and the sampling timeline?
Use the two plots you’ve made and the table above to make a few observations that compare and contrast the sampling designs of the original studies.
Answer
Possible observations from the plots:
- Two studies have small samples sizes (Asnicar with 16 samples and Chu with 27 samples), three studies have more moderate sample sizes (Wampach with 49 samples Parnanen with 64 samples, and Ferretti with 102 samples), and three studies have larger sample sizes (Yassour with 258 samples, Backhed with 392 samples, and Shao with 588 samples).
- Some studies take the same number or similar numbers of samples from mothers and infants (Asnicar, Chu, Parnanen) and other studies take significantly more samples from infants than mothers (Wampach, Ferretti, Yassour, Backhed, and Shao).
- Wampach sampled only in the first days after birth, Chu, Parnanen, Ferretti, and Yassour sampled only in the first six months since birth, and Asnicar, Backhed, and Shao took samples in the first year and a half since birth.
- Some studies appear to have sampled at specific time points (Asnicar, Chu, Wampach, Parnanen, and Ferretti) and other studies appear to have sampled at a wider variety of timepoints (Yassour, Backhed, Shao).
Since you’ve performed the requested analysis, make sure to document any new files in this repository in the README.md file.
Navigate back to GitHub Desktop.
We need to first stage 03_visualize_study_cohorts.qmd and README.md.
git add 03_visualize_study_cohorts.qmd README.mdNext, add a commit with an appropriate commit message.
git commit -m "Draw conclusions and document new files in README"Push the changes that you’ve made locally to your remote repository. Because this is your first time pushing from a new branch, you will need to tell Git where you want to push to, adding the flag --set-upstream or -u followed by origin and the name of the branch that you’ve been working on.
git push --set-upstream origin study_comparisonFinally, open the repository on GitHub and confirm that these changes are now visible in the remote repository.
Pull Requests
What is a pull request?
Recall that in the initial description of branches, you learned that branches can be used for development of a new part of a project, separate from the stable version of a repository. A is a way to take a collection of commits on a branch and request to those into another , typically main. A pull request will provide a list of each file that is changed in the branch, as well as the difference between each file and the version of that file on the branch that you are trying to merge your changes into. While you can review your own pull requests, GitHub also has features that make it convenient for collaborators to review your pull requests.
How to make a pull request
In the previous section, you worked locally to make the visualizations that Collab O. Rator had asked you for, and you staged, committed, and pushed these changes. Recall that you were working on a branch called study_comparison. Let’s take a look at this branch on GitHub.
This set of steps will bring you to a page where you can make your pull request. The first thing to note is the panel at the top of the page, which gives you the base branch (this will by default be main) and the compare branch (this will be the branch you’ve been working on, in this case study_comparison). There is an arrow, showing that you are trying to merge the updates that you’ve made in the compare branch into the base branch.
There are a few useful components of this page in which you make a pull request:
- You have a spot to add a title and a description.
- If you scroll down, you’ll see a list of commits that make up this pull request along with the commit messages, and a view of each of the files changed with details of what was changed.
- On the right panel next to the title you’ll see an option for reviewers. If other users have access to this repository, then you can add them as a reviewer. Depending on how they have configured their notification preferences, they may get an email notification that you’ve requested a review from them. It is good practice for you to also reach out to them and send them the link to your pull request to review!
Reproducibility considerations
Components of a good pull requests include:
- A concise but descriptive title.
- A description of the changes you want to merge. This is a good place to list files added and modified and give a quick description of those changes. Give plenty of context; you’ve likely been thinking about the code you want to merge more recently than your collaborator who will review it.
- One good way to describe changes is in a checklist of what you’ve done.
- It can also be helpful to include a checklist of what is left to do, especially if your pull request is a work in progress.
- A request for code review (make specific requests: do you want your collaborator to review all changes? do you want them to focus on a specific file or part of an analysis? do you just a bigger picture review to see if your approach to the problem makes sense?).
For additional suggestions on making good pull requests, you can read more in this reproducibility course. Also see this real-world example of a pull request with these components, followed by back-and-forth between the author and reviewer to iterate on the proposed changes to the analysis.
Navigate to your pull request page and do the following:
Example pull request for this analysis
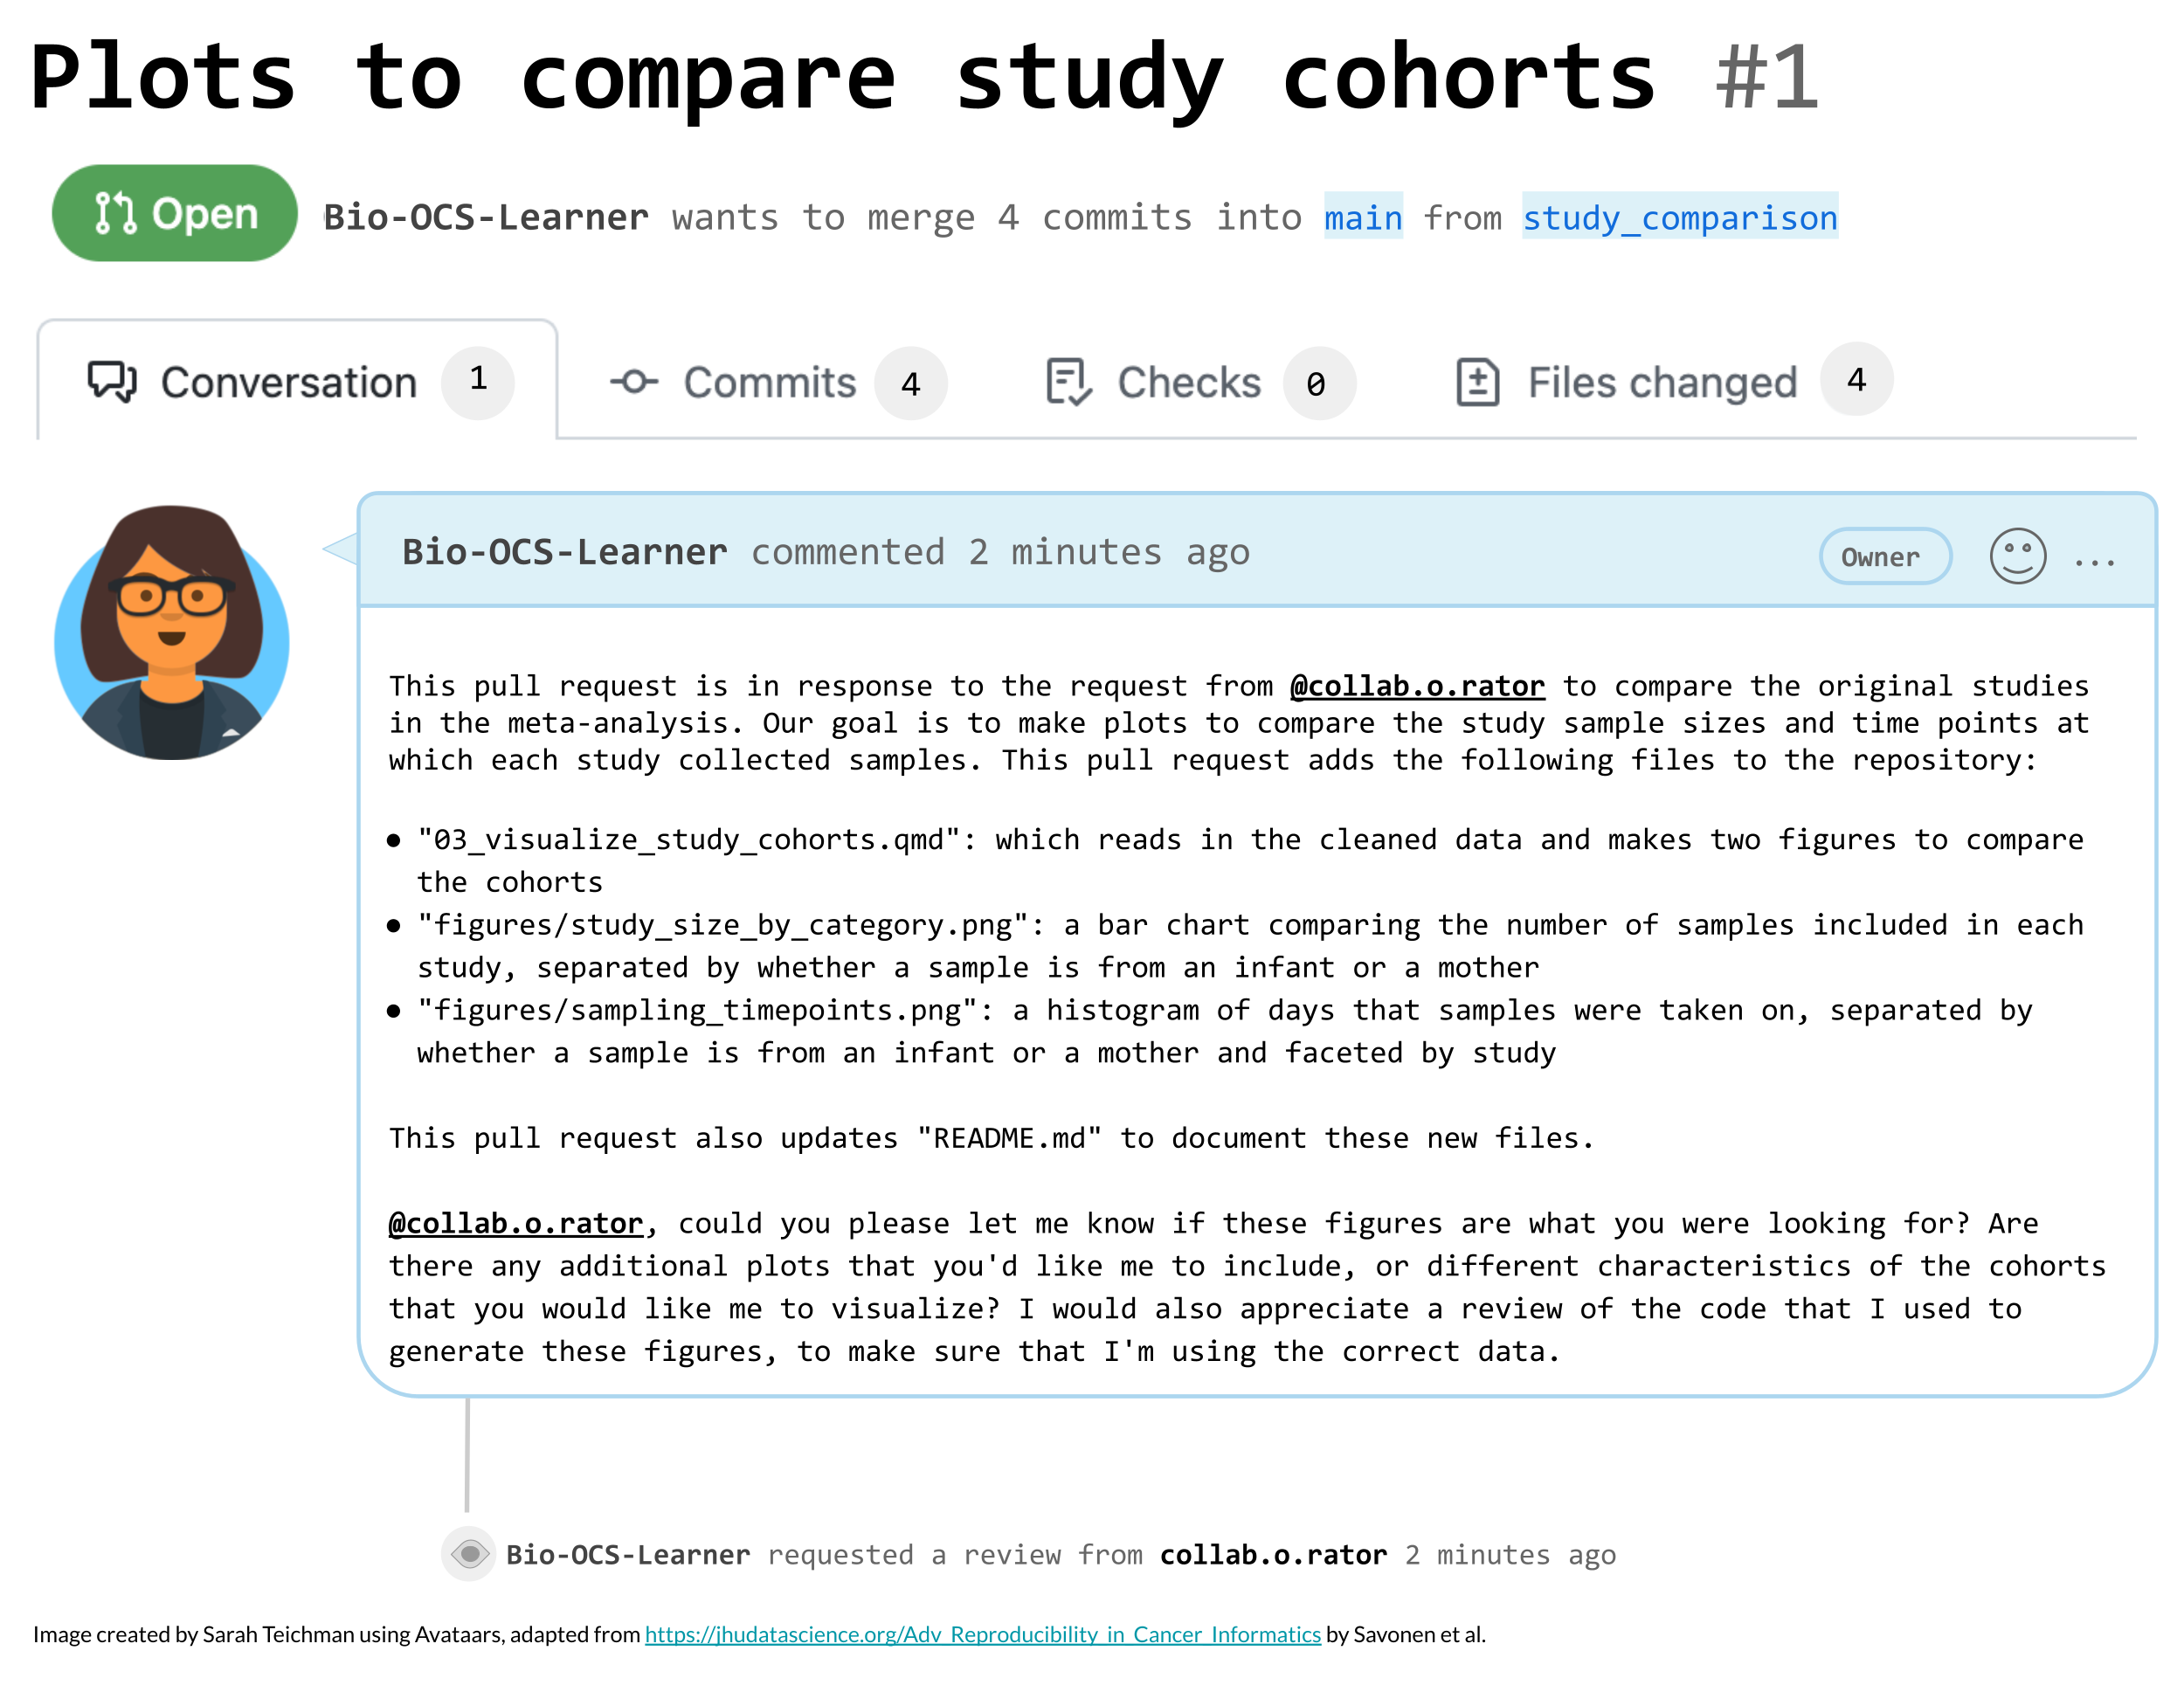
Merging or closing pull requests
Once you have created a pull request, it is referred to as “open”, and the two potential actions are to merge it or close it.
Merging pull requests
Imagine that you submitted a pull request, you or your collaborator has decided that the changes look good, and you want to integrate the changes from your development branch into the base branch. This is called merging your pull request. In most cases, you will see a box that says “No conflicts with base branch”, and you can click the button that says “Merge pull request”. However, in some cases, you will not be able to merge until you resolve merge conflicts. See the troubleshooting section for more information about merge conflicts and how to resolve them.
Closing pull requests
If you close a pull request without merging it, this means that you’ve decided not to integrate the changes from the compare branch into the base branch. This may happen if you decide to go in another direction with an analysis. You can close a pull request by clicking the “Close pull request” button at the bottom of the pull request page. It is important to close pull requests that are no longer active so that the set of open pull requests accurately represents the current state of the project.
Additional notes on pull requests
While your pull request is open, any additional changes that you commit and push to this branch will be automatically added to the pull request.
It is recommended to not let your pull requests get too large. A pull request should be a set of changes that address a certain component of an analysis. Try to avoid combining multiple parts of a project in a single pull request. If you decide to start working on a different part of a project, you can create a new branch for this, and eventually submit a new pull request from that branch. For example, in this project, if you wanted to change how the data is imported, you would want to do this in a separate pull request from the one in which you create data visualizations to compare the study designs. This is a great way to stay organized for complex projects that have different components happening in parallel. Additionally, using more branches and smaller pull requests, each focused on a single set of related changes, can make it easier to review the pull requests and to identify when changes were introduced to a project. Changes to code that depend on each other but address different issues can be addressed in a series of “stacked” pull requests (check out GitHub’s documentation about stacked pull requests for more information).
Summary
Synopsis
In this case study, you’ve learned about why is used as part of science workflows. You’ve been introduced to and , and learned procedures for managing Git-tracked locally using or the , and remotely using GitHub (github.com). You’ve practiced using the “pull → stage → commit → push” workflow to make changes locally that are then tracked remotely. In your analysis, you worked in a , and you submitted a in order to integrate new changes into a stable version of the code and as a way to ask a collaborator to review your code.
Along the way, you’ve also learned about the advantages and challenges of and best practices for scientific project organization.
Summary Activity
Reconstruct the workflow
Drag each workflow block into the correct position below and click Check Answer or Reset to start over. This diagram provides a high-level overview of the steps that you took in this case study. While some of these will not always be necessary for all projects or follow this exact order, each of these steps represent parts of a version controlled project workflow and are important to understand.
Summary Image
Now that you’ve reconstructed the version control workflow from this case study, recall the motivation for version control. Without version control, collaborative scientific projects often involve many emails back and forth, and either a single recent version of the project with no record of its history, or a collection of files representing older versions of the project that can be challenging to organize and are not optimal for multiple people to work on. Version control provides a solution to these challenges. When a project is version-controlled, each file within the project has a recorded history. Commits and associated commit messages can be used to understand when and why changes were made. Additionally, version control facilitates collaboration on scientific projects, letting multiple people work on the same set of files more easily, and providing a useful interface for code review through pull requests.
Main Questions Revisited
NoteMain Questions Revisited: What Did We Learn
| Question | Current answer | Caveat |
|---|---|---|
| How does the use of version control contribute to transparent and reproducible science? | As we describe in the introduction to Git and GitHub section, version control provides a full history of a project, showing who made which changes and when. Additionally, commit messages and pull request descriptions explain why changes were made. Version control also provides an easy way to make a public online code repository for a project. | Versions of a project are only tracked when the user manually makes a commit, changes are not automatically tracked. Commit messages and pull request descriptions are only useful when they are concise and meaningful. |
| How can Git and GitHub be used to facilitate collaboration on a research project? | GitHub provides a central location to store the files for a project, and collaborators can pull changes to their local repository, make updates, and push changes back to the remote repository. An individual can suggest a series of changes through a pull request (see the pull request section for more information), and request a code review from a collaborator before merging the changes into the main branch of the repository. | It is important for collaborators to pull before they begin work locally, otherwise they will likely create merge conflicts (see the troubleshooting section for advice for working through merge conflicts). The careful use of branches and pull requests let collaborators work on and review different aspects of projects at different times. More information about branches can be found in the branches section. |
| In this meta-analysis of infant gut microbiome samples, how do the original studies compare in their sampling designs? | From the plots created in the data visualization section, we can identify major differences across studies in terms of number of samples, proportion of samples from infants versus mothers, and different times at which samples were collected from infants and from mothers. | As described in the limitations section, the sampling date is measured differently in different studies, and there are other potentially relevant study characteristics that we don’t consider in this analysis. |
Troubleshooting Git and GitHub
Most new and experienced users of and will run into problems occasionally. Luckily, is designed so that these problems can be solved, it just may take some time to get used to. There are many helpful resources online for common Git and GitHub problems, and AI chatbots can provide advice (please see our AI disclaimer below for advice on using AI for version control!). In this section, we will mention a few common Git and GitHub problems and provide solutions.
Amending Commit Messages
I my work but I made a mistake in my most recent commit message that I would like to fix.
Navigate to the repository in GitHub Desktop and go to the “History” pane. Right-click on the commit, and you should see the option “Amend Commit…”, click on this option.
If you have not yet pushed your work, you can then update your commit message and click “Commit”, and then continue working.
However, if you have already pushed your work, then you will need to amend the commit message and then force push. This should only be done carefully, because it will rewrite the commit history of the branch for any other collaborator using that branch. Therefore, it is suggested to only do this for branches that you are working on alone, or to alert your collaborator before performing this operation and having them reset their branch after you force push.
If you have committed but not yet your work, you can open the command line and do the following:
git commit --amend -m "Corrected commit message"If you have already pushed your work, you will need to run the previous line, and then push those changes.
git push --force-with-leaseThe --force-with-lease option will push your change to the remote repository, unless the remote branch has new commits. If there are already new commits, this will fail, to avoid disrupting the version history of other users. If you would like to change the message anyway, you can replace --force-with-lease with --force.
Resolving Merge Conflicts
I’ve created a merge conflict. What is this? How do I fix it?
Typically, Git is able to automatically changes from one into another. However, a merge conflict happens when there are competing changes between the two branches, and Git needs you to manually decide how to resolve these differences. A merge conflict may arise in a scenario in which you made a branch from main, worked on that branch, and by the time you submit a pull request back to main, someone else has already committed to main and updated the same file as you have.
Merge conflict
When Git cannot automatically reconcile differences between branches it is attempting to combine, typically because the same part of a file (or closely related parts) were edited in incompatible ways, or because one branch modified something the other removed.
You will know that you have a merge conflict when Git attempts to combine changes (for example, during git merge or git pull) and reports that it cannot automatically resolve some differences.
You will see a pop-up window that says “Resolve conflicts before Merge”, along with a list of files with conflicts. You will need to open the files in a text editor in order to manually resolve the merge conflicts.
When you try to run git pull, you’ll get a response that includes: “Automatic merge failed; fix conflicts and then commit the result”. To identify the files that need to be resolved, you can use the git status command:
git statusRecall the hypothetical branch workflow from earlier in the case study.
Here is an example of a file from the branching workflow that will result in a merge conflict.
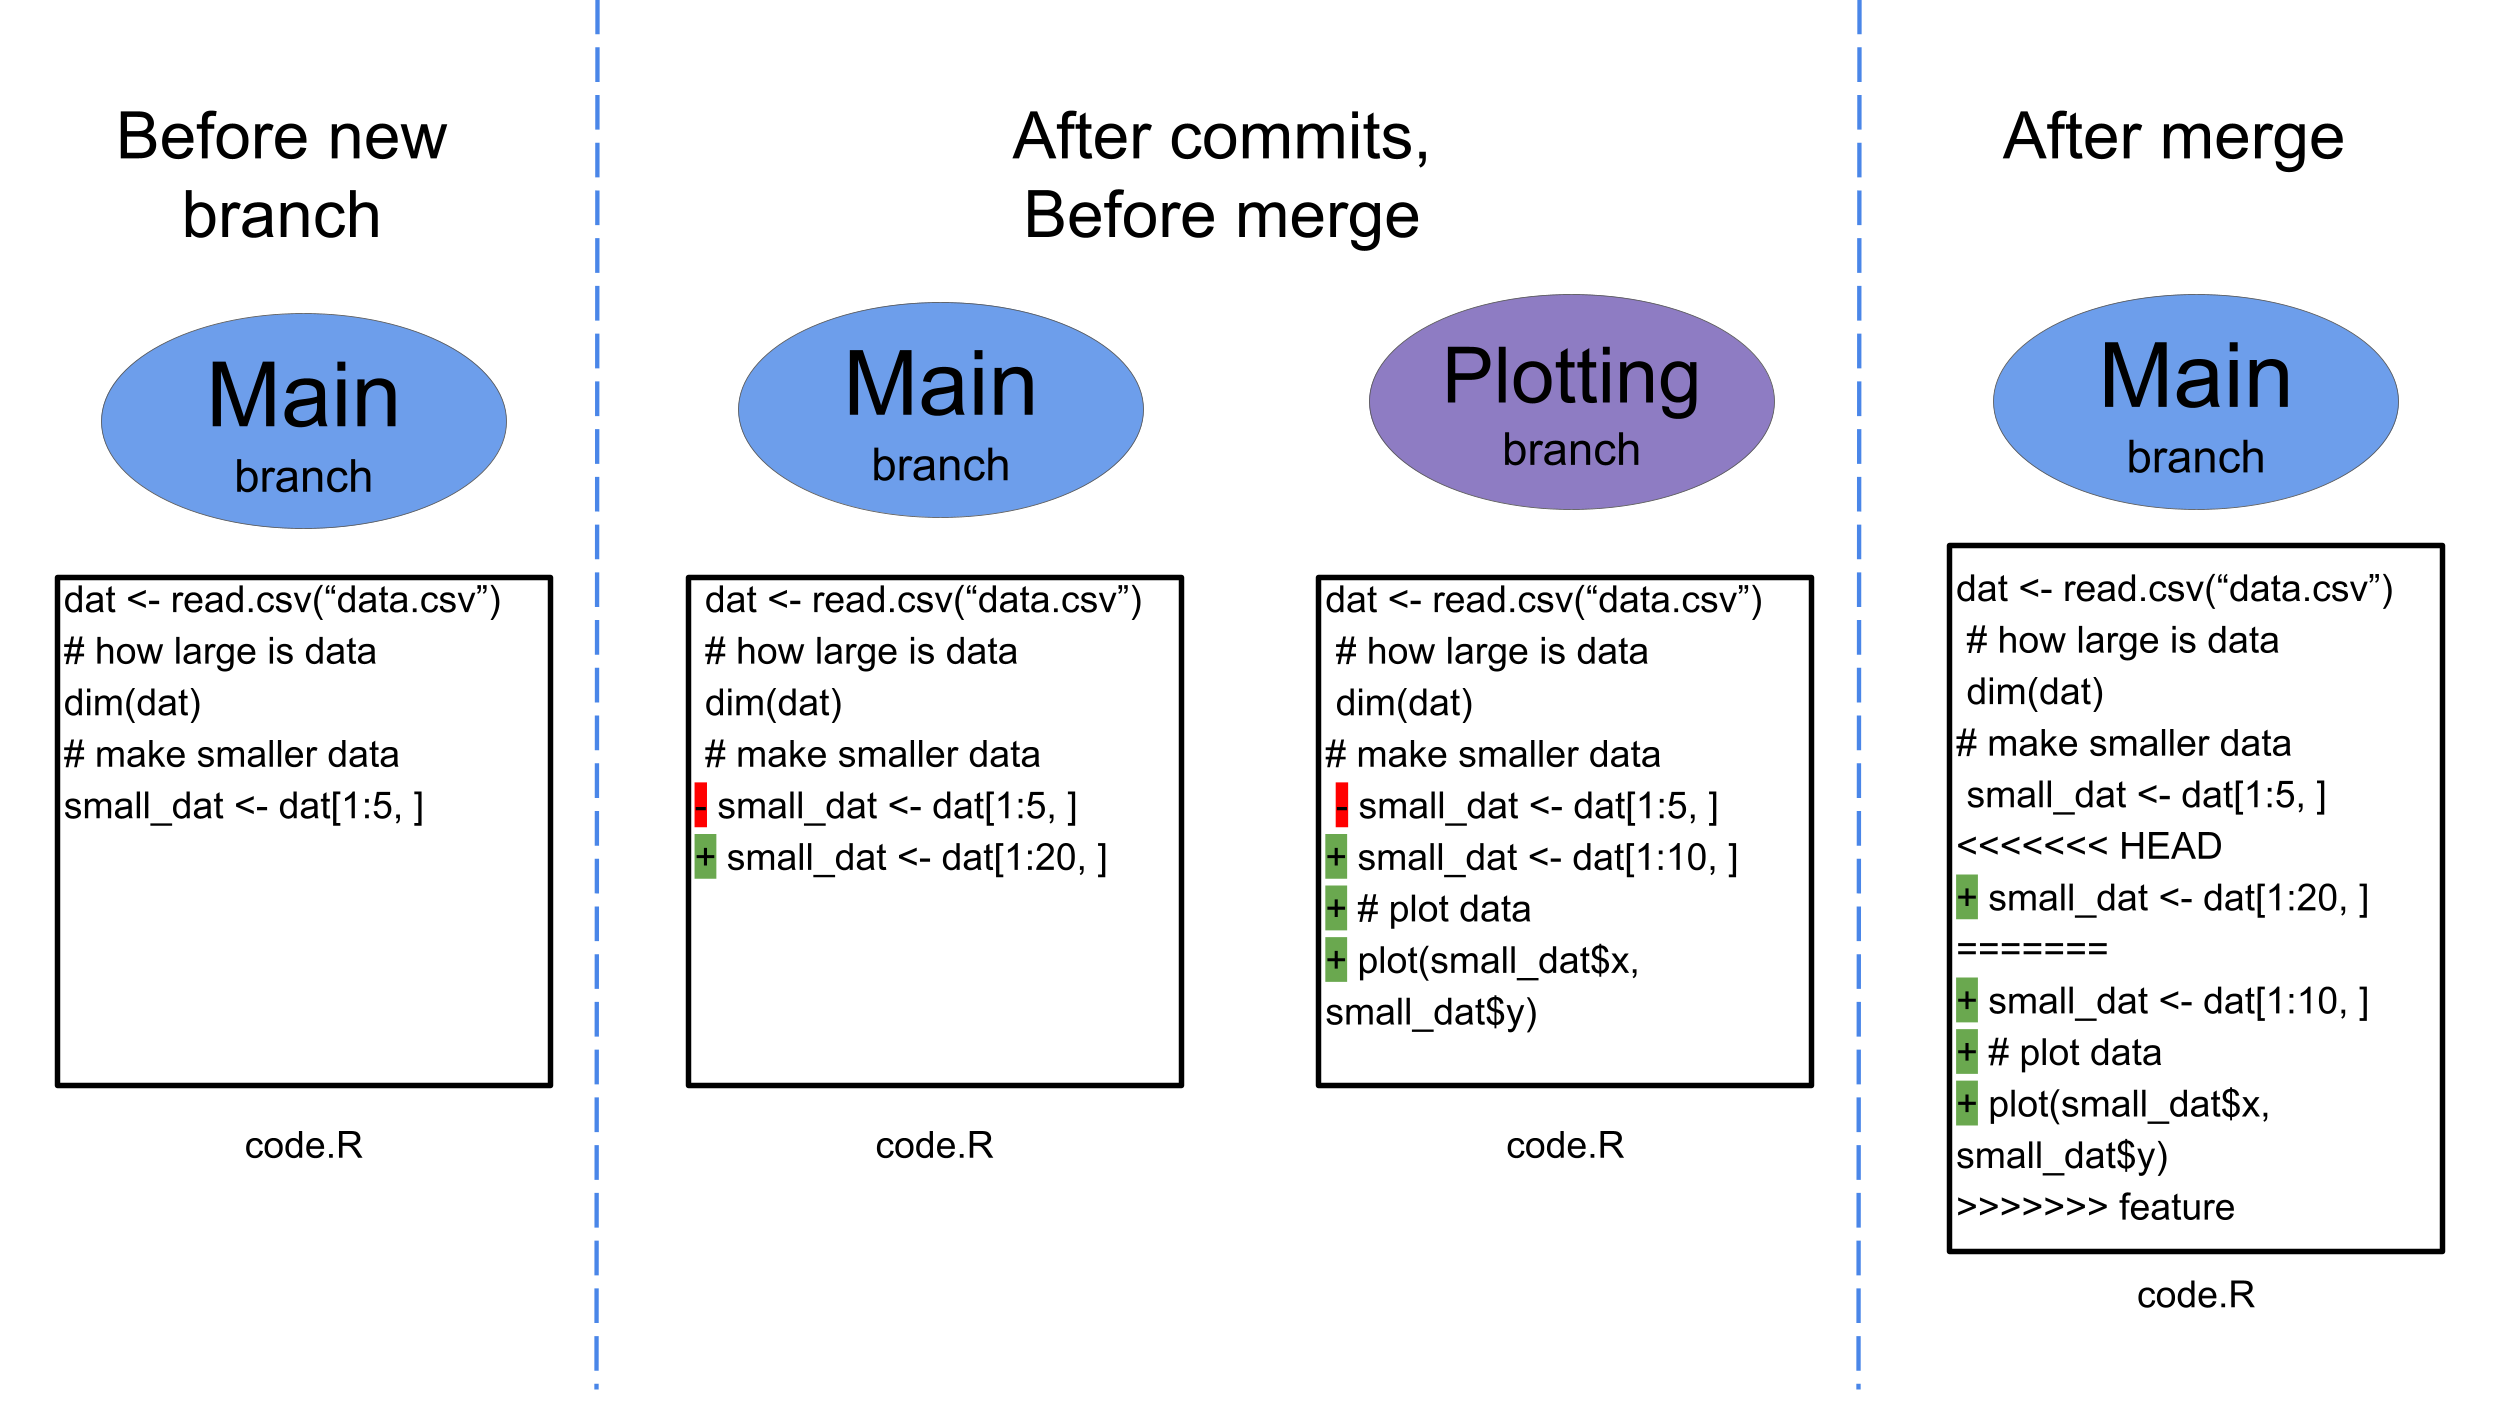
When you open a file with a merge conflict, you will see that conflict markers have been added. For lines that are in conflict, you’ll see <<<<<<< HEAD and =======. The code between these two markers is the version contained in the branch you are currently working on. Lower in the file, you’ll see >>>>>>> incoming_commit_or_branch_name, where incoming_commit_or_branch_name references the commit or branch containing the incoming changes. You need to manually edit the file to remove the conflict markers, and to include whatever content you would like (either the content in your local branch, the content from the incoming branch, or a combination of the two). Once you’ve edited this file, save it and stage the changes.
In some cases, such as when one branch deletes a file and another edits it, you may not see conflict markers inside a file. Instead, Git will require you to decide whether to keep or remove the file. To resolve the conflict, either delete the file (to remove it) or stage the file (to keep it).
After you have resolved and staged all files that had merge conflicts, create a commit to complete the merge. This will resolve your merge conflict.
You can read more about when you might merge branches versus using a rebase operation to integrate changes in this article.
Moving Work Between Branches
I’ve accidentally been working in the main branch, but I actually want my work to all go into a new branch. How do I switch branches and move this work with me?
Luckily, this is an easy problem to resolve!
If you have made changes locally but haven’t yet committed, you can do the following:
Open GitHub Desktop, and create a new branch. If you have changes in main that haven’t been committed, GitHub Desktop will open a pop-up to ask you if you’d like to leave your changes on main or bring your changes to the new branch. Choose to bring the changes to the new branch.
If you have made changes locally and have committed, you can follow the steps above and then additionally do the following:
Switch back to the main branch, and click on “History” in the upper left panel. Then, right-click on the commit that you would like to return to in your main branch and choose “Reset to Commit…” from the right-click menu.
If you have made changes locally but haven’t yet committed, you can do the following:
Use the following command, replacing new_branch_name with your desired branch name.
git checkout -b new_branch_name If you have made changes locally and have committed, you can follow the steps above to create a new branch, and then additionally do the following to revert main back to match the remote version of main:
git reset --hard origin/mainHowever, make sure that you only git reset --hard after you’ve created the new branch and moved your commits, otherwise you risk losing your updated work.
Alternately, if you have only edited a few files, you could just run git restore --hard for those files. This reverts the files to their previous versions, instead of reverting the full branch. If you have edited files called file1.txt and file2.txt and want to revert them to the versions saved in main, you could do the following:
git fetch origin
git restore --source=origin/main file1.txt file2.txt
Integrating Updates into Branch
I am currently working in a branch and want to merge updates from the main branch into my branch.
This situation may come up if you are working in a branch and are not yet ready to submit a pull request, but updates have been made to the main branch that you would like to integrate into your work. You can do this by fetching the latest changes from GitHub and then merging the main branch into your current branch. First, make sure that you have committed your current work or have stashed it to return to later (for details about this, see the section on moving between branches).
In GitHub Desktop, perform the following steps:
First, we will confirm that we’re on the current branch that we would like to continue working on.
git branchThis command will list all branches, with a star next to the one that you are currently working on.
We will use two Git commands for this merge operation. We will start with git fetch origin, which will download the latest changes from the remote repository, without making any changes locally.
git fetch originTo incorporate the latest changes from the main branch into the branch you’re currently working on, we will use git merge.
git merge origin/mainIf Git identifies conflicting changes, it will pause the merge and ask you to resolve the conflicts before completing the merge commit. If there are merge conflicts, address them as described above in the instructions for resolving merge conflicts.
Removing Files from Version Control
I’ve staged and committed a file, but I don’t want to track it anymore. How can I remove it?
This is another common problem. We’ll first tell Git to stop tracking the file (but keep it locally on your computer), and then we will add it to the .gitignore file to avoid tracking it with Git in the future.
Make sure you are starting in the correct branch that you have been working in. This is a situation that we cannot resolve directly with the GitHub Desktop GUI. Instead, we will launch a command line within GitHub Desktop.
Click “Repository” → “Open in Terminal”. This will open a command line for you to work with. In this command line, use the following command, replacing path_to_file with the path to the file to stop tracking, including the file name.
git rm --cached path_to_file Next, return to GitHub Desktop and do the following:
Use the following command, replacing path_to_file with the path to the file to stop tracking, including the file name.
git rm --cached path_to_fileNext, open the .gitignore file and add the file to the list of files to avoid tracking.
Then, return to the command line and stage and stage and commit these changes.
git add .gitignore
git commit -m "removing file_name from Git tracking and adding it to .gitignore"
Removing Large Files from Version Control
I’ve accidentally committed a large file and when I try to push I get an error from GitHub saying that the file is too big. How do I resolve this?
This is a common error that can be a little tricky to resolve. You need to remove this file from Git tracking and also amend the commits that include the file. We will assume that the large file was added in the most recent commit. If it was added multiple commits previously, then it can still be removed but will include additional steps that we will not cover here (see here for a workflow for removing a file from multiple commits).
Make sure you are starting in the correct branch that you have been working in. Click “Repository” → “Open in Terminal”. This will open a command line for you to work with. In this command line, use the following command, replacing path_to_file with the path to the file to stop tracking, including the file name.
git rm --cached path_to_file
git commit --amend
Including the git commit --amend rewrites the most recent commit as if the large file was not added. Don’t close the terminal yet, we will come back to it.
Next, open the .gitignore file and add the file to the list of files to avoid tracking. In GitHub Desktop, stage the .gitignore, but do not commit it yet.
Return to the terminal. Repeat the git commit --amend command, which will add this update to the .gitignore to the most recent commit.
git commit --amend Then, return to GitHub Desktop and commit these changes.
Use the following command, replacing path_to_file with the path to the file to stop tracking, including the file name. Including the git commit --amend rewrites the most recent commit as if the large file was not added.
git rm --cached path_to_file
git commit --amend
Next, open the .gitignore file and add the file to the list of files to avoid tracking.
Then, return to the command line and stage and stage and commit these changes. Note that we include git commit --amend a second time to add the changes to the .gitignore file to the previous commit.
git add .gitignore
git commit --amend
git commit -m "removing file_name from Git tracking and adding it to .gitignore"
The best way to avoid this problem is when you add large files to a folder that is tracked with Git, immediately add them to the .gitignore. If you really do want to track them with version control, consider using Git Large File Storage (LFS).
Moving Between Branches
I’m in the middle of working on one branch, but I need to pause and make a quick update on another branch. How do I move between branches if I’m not ready to commit my current work?
This is a common occurrence when you’re working on a project with multiple branches. Imagine that you are deep in work for a feature that you’re adding to an analysis, when your collaborator asks you to make a quick update to a different branch that they’ve been working on. You aren’t yet ready to commit the changes that you’ve been working on. This is a great time to use the stash feature!
Open GitHub Desktop in the current branch that you’re working with. In the top toolbar, click “Branch” → “Stash All Changes”. This will take all of the changes in this branch since your last commit and store them for you to come back to. Once you’ve done this, you should see no local changes to the branch. You can then move into the other branch you want to work on.
Once you are ready to return to your original branch and continue your work, navigate back to that branch on GitHub Desktop. In the “Changes” panel, you should see the message “Stashed Changes”. If you click on this, it will bring you to a page where you can click the “Restore” button to return your stashed changes to the branch. You can continue working from there.
Open the command line to the branch that you’ve been working in. To save the changes in your current branch for you to later return to, use the following command:
git stashAfter doing this, you can move to the other branch that you’d like to work on. Once you are ready to return to your original branch and continue your work, navigate back to that branch, and use the following command:
git stash popThis command will restore your stashed changes to the current branch.
To learn more about Git stash and additional options, you can read its documentation from Git.
Other Troubleshooting Resources
You can learn more about other common Git mistakes and their fixes in this article. AI chatbots can also be helpful for troubleshooting problems with Git and GitHub, but should be used with care.
AI use considerations
Context:
When you ask an AI chatbot for assistance with version control, make sure to give appropriate background. Describe the specific task that you would like to do, or the problem that you are encountering. It can be helpful to include any error messages that you might be receiving from Git. For example, imagine that you’ve created a merge conflict.
Suggested Prompt:
I am working with a Git-controlled repository, in a branch called new_feature. I have made several changes locally, and have staged those files and committed them. I just went to pull changes from the remote version of this branch that my collaborator made recently, and I'm getting a merge conflict. Specifically, I've received the following message:

Auto-merging README.md
CONFLICT (content): Merge conflict in README.md
Auto-merging 01_import_data.R
CONFLICT (content): Merge conflict in 01_import_data.R
Automatic merge failed; fix conflicts and then commit the result.

How can I resolve this merge conflict?
Validation: You should always be careful when taking advice on Git and GitHub from an AI chatbot. If you are asking for commands to use with Git for a situation that is very new to you, it could be helpful to do a quick search of the commands the chatbot tells you to use, to confirm that they do what you want to do. You could also ask multiple chatbots the same question.
You should be especially careful when using agentic AI with Git and GitHub. Agentic AI systems can use external tools and execute tasks, often performing steps without human supervision. There are many git commands (and command line commands in general) that are challenging to reverse and can cause major problems to scientific projects. For example, running git reset --hard will reset a local branch to the remote version of the branch, removing all uncommitted changes, which could undo your hard work or remove valuable content. Therefore, it is recommended to monitor the ways that agentic AI can make changes with version control and to prevent them from performing potentially destructive actions without human supervision.
AI Use Disclaimer:
Follow any relevant required guidelines/policies for AI use.
Examples
Your team or lab, institution, funding organization, or publisher. These requirements should take precedence over our suggestions.
Check AI responses critically, as they may be inaccurate, out-of-date, incomplete, or unnecessarily complicated.
Examples
- Always validate the existence and relevance of suggested citations or packages.
- Review, test, possibly simplify, and work to understand generated code or functions.
- Validate factual information using reliable sources.
- Exercise extra caution with code in certain instances: code that installs packages, accesses or modifies files or data, uses credentials, or sends information over the internet.
Disclose your AI use (including model and versions).
Never provide sensitive data to a public AI tool.
Examples
Patient or student data, passwords, credentials, API keys, unpublished manuscripts or grants, and other proprietary code or internal documents.
Be specific in your prompts and ask the AI tool to help you understand the code.
The confidence of an AI tool does not indicate if its responses are correct. They may also agree with you when you are wrong.
AI may respond differently to the same repeated prompt. Be sure to document what you can for the sake of reproducibility.
Recognize that you may need to iteratively improve your prompt to reach the desired output.
Continued Learning
Common Next Steps
Now that you’ve learned how to how to make and use version-controlled repositories, you are ready to use Git and GitHub for your work! Common next steps include:
- adding collaborators to your repository
- making more branches for other components of your analysis
- using GitHub issues to keep track of to-do’s related to your GitHub repository
Reinforcement Exercises
A good way to reinforce these version control skills is to make a current scientific project that you’ve been working on into a Git tracked repository, and connecting it to a remote GitHub repository. See if you can integrate the Git workflow that you’ve learned here into your scientific process. Even if you are the only one working on this project, this is a good way to practice skills. This will get you into the habit of staging, committing, and pushing changes as you work, and working on different branches for different components of a project. Additionally, making GitHub repositories for your projects will give you an easy way to host and share code for publications. You can edit the README.md file to provide more information about your analysis (check out this template to make a README.md file for a scientific or data analysis project and this example of a scientific project hosted on GitHub with a very informative README).
Advancement Exercises
Beginner
Moving work in progress into a new branch
In this exercise, we will follow a process where we start to make changes to the main branch, but then realize that we would rather keep this work in a separate branch and only merge it into the main branch of the repository through a pull request after code review.
Complete the following steps:
Question opportunity
What are some advantages to working in a new branch and using a pull request to merge changes from that branch into the main branch (instead of working directly in the main branch)?
Answer
There are several advantages to this workflow:
- Using a new branch lets you try new things without disrupting a stable version of the code and project.
- Multiple people can work on different components of a project on their own branches, and then merge the branches into
mainwhen they are ready to contribute their work. - A branch and pull request lets you group several related commits together, and describe in more detail in the pull request why you made them.
- The “Files changed” tab can help you identify exactly which lines were changed across all commits included in the pull requests, which is often more convenient than separately looking at the changes from each commit.
- A pull request lets you request a code review from a team member or collaborator before merging your work into
main, making you less susceptible to mistakes in your analysis.
Intermediate
Going through a project’s history
In this exercise you will search through the history in a GitHub repository to find when a change took place.
Your goal is to find the pull request number and commit tag from when the learning objectives map table was filled in within the case study (the learning objectives table can be found here).
Hints:
There are multiple ways to search for this change:
- Open the file
_lo_map.qmdand click the “History” button to see a history of commits that affected this file. - Go to the “Pull requests” tab, click on the “Closed” pull requests, and search a relevant search term. Once you find the correct pull request, look at the commits that make up that pull request.
Answer:
Content was added to the learning objectives map in pull request 18, within the commit tagged 34a4550.
Advanced
Forking
So far, you’ve created repositories to work with. This means that GitHub considers you the repository owner. If you are working with collaborators who you want to be able to push to your GitHub repo, you can add them to your repository with write permissions (you can also make them a maintainer or admin to have additional abilities). However, let’s consider a different situation. You want to contribute to a GitHub repository, but you do not have permission to push to this repository. This is where forks come in.
Fork
A copy of a repository, often used to make changes when the user does not have write access to the original repository.
We will call the original repository (for which you do not have write permissions) the repository. Earlier, when you cloned a GitHub repository, you made a local version of that repository. In contrast, when you fork from the upstream, you make a remote copy of the GitHub repository, that you own with your GitHub account. You can then clone this fork, so that you can work locally.
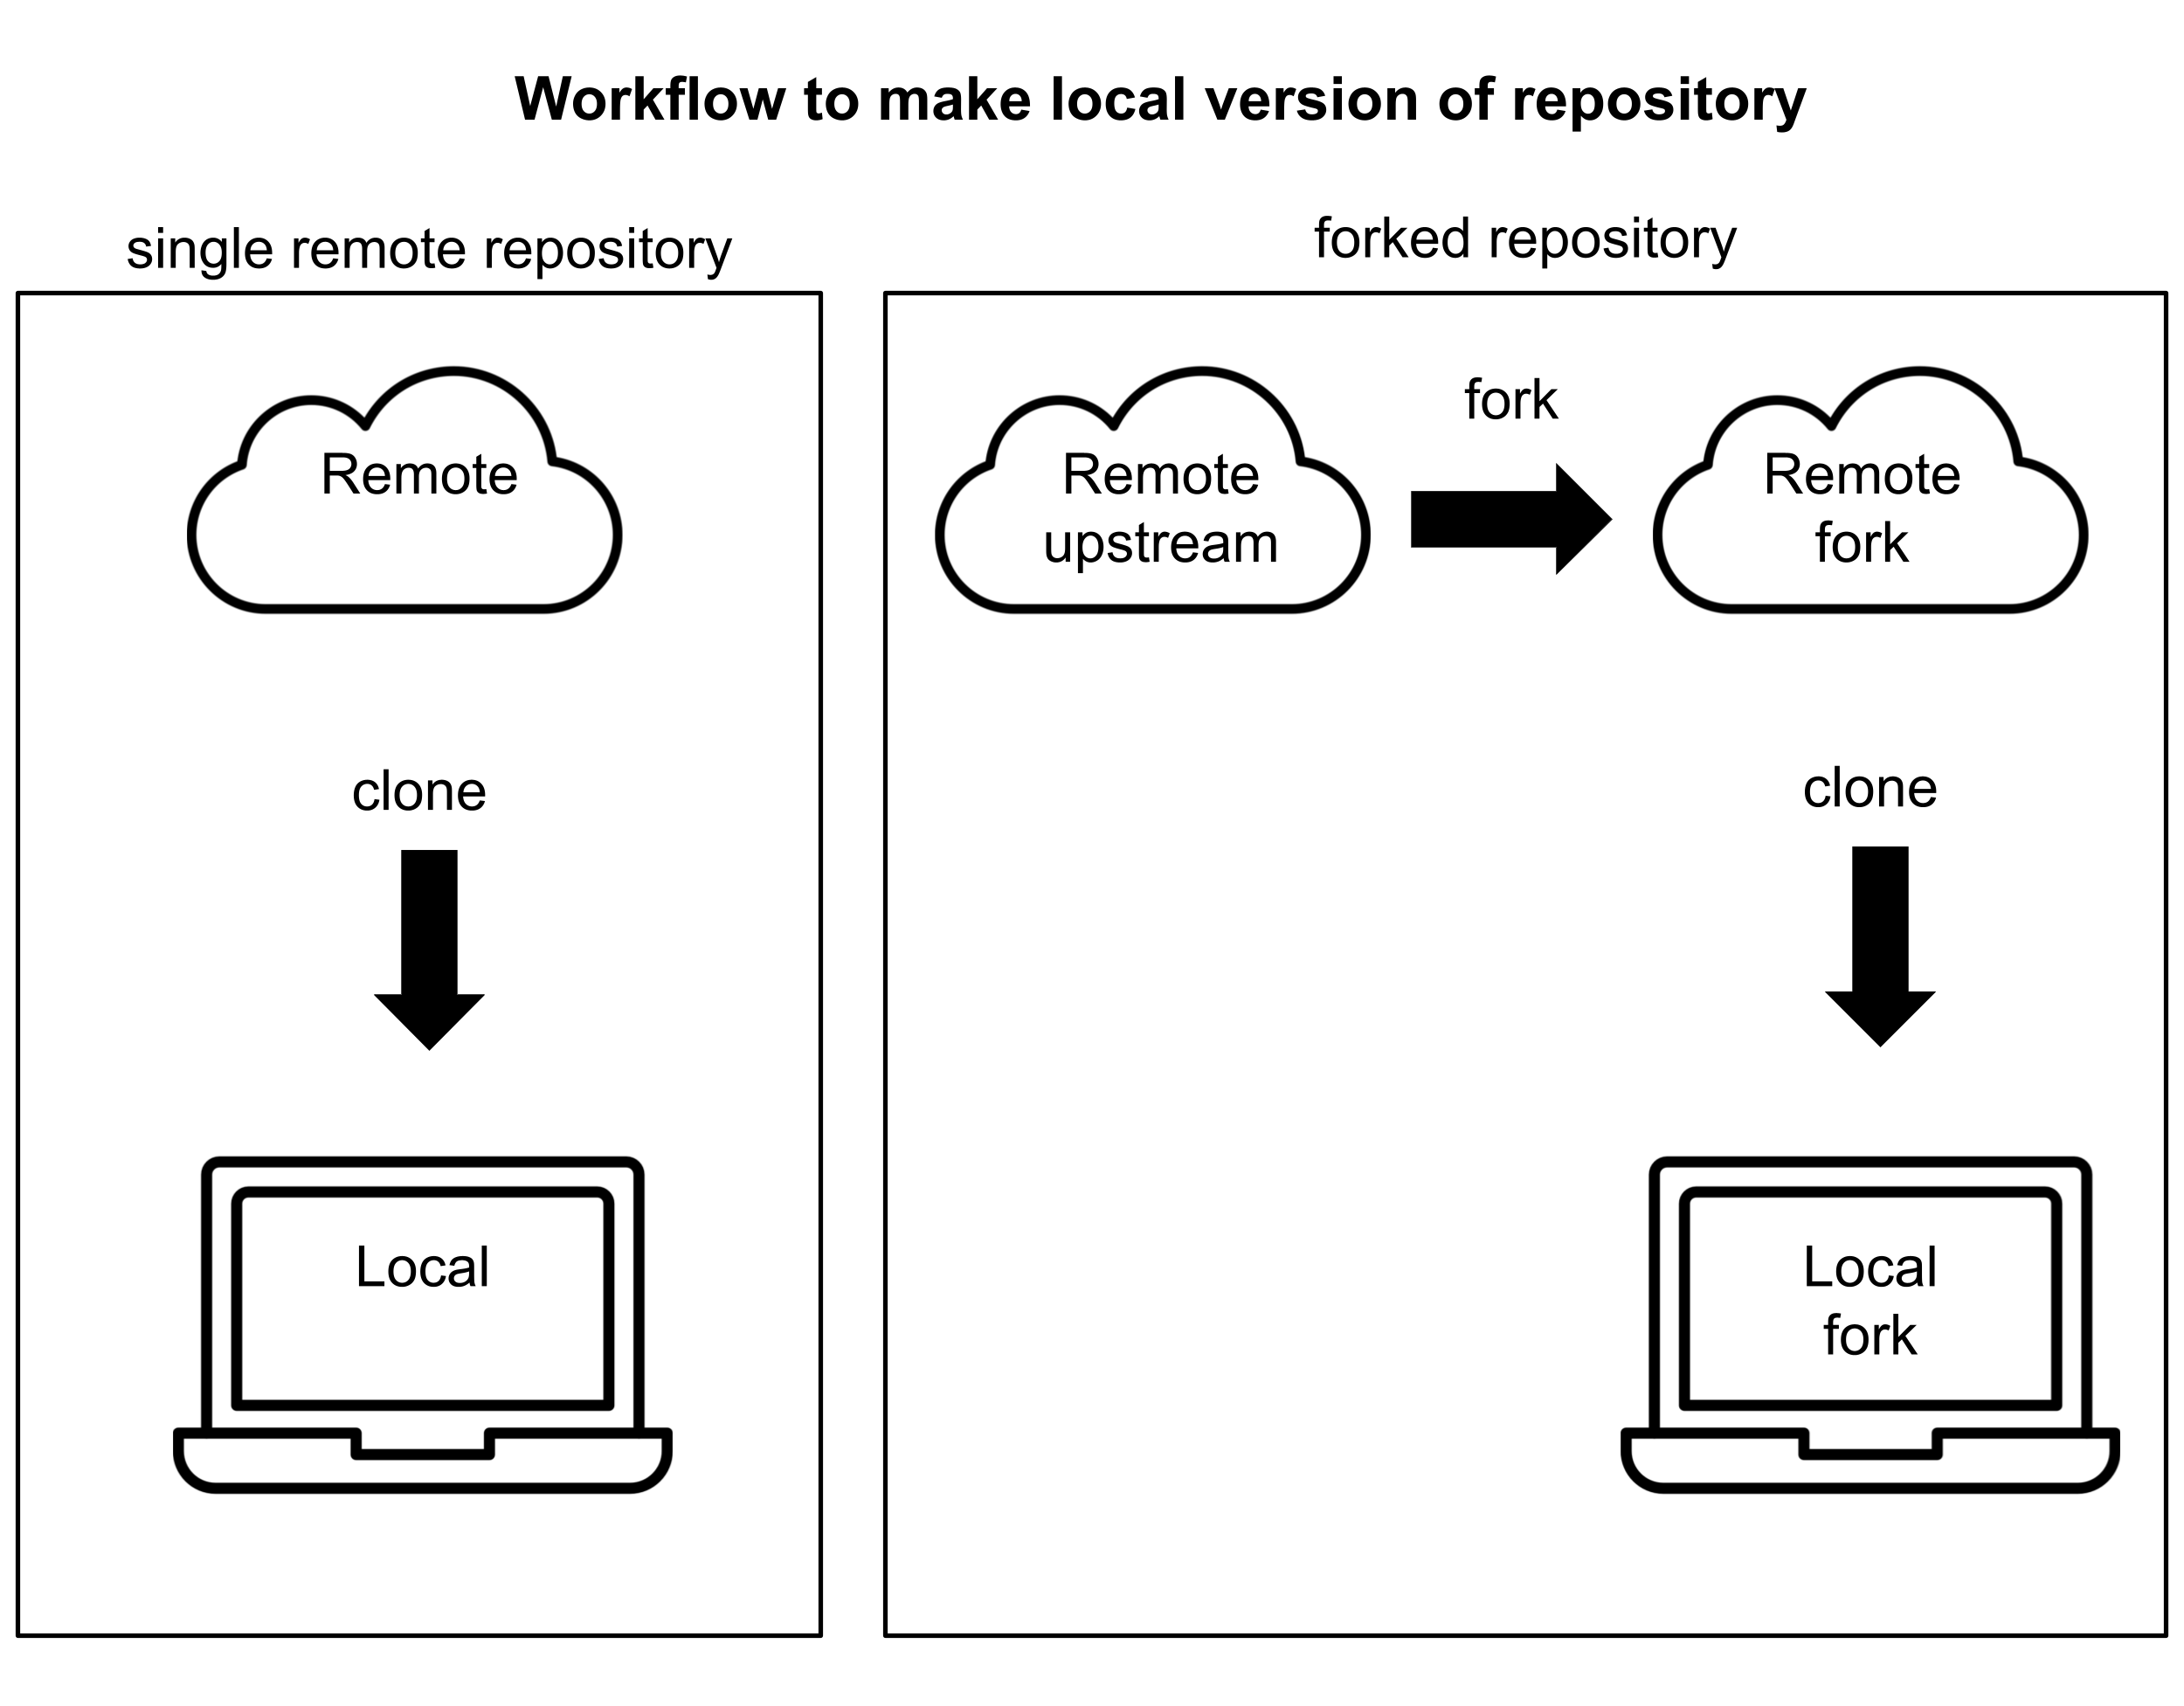
When you want to propose changes back to the upstream repository, you can submit a pull request from your fork into the upstream.
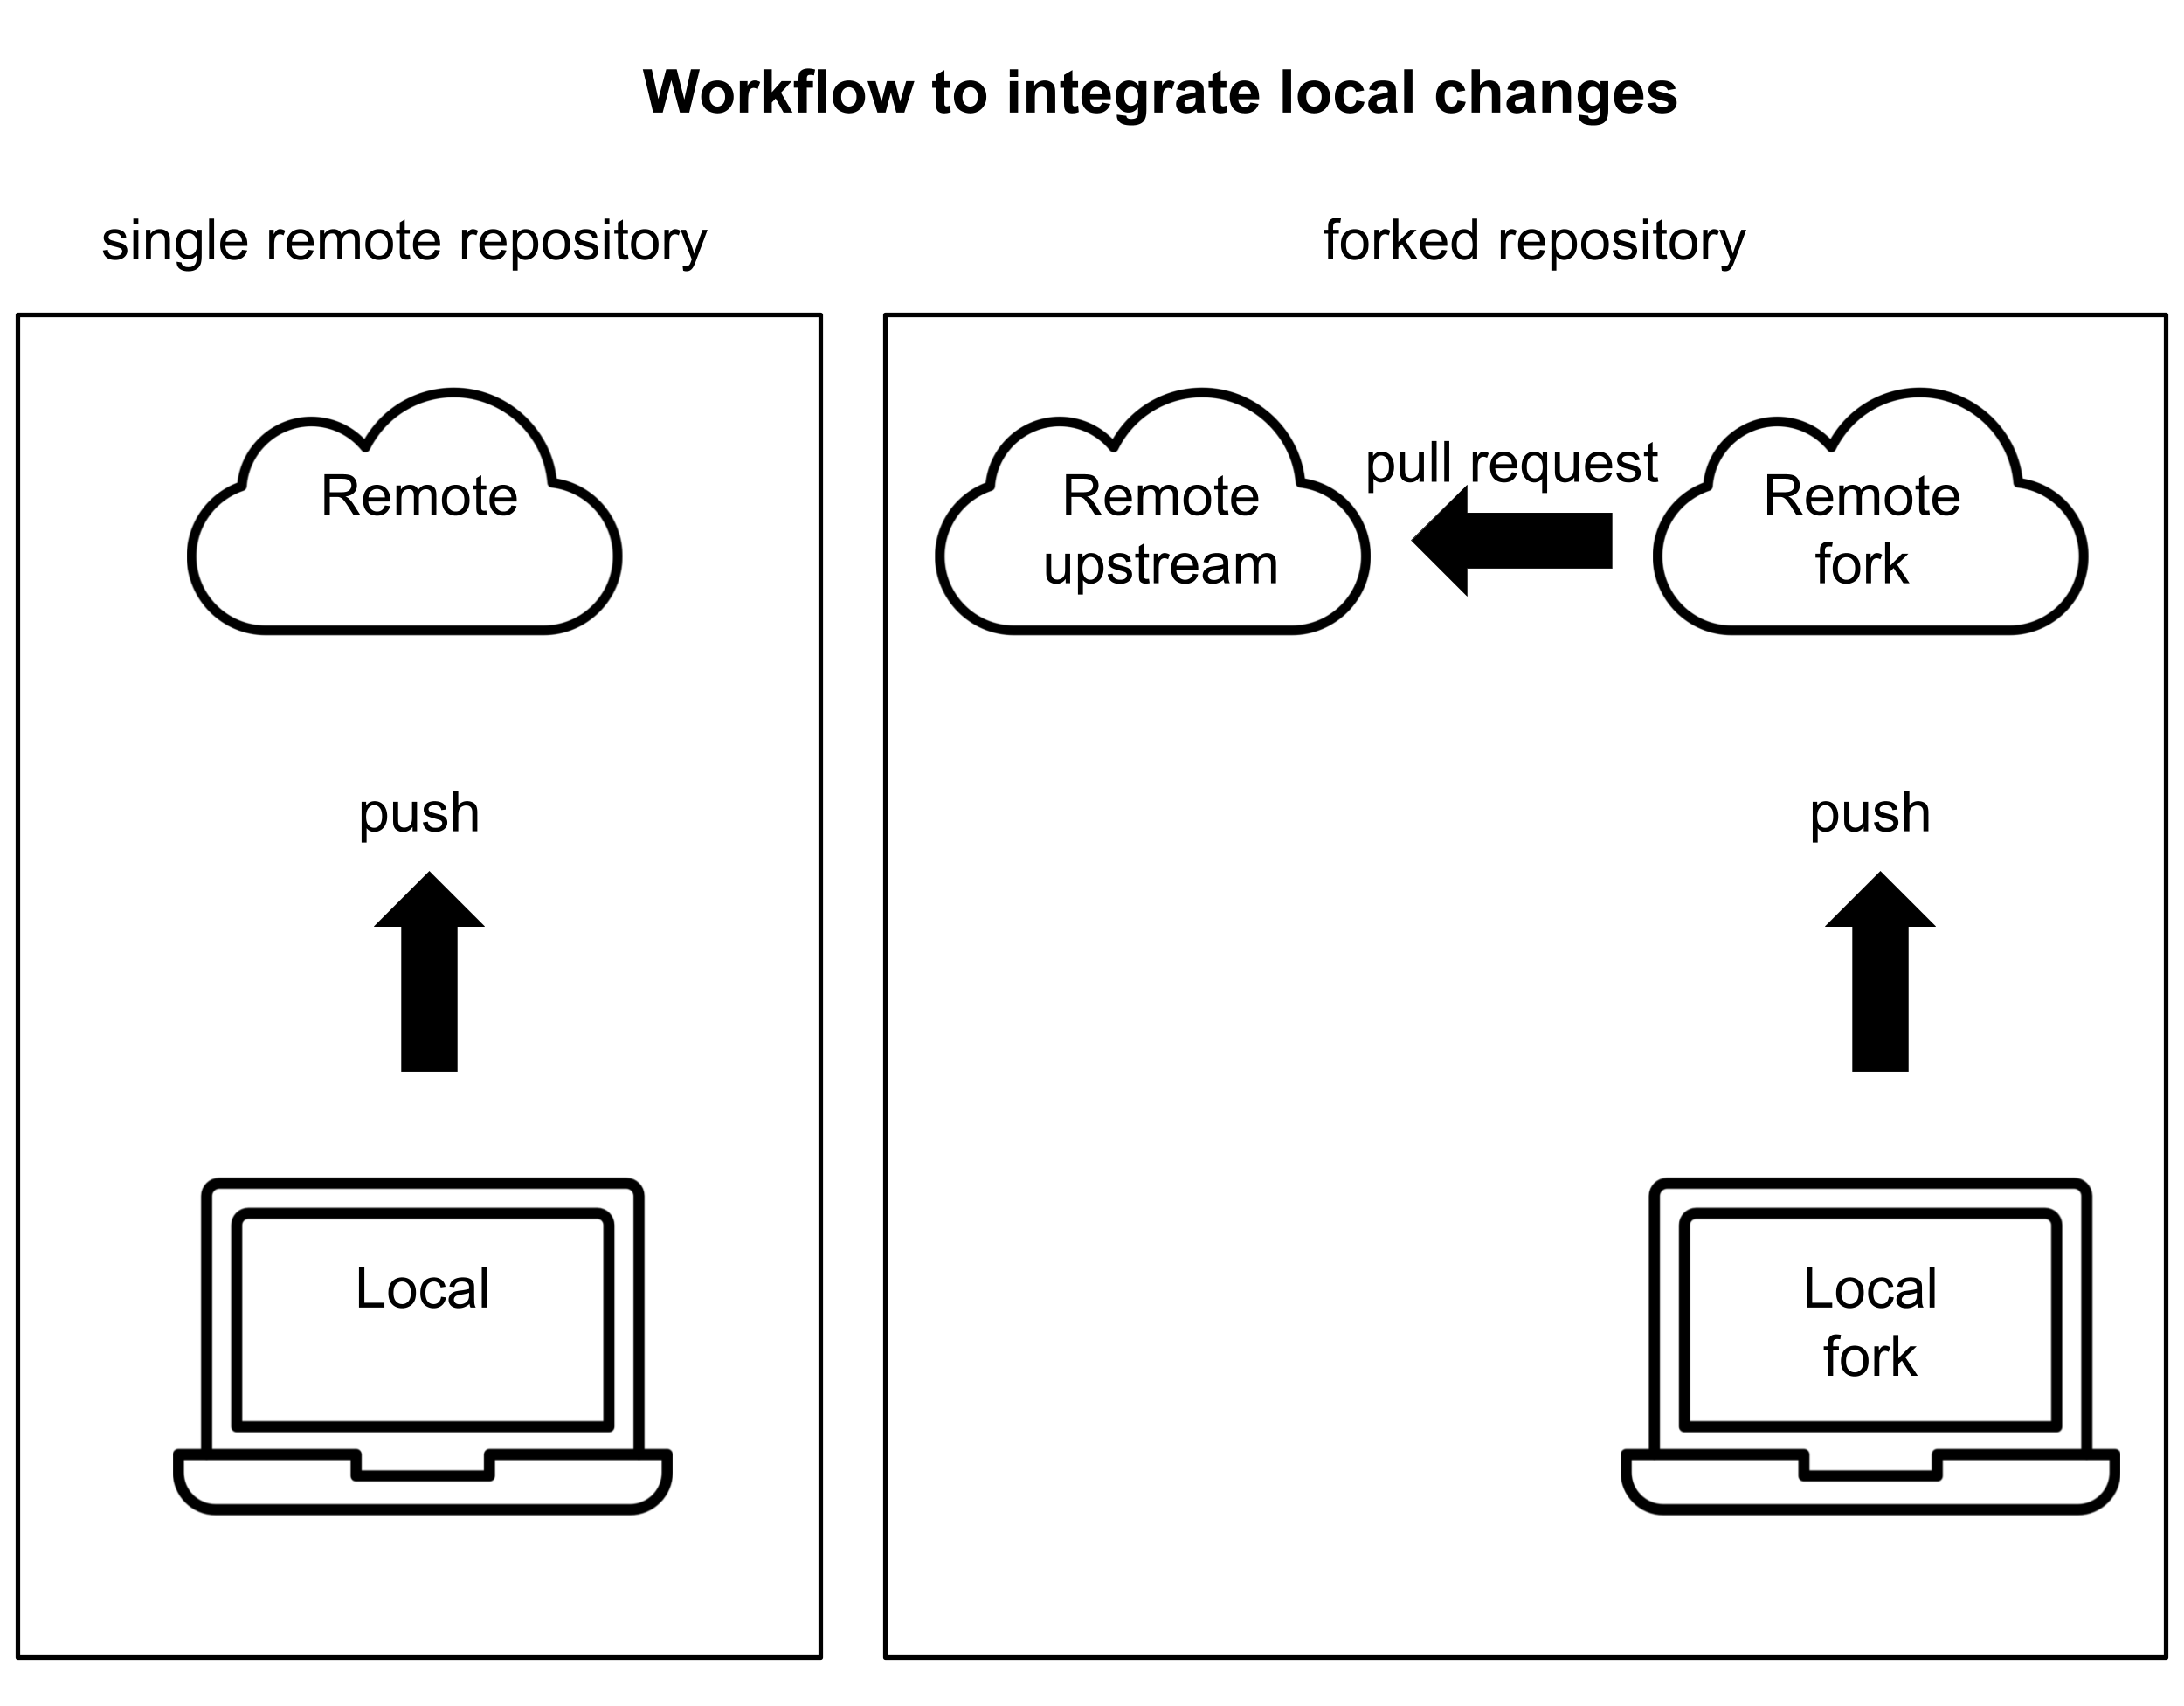
Practice making and using a fork
To practice using a fork, follow these instructions:
This will bring you to a page that is very similar to when you had created a new repository at the beginning of the case study. However, there are a few differences. You’ll see now that you are the owner of this repository, and by default it has the same name as the repository that you are forking from.
After you push, you should now see the file on GitHub in your remote forked repo, along with a notification that this branch is a commit ahead of the upstream repository. There will be a button with the option to “Contribute” these changes.
Question opportunity
How does this pull request from a fork to an upstream repository look different from the pull request that you made earlier, between two branches in the same repository? How does it look similar?
Additional Information
Helpful Links
- happy git with R: online book that covers most relevant topics for using Git and GitHub with R
- How to Use Git/GitHub with R: blog post about getting Git and GitHub set up and working with RStudio. This uses the built-in Git GUI in RStudio instead of GitHub Desktop
- Dangit, Git!?!: brief description of some common Git errors and how to resolve them
- Git Tutorial: How to Fix 18 Common Mistakes: another collection of common Git errors and their fixes
- Intro to reproducibility in cancer informatics: short course on reproducibility for scientific projects, includes Git and GitHub in chapter 4 and provides other resources on reproducibility
- Advanced reproducibility in cancer informatics: short course on more advanced reproducibility for scientific projects, includes GitHub in chapter 3 and provides other resources on reproducibility
- Carpentries:
- Install Git: instructions on installing Git (and other types of software)
- Set up Git: instructions on setting up Git
- Build on existing branch: instructions on how to work from a branch on someone else’s fork of a repository
- Hands on introduction to Git and GitHub: another introduction to Git and GitHub, covering some overlapping material and some additional material
- Contributing to Galaxy Training Network with GitHub: tutorial on how to contribute to an open source project with GitHub
- GitHub cheatsheet: cheatsheet with Git commands that can be used in the command line
- Merge vs. Rebase vs. Fast-Forward: Mastering Git Integration Strategies: article that explains the differences between merging, rebasing, and fast-forwarding, as well as when to use each of them
Glossary
| Term | Definition |
|---|---|
| .gitignore | File that tells Git what files to avoid tracking |
| branch | A history of commits in a Git-tracked repository (there can be multiple parallel branches in a repository) |
| clone | Create a local repository that is a copy of a remote repository on GitHub |
| command line | A window that lets a user interact with a computer through typing commands |
| commit | A snapshot of all files in a repository at a moment in time |
| fork | A copy of a remote GitHub repository, owned on a personal GitHub account |
| Git | A popular version control tool that works to track files on a local computer |
| Git LFS | Git large file storage, an option to version control large files that are too large to track using Git and GitHub |
| GitHub | A website for hosting folders that are tracked with GitHub |
| GitHub Desktop | A graphical user interface for interacting with Git on a local computer |
| license | A legal document that states who can use your code and for what purposes |
| local | The Git-tracked repository on your computer |
| longitudinal | Over time (a longitudinal study follows a group of participants over time) |
| merge | Integrating changes from one branch to another branch |
| merge conflict | When Git cannot automatically reconcile differences between branches it is attempting to combine, typically because the same part of a file (or closely related parts) were edited in incompatible ways, or because one branch modified something the other removed |
| meta-analyses | Analyses of data from a collection of studies targeting a common research question |
| meta-analysis | An analysis of data from a collection of studies targeting a common research question |
| microbiome | A collection of microorganisms that live in a shared environment |
| pull request | A request to integrate a collection of commits from one branch (or from a fork) into another branch (or another repository) |
| push | Sending commits from the local version of a repository to the remote version of the repository on GitHub |
| quarto | A type of document that combines code with the output of the code and text |
| README | A document that describes what files are in a folder, as well as other relevant information |
| remote | The online version of the repository tracked on GitHub |
| repo | A shortened version of "repository", a folder in Git that contains all of the files to be tracked for a project |
| repositories | Folders in Git that contains all of the files to be tracked for a project |
| repository | A folder in Git that contains all of the files to be tracked for a project |
| reproducibility | The ability for someone else to run the same analysis on the same data and get the same results |
| reproducible | Describes a project in which a new researcher can re-run an experiment or analysis with the same data and code and generate the same results |
| stage | Prepare to track specified files when the next commit is made to a repository. |
| upstream | The original repository that was copied to create a forked repository |
| version control | A tool that records changes to a project over time |
References
Andrade, Chittaranjan. 2025. “A Primer on Individual Participant Data Meta-Analysis and Its Strengths and Limitations.” J Clin Psychiatry 86 (3): 25f16001.
Blischak, John D, Emily R Davenport, and Greg Wilson. 2016. “A Quick Introduction to Version Control with Git and GitHub.” PLoS Computational Biology 12 (1): e1004668.
Bryan, Jennifer. 2018. “Excuse Me, Do You Have a Moment to Talk about Version Control?” The American Statistician 72 (1): 20–27.
DerSimonian, Rebecca, and Nan Laird. 1986. “Meta-Analysis in Clinical Trials.” Controlled Clinical Trials 7 (3): 177–88.
Han, Yu, Zian Wang, Jiahao Xie, Guangdi Yang, Monong Su, Siqi Wang, Mengxin Yang, et al. 2026. “Host–Gut Microbiota Interactions in Health and Disease: Mechanisms and Intervention Strategies.” Frontiers in Microbiology 17: 1785607.
Wang, Shaopu, Shuqin Zeng, Muireann Egan, Paul Cherry, Conall Strain, Emilene Morais, Patrick Boyaval, et al. 2021. “Metagenomic Analysis of Mother-Infant Gut Microbiome Reveals Global Distinct and Shared Microbial Signatures.” Gut Microbes 13 (1): 1911571.
Session info
Reproducibility considerations
While using version control to track the data and code that produce a given output improves the reproducibility of a project, two people can be working from the same GitHub repository and get different results when they run an identical script. This can happen if they have different versions of the software they are using (for example, different versions of the same R package). To learn more about standardizing the versions of tools to use in an analysis, you can work through this open case study about containers. However, a good first step is to print the versions of software that you are using for a project. We do that here, using the R function sessionInfo().
sessionInfo()R version 4.3.2 (2023-10-31)
Platform: x86_64-pc-linux-gnu (64-bit)
Running under: Ubuntu 22.04.4 LTS
Matrix products: default
BLAS: /usr/lib/x86_64-linux-gnu/openblas-pthread/libblas.so.3
LAPACK: /usr/lib/x86_64-linux-gnu/openblas-pthread/libopenblasp-r0.3.20.so; LAPACK version 3.10.0
locale:
[1] LC_CTYPE=en_US.UTF-8 LC_NUMERIC=C
[3] LC_TIME=en_US.UTF-8 LC_COLLATE=en_US.UTF-8
[5] LC_MONETARY=en_US.UTF-8 LC_MESSAGES=en_US.UTF-8
[7] LC_PAPER=en_US.UTF-8 LC_NAME=C
[9] LC_ADDRESS=C LC_TELEPHONE=C
[11] LC_MEASUREMENT=en_US.UTF-8 LC_IDENTIFICATION=C
time zone: Etc/UTC
tzcode source: system (glibc)
attached base packages:
[1] stats graphics grDevices utils datasets methods base
other attached packages:
[1] yaml_2.3.12 stringr_1.5.1 ggplot2_3.5.0 dplyr_1.1.4 readxl_1.4.3
[6] here_1.0.2
loaded via a namespace (and not attached):
[1] utf8_1.2.4 generics_0.1.3 tidyr_1.3.1 xml2_1.5.1
[5] stringi_1.8.3 hms_1.1.3 digest_0.6.34 magrittr_2.0.3
[9] evaluate_1.0.5 grid_4.3.2 fastmap_1.1.1 cellranger_1.1.0
[13] rprojroot_2.1.1 jsonlite_2.0.0 processx_3.8.6 chromote_0.5.1
[17] ps_1.9.1 promises_1.2.1 httr_1.4.7 rvest_1.0.5
[21] purrr_1.0.2 fansi_1.0.6 ottrpal_2.0.0 viridisLite_0.4.2
[25] scales_1.3.0 cli_3.6.5 rlang_1.1.6 gitcreds_0.1.2
[29] munsell_0.5.0 withr_3.0.2 tools_4.3.2 tzdb_0.4.0
[33] colorspace_2.1-0 curl_7.0.0 vctrs_0.6.5 R6_2.6.1
[37] png_0.1-8 lifecycle_1.0.4 htmlwidgets_1.6.4 pkgconfig_2.0.3
[41] pillar_1.9.0 later_1.3.2 gtable_0.3.4 glue_1.7.0
[45] Rcpp_1.0.12 xfun_0.55 tibble_3.3.0 tidyselect_1.2.0
[49] knitr_1.50 farver_2.1.1 htmltools_0.5.7 spelling_2.3.2
[53] websocket_1.4.4 labeling_0.4.3 rmarkdown_2.25 webshot2_0.1.2
[57] readr_2.1.5 compiler_4.3.2 Acknowledgments
We would like to acknowledge Candace Savonen, Casey Greene, Emma Lathouwers, Taylor Reiter, and ethicist Jodyn Platt for their expert review of this case study.
We would also like to acknowledge the National Institute of General Medical Sciences for funding this work (1R25GM160622).
Icons are from iconpacks.
Avatars are from avataaars
AI Attribution Statement
The text in this work was primarily human-created. AI was used to make stylistic edits, such as changes to structure, wording, and clarity. AI was used to make content edits, such as changes to scope, information, and ideas. AI was prompted for its contributions, or AI assistance was enabled. AI-generated content was reviewed and approved. The following model(s) or application(s) were used: Microsoft 356 Copilot (GPT-5).

The code for the drag-and-drop activity was entirely AI-generated. AI was prompted for its contributions. AI-generated content was reviewed and approved. The following model(s) or application(s) were used: Microsoft 356 Copilot (GPT-5).
AIA Entirely AI, Human-initiated, Reviewed, Microsoft 356 Copilot (GPT-5) v1.0
More information about this AI attribution can be found here.